Mac Microphone Not Working? macOS Tahoe 26.5 Complete Fix
Mic not picking up sound on your Mac? Fix microphone permissions, input levels, and Bluetooth device issues on macOS Tahoe 26.5 with this complete guide.
There are few things more frustrating than a Mac microphone not working at the exact moment you need it. You join a Zoom call and three people type "we can't hear you" into the chat. You start recording a voice memo and the waveform stays flat. You ask Siri a question and it just blinks at you. The maddening part is that the hardware is almost always fine. On macOS Tahoe 26.5 -- the current stable release that shipped on May 11, 2026 -- the overwhelming majority of microphone failures trace back to one of two invisible culprits: a per-app Microphone permission that was silently denied, or an input source that is quietly stuck on a disconnected Bluetooth or USB device. Neither produces an error message. Your Mac simply listens to nothing, or listens to the wrong thing, and leaves you to figure out why.
This guide walks through the complete input-device triage, from the thirty-second check that fixes most cases to the deep audio-stack resets that resolve the stubborn ones. It is written for macOS Tahoe 26.5 specifically, because Apple has reworked how microphone access, input switching, and the new Mic Mode controls behave over the last several releases. Everything here applies to both Apple Silicon and Intel Macs unless noted otherwise, and every step explains why it works so you can recognize which fix matches your symptom rather than blindly trying all of them.
Key Takeaways
- The single most common reason a Mac microphone is not working in a specific app (Zoom, Teams, Discord, a browser) is a denied per-app Microphone permission in System Settings > Privacy & Security > Microphone. The mic works system-wide but the app is blocked, and macOS shows no warning.
- The second most common cause is the input source being stuck on a disconnected Bluetooth or USB device, or AirPods being auto-selected as the input. When AirPods become the mic, macOS drops the connection into a low-bandwidth SCO codec mode that mutes other audio and degrades quality dramatically.
- Always start at System Settings > Sound > Input. If the input level meter moves when you speak, your hardware and driver are fine, and the problem is a permission or app-level setting. If the meter is flat, the problem is device selection, input volume, gain, or hardware.
- Browsers add a second permission layer: Safari and Chrome each maintain their own site-by-site microphone permission on top of the macOS permission. You must grant access at both layers for a website to hear you.
- For audio interfaces and USB mics that disappear or crackle, a Core Audio restart (
sudo killall coreaudiod) and a sample-rate check in Audio MIDI Setup resolve most cases without a reboot.
Start Here: The Thirty-Second Input Triage
Before changing a single setting, you need to answer one question: does the Mac hear anything? This is the fork in the road for the entire troubleshooting process, and it takes about thirty seconds.
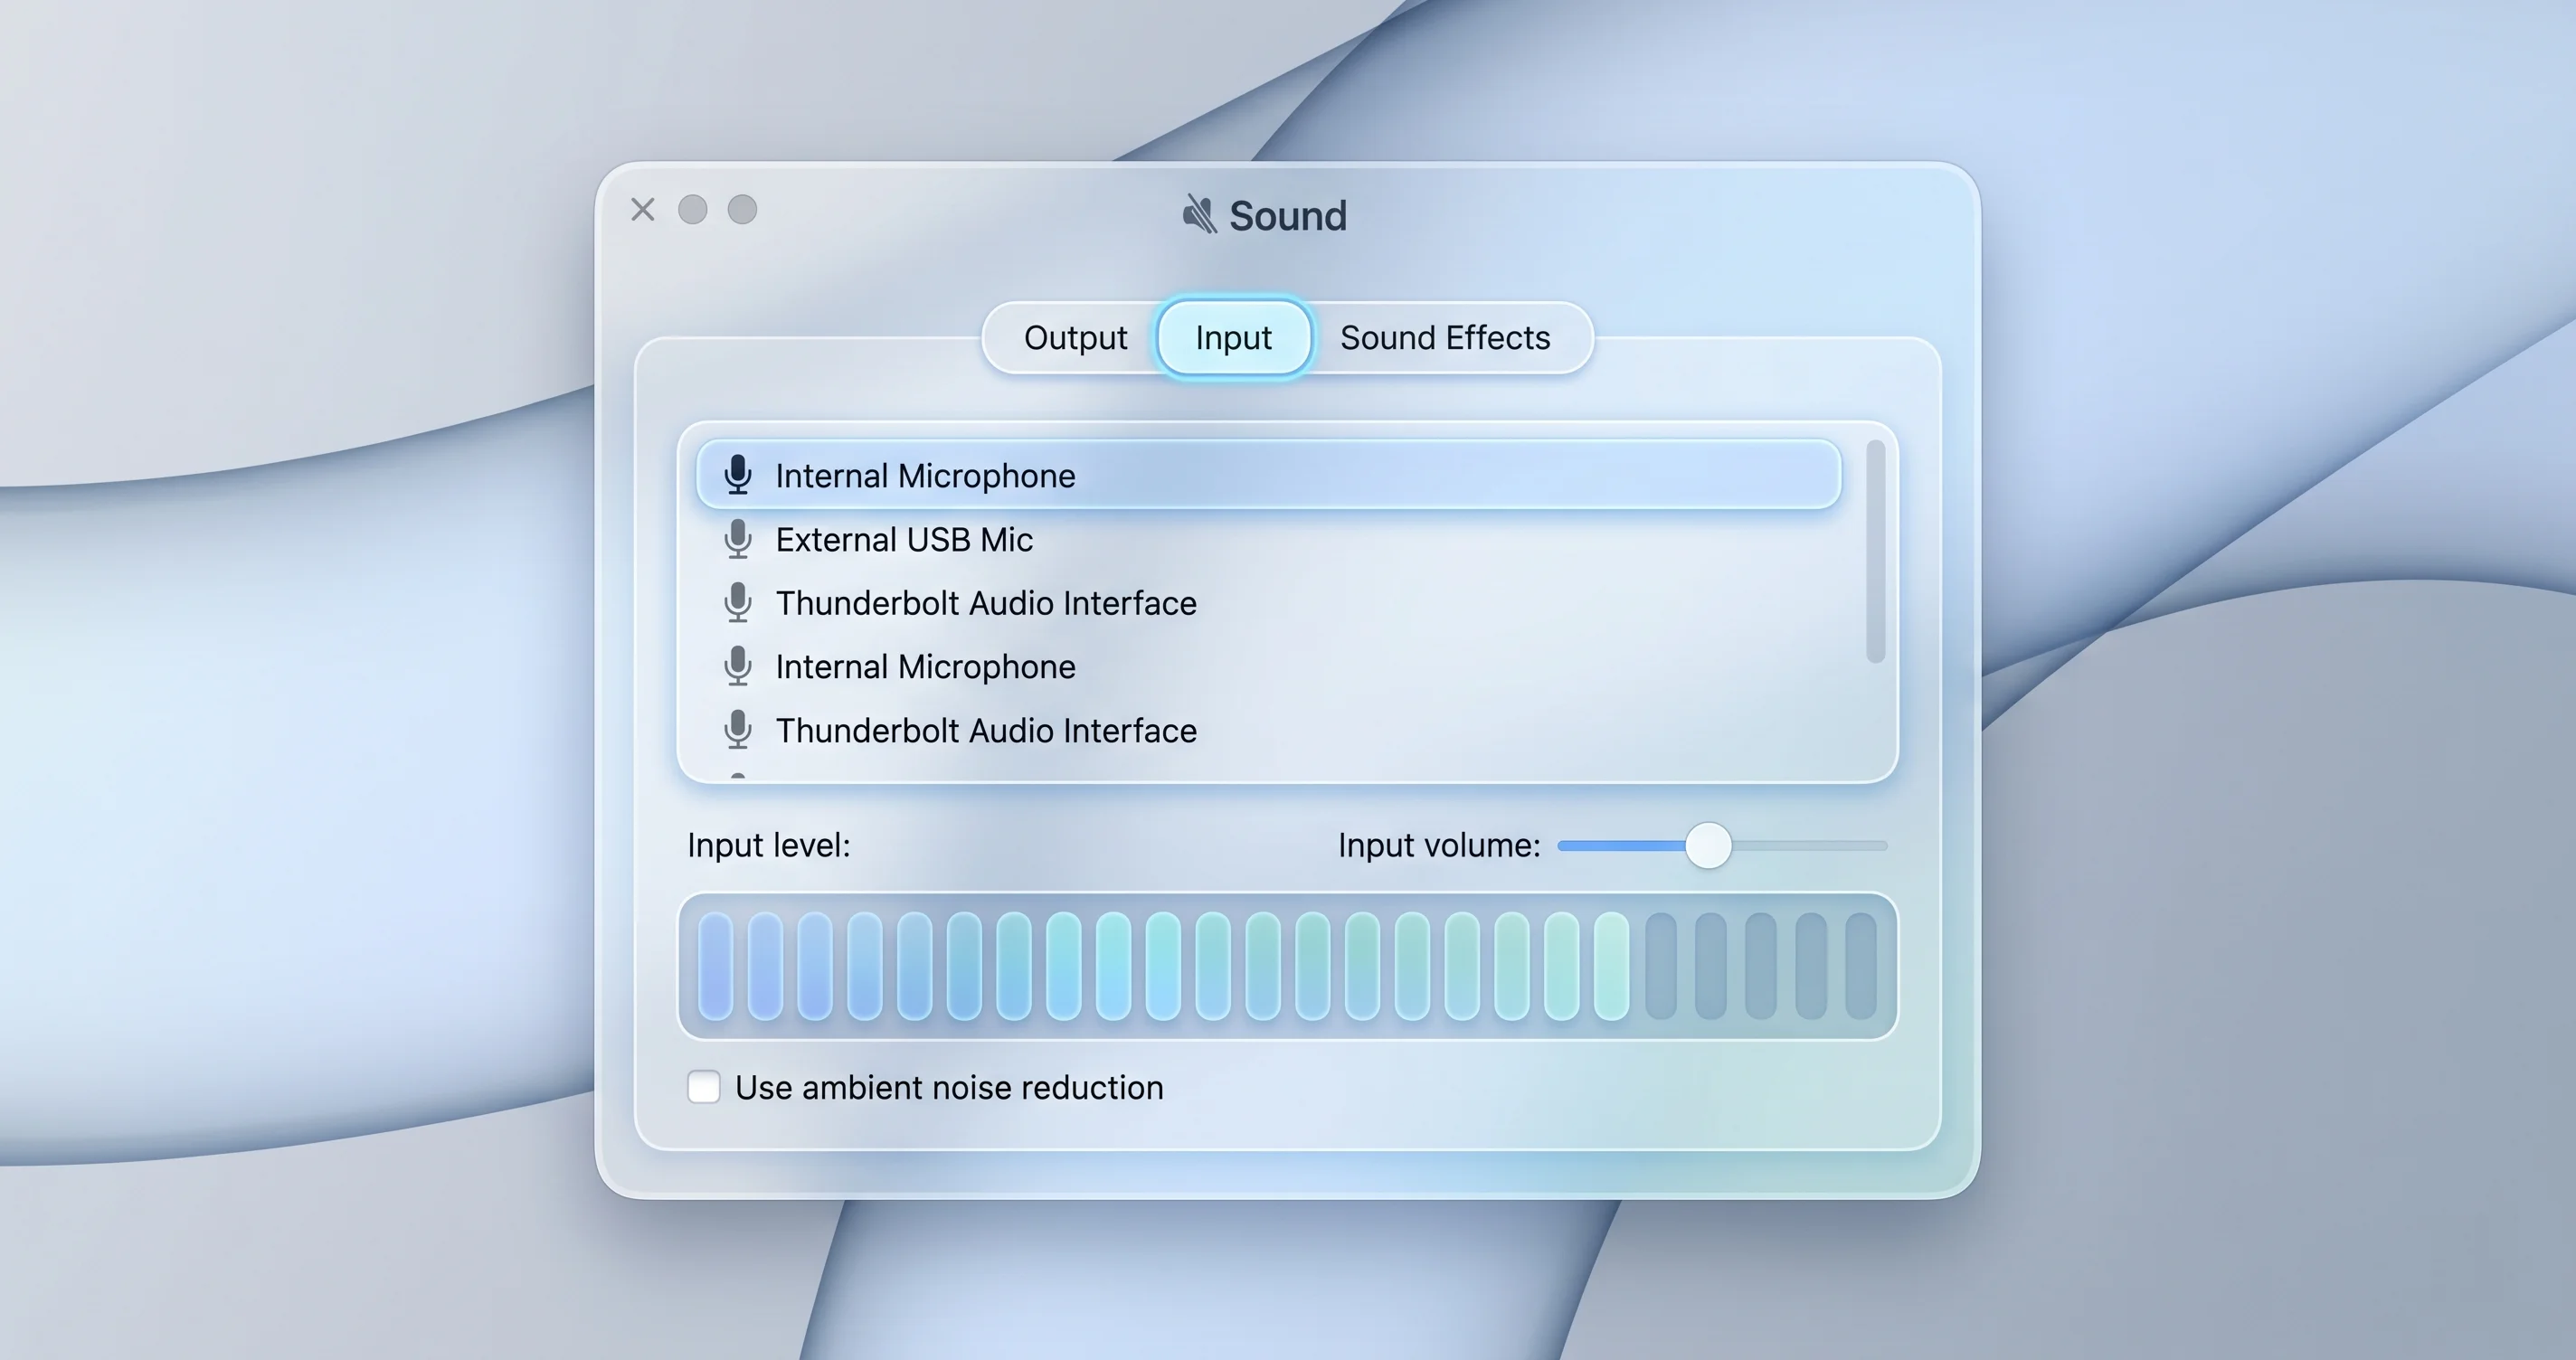
Open System Settings, click Sound in the sidebar, and select the Input tab. You will see a list of available input devices and an Input level meter at the bottom. Now speak normally toward your Mac. Watch the meter.
If the input level meter moves
If the bars light up when you talk, your microphone hardware, its driver, and the Core Audio stack are all working correctly. This is genuinely good news, because it eliminates the entire category of hardware and driver problems. The reason a specific app cannot hear you is almost certainly a permission issue, an app-internal device selection, or a browser site setting -- jump straight to the per-app Microphone permission section below.
If the input level meter is flat
If you speak and the meter does not move at all, the Mac is not receiving audio from the selected device. There are four possibilities in descending order of likelihood: the wrong input device is selected, the input volume slider is at zero, a Mic Mode or gain setting is suppressing the signal, or there is a hardware/driver problem. Work through the sections in order and you will land on the right one.
Confirm the correct input device is selected
This is where a surprising number of cases resolve immediately. In the Input tab, look at which device is highlighted. macOS lists every input it currently knows about, and it does not always pick the one you expect.
A typical list on a MacBook might show MacBook Pro Microphone, plus any connected USB mic, audio interface, or Bluetooth headset. If you intend to use the built-in mic but a USB webcam's microphone is selected, or AirPods are highlighted, click the device you actually want. The instant you select a live device, the level meter should respond to your voice. If selecting the built-in MacBook Pro Microphone makes the meter spring to life, you have found your problem: macOS had silently routed input to a device that is either disconnected, far away, or muted.
This silent auto-switching behavior is the second-biggest source of "my mic stopped working" reports on macOS Tahoe, and it deserves its own deeper discussion further down.
Why the meter test is the right first move
It is tempting to start by reinstalling the app, resetting the Mac, or digging through forums for your exact symptom. Resist that. The input level meter is a direct, ground-truth window into the audio stack: it sits below every app and shows you exactly what Core Audio is receiving from the selected device. If the meter moves, the entire hardware-and-driver chain -- microphone element, analog-to-digital converter, USB or Bluetooth transport, kernel driver, and Core Audio routing -- is provably intact. That single observation eliminates roughly two-thirds of the possible causes in one glance, which is why every experienced troubleshooter checks it first. Everything downstream of the meter (per-app permissions, browser site settings, app device pickers, Mic Mode) is software configuration you can change in seconds; everything upstream is hardware or driver work. Knowing which side of the meter your problem lives on is the whole game.
The #1 Silent Culprit: Per-App Microphone Permission
If your input level meter moves in System Settings but a specific app insists it cannot hear you, you have found the most common cause of a Mac microphone not working: macOS has not granted that individual app permission to use the microphone.
macOS treats microphone access as a per-application privilege under its Transparency, Consent, and Control (TCC) privacy framework. The first time any app tries to access the mic, macOS shows a one-time prompt asking you to Allow or Deny. If you clicked Deny -- or dismissed the prompt, or were not at the keyboard when it appeared -- that app is permanently blocked until you change the setting manually. Critically, the app receives silence, not an error. Zoom thinks it is recording. Discord shows your mic as active. But macOS feeds them an empty audio stream, so everyone hears nothing.
How to grant Microphone permission
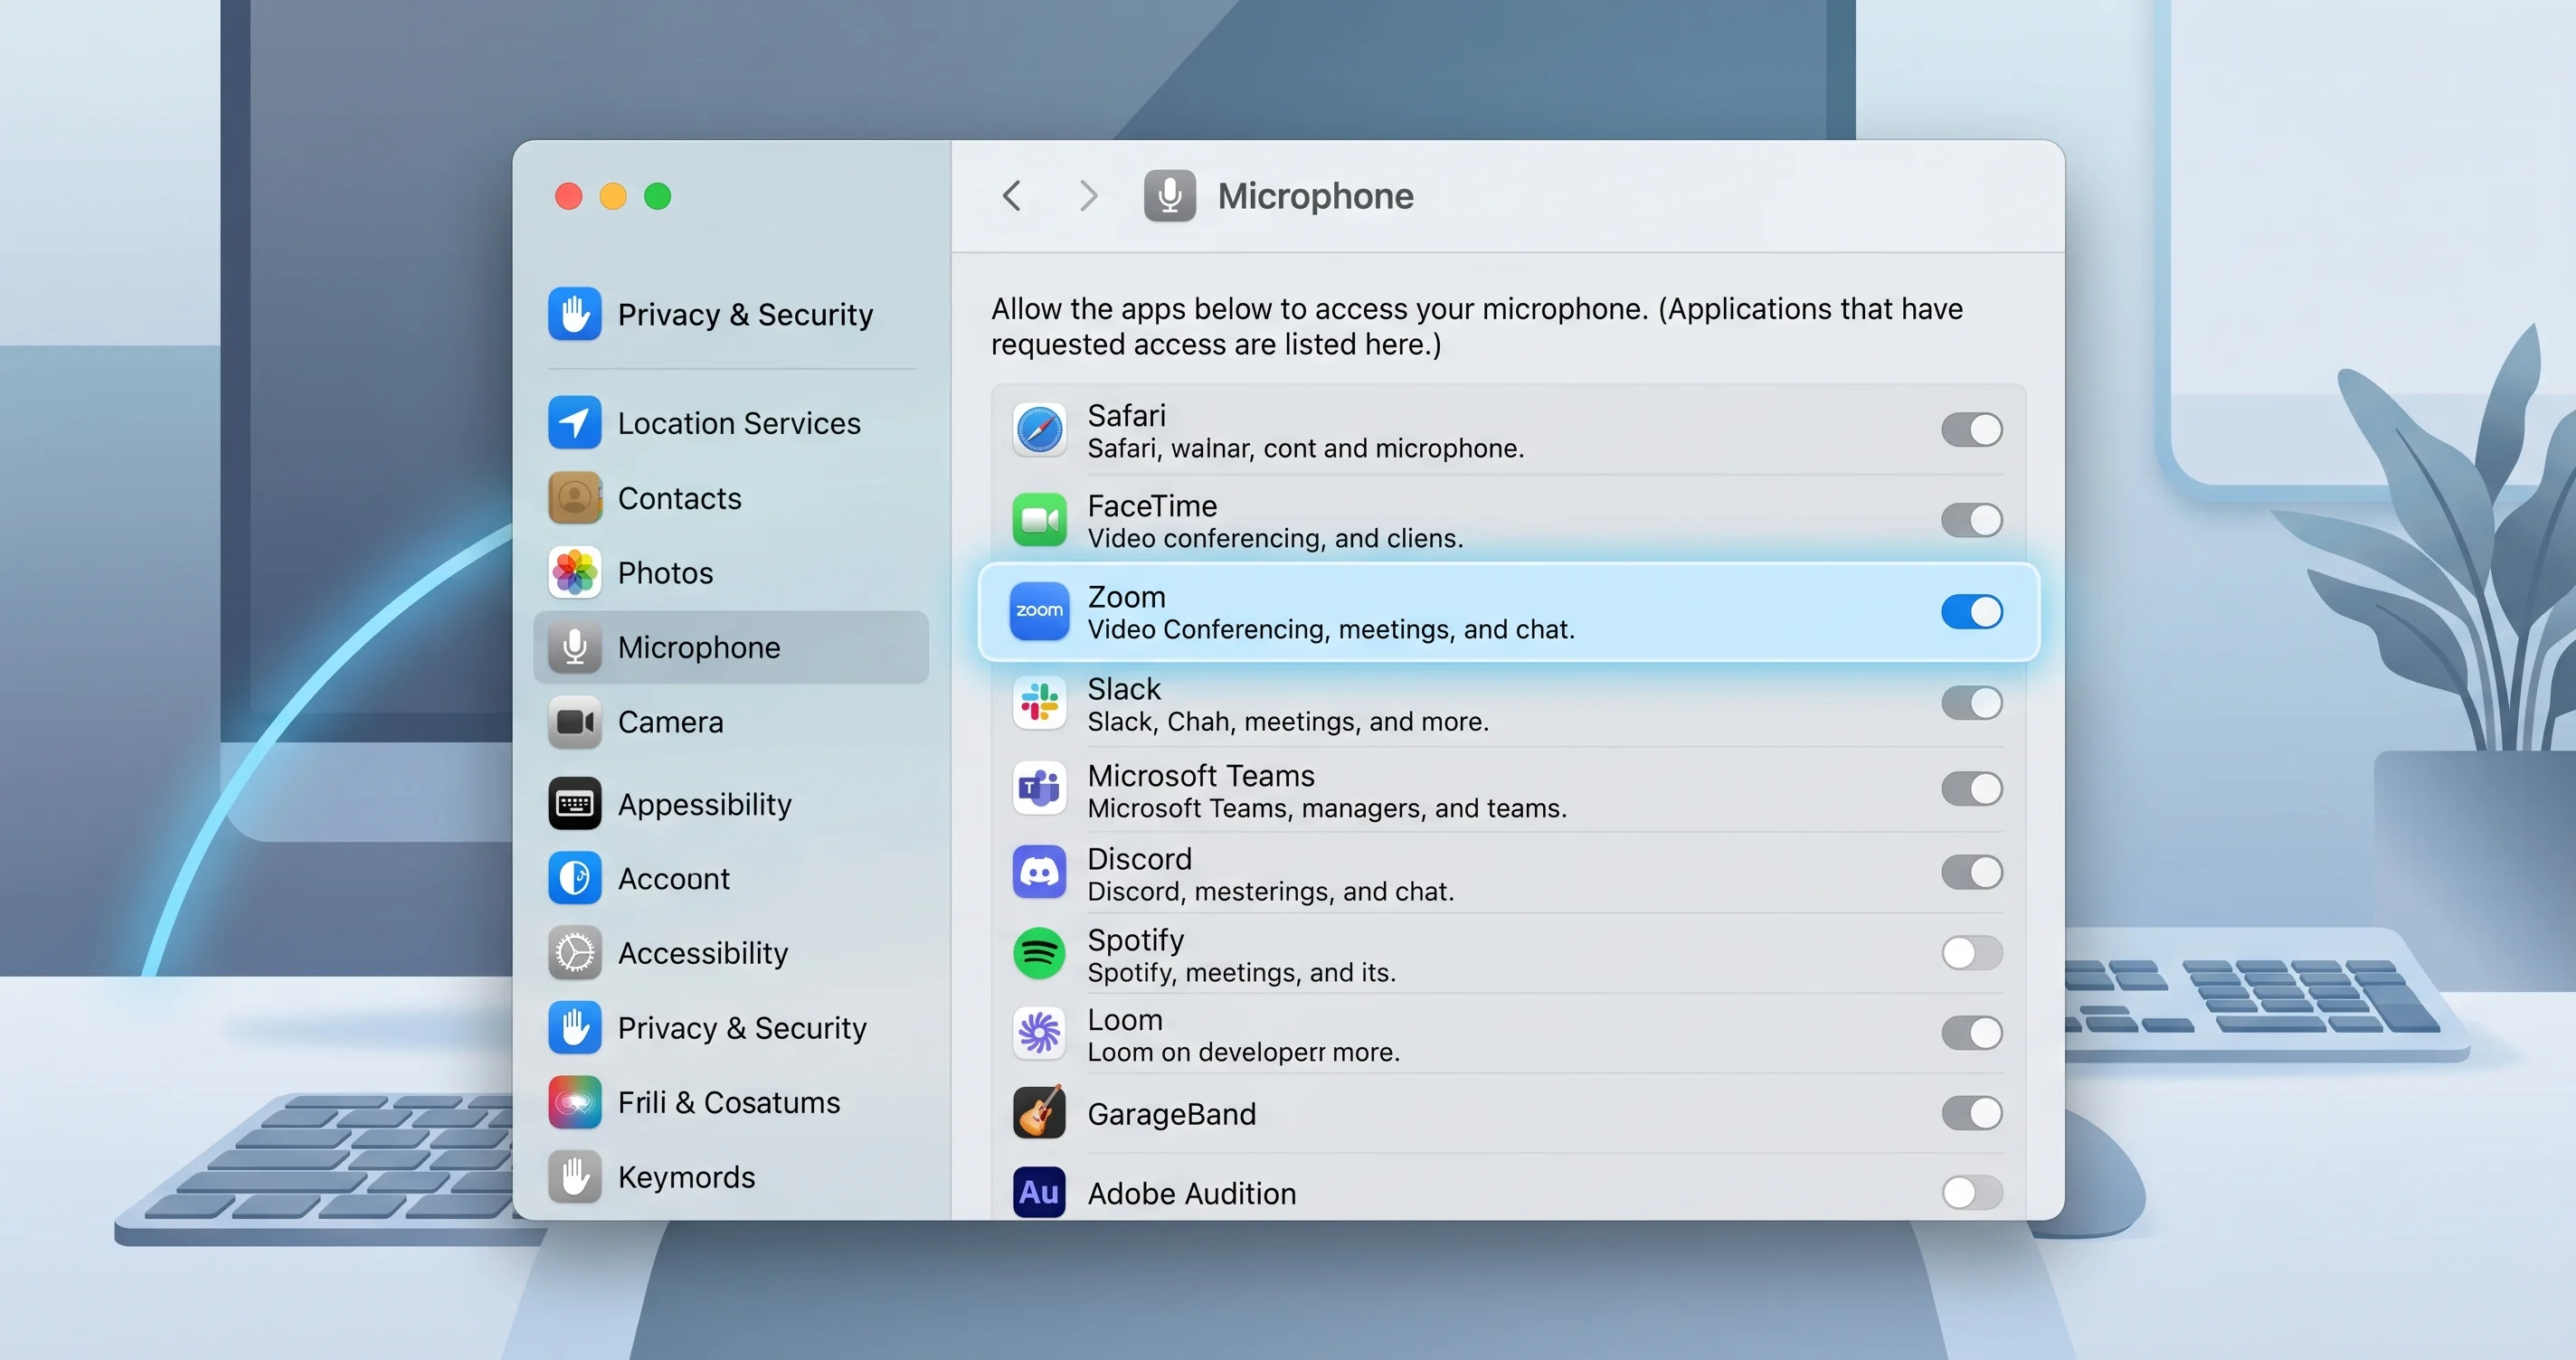
Open System Settings, go to Privacy & Security in the sidebar, scroll down, and click Microphone. You will see a list of every app that has ever requested microphone access, each with a toggle.
Find the app that cannot hear you -- Zoom, Microsoft Teams, Discord, Slack, OBS, your browser -- and make sure its toggle is switched on (green). If it is off, turn it on. If it is already on but the app still cannot hear you, turn it off and back on to force macOS to re-issue the permission.
The relaunch requirement
Here is the detail that trips up the most people: changing a microphone permission while the app is running often does not take effect immediately. macOS grants the entitlement, but the already-running process is still holding its old, denied state. After toggling the permission on, quit the app completely (Command-Q, or right-click its Dock icon and choose Quit) and reopen it. For some apps macOS will even show a banner saying the app must be relaunched for the change to apply. Do not skip this -- a permission that "looks correct" but was changed mid-session is the number-one reason people think the toggle did not work.
If the app is not in the list at all
If the app you are looking for does not appear under Microphone, it means the app has never actually requested microphone access. This usually points to the app itself being misconfigured or a different bug. Trigger a mic request inside the app -- start a call, open audio settings, begin a recording -- and macOS should then prompt you and add the app to the list. For a broader look at how Apple's privacy framework controls access to the mic, camera, screen, and more, see our macOS Tahoe security and privacy complete guide.
The Browser Trap: Two Layers of Microphone Permission
Web apps deserve special attention because they involve two independent permission layers, and people routinely fix one while forgetting the other.
When you use Google Meet, a web-based Zoom session, a browser dictation field, or any site that needs your mic, the request passes through two gatekeepers. First, the browser itself (Safari, Chrome, Edge, Arc, Brave) must have macOS-level microphone permission in Privacy & Security > Microphone -- exactly like any native app. Second, the browser maintains its own per-website microphone permission, completely separate from macOS, and it asks you site by site.
Layer one: the browser's macOS permission
Confirm your browser appears in System Settings > Privacy & Security > Microphone with its toggle on. If Safari or Chrome itself is blocked at the macOS level, no website can ever access your mic, no matter what you click inside the browser. Fix this first.
Layer two: the per-site permission inside the browser
In Safari, go to Safari > Settings > Websites > Microphone (or click the site settings in the address bar). Each site you have visited shows Allow, Deny, or Ask. Set the misbehaving site to Allow. In Chrome, click the tune/site-settings icon at the left of the address bar, find Microphone, and set it to Allow; you can also visit Settings > Privacy and security > Site settings > Microphone to manage the full list and clear a bad "Block" entry.
The classic browser symptom is this: the macOS permission is on, the green mic-in-use dot appears in your menu bar, yet the website still says it cannot hear you. That is almost always a site-level Block buried in the browser settings. Reset it to Ask or Allow, reload the page, and re-accept the in-page prompt.
Input Stuck on a Disconnected or Bluetooth Device
Now we return to the auto-switching problem, because on macOS Tahoe 26.5 it has become one of the most reported audio annoyances. macOS aggressively manages which device is the active input, and its choices are not always sensible.
The disconnected-device ghost
If you previously used a USB mic or Bluetooth headset and it later disconnected, macOS sometimes leaves the input pointed at that now-absent device. The Sound > Input list may still show it grayed out or simply keep routing to nothing. The level meter stays flat, every app gets silence, and there is no warning. The fix is simply to reselect a live device -- usually the built-in MacBook Pro Microphone -- in System Settings > Sound > Input.
The AirPods SCO codec trap
The most insidious version of this problem involves AirPods. When AirPods (or most Bluetooth headsets) are selected as the input device, the Bluetooth connection cannot use the high-quality playback codec at the same time. Classic Bluetooth audio can either send rich stereo to your ears or run a bidirectional voice link, but not both at full quality. The moment macOS picks AirPods as the microphone, it switches the whole connection into a telephony-grade mode -- historically the SCO/HFP profile -- which collapses your music or call audio to a narrow, tinny, low-bandwidth stream. People describe it as "my AirPods suddenly sound terrible on calls," and the cause is precisely this: the system chose them as the mic.
If you do not actually need AirPods as your microphone, set the input back to the built-in mic in Sound > Input, and your AirPods will return to full-quality playback. This dynamic pairs directly with the broader audio-quality discussion in our AirPods stuttering and cutting out fix guide and the comprehensive macOS Tahoe audio complete guide. If the headset itself will not connect or keeps dropping, work through the macOS Tahoe Bluetooth troubleshooting guide first.
Stopping unwanted auto-switching
There is no global "never switch my input" toggle in macOS, but you can reduce surprises. Manually select your preferred input in Sound > Input and macOS will usually keep it until a new device is connected. If a specific app keeps grabbing AirPods, check that app's own audio device dropdown -- many apps (Zoom, Teams, OBS) store an independent device preference that overrides the system default.
Input Volume, Gain, and Mic Modes
If the correct device is selected but the level meter still barely moves, the signal is being attenuated somewhere between the microphone element and the operating system.
The input volume slider
In System Settings > Sound > Input, below the device list, there is an Input volume slider. If it has been dragged to or near zero -- easy to do accidentally, and some apps reset it -- the mic is technically working but recording near silence. Drag it up to roughly 75 percent and watch the level meter respond. Avoid pushing it to maximum, which can introduce hiss and clipping; aim for a level where normal speech fills most of the meter without pinning it.
Mic Mode in Control Center: Voice Isolation and Wide Spectrum
macOS includes microphone-processing modes that change how your voice is captured during calls. Open Control Center from the menu bar, and while an app is actively using the mic, click Mic Mode. You will typically see three options:
- Standard -- no special processing.
- Voice Isolation -- aggressively suppresses background noise and focuses on your voice. This is excellent in noisy rooms, but it can over-process quiet or distant speech, cutting out parts of your voice or making you sound gated and choppy.
- Wide Spectrum -- captures everything in the room, ideal for music or multiple speakers, but it lets in all background noise.
If callers say you sound robotic, clipped, or like you keep dropping out, switch the Mic Mode back to Standard. Voice Isolation's noise suppression is the usual cause of mysteriously distorted or partially muted input, especially with soft-spoken users or omnidirectional room mics. Note that Mic Mode only appears in Control Center while an app is actively accessing the microphone -- if you do not see it, start a call or recording first.
Ambient noise reduction on the built-in mic
Some Macs and external mics expose an ambient-noise-reduction option that, like Voice Isolation, can suppress legitimate quiet audio. If your internal mic sounds thin or drops syllables, try disabling any "Use ambient noise reduction" setting you find and test again with plain Standard processing.
When the Internal Microphone Is Too Quiet
A built-in mic that works but is faint is a distinct problem from one that produces silence. The signal is present; it is just weak.
Raise input gain and re-aim
First, confirm the Input volume slider (covered above) is at a healthy level. Second, remember that the built-in mics on MacBooks are tuned for someone sitting roughly arm's length away facing the screen. If you lean back, turn away, or sit far from the laptop, your voice level drops sharply. Sit closer and face the Mac to confirm whether distance is the issue.
Check for dust and debris on the mic ports
The microphone openings on a MacBook are tiny pinholes, usually along the speaker grilles or near the keyboard, and they collect lint, dust, and pocket debris over time. A clogged mic port produces exactly the "too quiet and muffled" symptom. Inspect the openings under good light and clear them gently with a soft, dry brush or a burst of compressed air held at a distance. Never poke into the holes with anything sharp or push debris deeper.
Rule out software suppression
If gain is up, you are close to the mic, and the ports are clean but audio is still faint, the culprit is almost always Voice Isolation or ambient noise reduction over-processing your voice. Return to Standard Mic Mode and disable noise reduction as described above before assuming a hardware fault.
Verify with a quick local recording
Rather than relying on a colleague's "you're quiet" feedback, capture an objective sample. Open Voice Memos or QuickTime Player, choose New Audio Recording, and record ten seconds of normal speech. Play it back at a fixed system volume. A genuinely too-quiet mic produces a recording you must crank the speakers to hear; a healthy mic at a healthy gain plays back clearly at a moderate volume. This local test removes every network and app variable from the equation -- if the local recording sounds fine, the faintness others reported is happening inside the conferencing app or its network path, not at your microphone. It is the fastest way to draw the line between a hardware/gain problem and an app problem.
External USB Mics and Audio Interfaces Not Recognized
USB microphones (Blue Yeti, Shure MV-series, Rode), and audio interfaces (Focusrite Scarlett, Universal Audio, MOTU) introduce their own class of problems because they add a driver and a sample-rate negotiation layer on top of the Mac's audio stack.
Basic recognition checks
Plug the device directly into the Mac rather than through an unpowered hub -- bus-powered interfaces frequently brown out on shared hubs. Then check whether macOS sees it at all in System Settings > Sound > Input. If the device is not listed, try a different cable and a different port; USB-C/Thunderbolt port issues and frayed cables are more common than dead interfaces. Some interfaces also require their manufacturer's driver or control-panel app; install the latest version compatible with macOS Tahoe 26.5.
Sample-rate mismatches in Audio MIDI Setup
A classic cause of an interface that is "recognized but produces no usable input" is a sample-rate mismatch. Open Audio MIDI Setup (in Applications > Utilities), select your interface in the left sidebar, and look at the Format dropdown. If your recording app expects 48 kHz but the interface is set to 44.1 kHz (or 96 kHz), you can get silence, distortion, or pitch artifacts. Set the interface and your app to the same sample rate -- 48 kHz is a safe default for most video and conferencing work. While you are there, confirm the interface's input channels are not muted and the gain/thru levels are sensible.
Reset Core Audio without rebooting
If an interface was working and suddenly drops out, crackles, or refuses to be selected, the Core Audio daemon has likely gotten into a bad state. You can restart it without rebooting the whole Mac. Open Terminal and run:
sudo killall coreaudiodEnter your administrator password when prompted. macOS automatically relaunches coreaudiod within a second or two, re-enumerates all audio devices, and clears most transient glitches -- crackling, devices that won't appear, inputs that won't switch. This is the single most useful audio fix that does not require a restart, and it is safe to run anytime no critical recording is in progress. If the audio stack is so wedged that even this fails to help, a full restart is the next step.
Hardware-Side Resets and Isolation Tests
When software settings all check out but the mic still fails, you escalate to resets and isolation tests that separate a true hardware fault from a corrupted software state.
Restart first
A plain restart clears the audio stack, reloads drivers, and resolves a remarkable share of "it just stopped working" cases, especially after a system update or a long uptime. Always try this before anything more involved.
NVRAM and SMC-equivalent resets on Apple Silicon
On Intel Macs, resetting NVRAM/PRAM and the SMC can clear audio-routing and power-management gremlins. On Apple Silicon Macs there is no manual NVRAM or SMC reset key combination -- Apple folded those functions into the boot process. The equivalent is a full shutdown: choose Shut Down, wait about thirty seconds for the system to fully power down (not just sleep), then power back on. This re-initializes the low-level controllers that an Intel SMC reset used to handle. For the complete, model-by-model procedure, follow our guide to resetting NVRAM, PRAM, and SMC on a Mac.
Test in Safe Mode
Safe Mode loads only Apple's core extensions and disables third-party kernel and audio drivers, which is perfect for isolating whether a third-party tool (a virtual audio router, a DAW driver, antivirus, or a screen-recording extension) is hijacking your mic. On Apple Silicon, shut down, then press and hold the power button until "Loading startup options" appears, select your disk, hold Shift, and choose "Continue in Safe Mode." Test the mic in Safe Mode: if it works there but not normally, a third-party audio component is the cause -- remove or update the recently installed audio software.
Create a test user account
To determine whether the problem lives in your user account (a corrupted preference, a per-user permission, a login item) versus the whole system, create a fresh user account in System Settings > Users & Groups, log into it, and test the mic. If the microphone works perfectly in the clean account, the fault is something in your original account's settings rather than the hardware or OS -- and you can hunt down the offending preference or login item instead of reinstalling.
Dictation, Siri, and Screen Time Restrictions
A few macOS features depend on the microphone in ways that are easy to overlook when triaging.
Dictation needs the mic enabled
Dictation converts speech to text and obviously requires microphone access. If Dictation does nothing when you press its shortcut, confirm it is enabled in System Settings > Keyboard > Dictation, that the microphone shown there is the device you expect, and that the system mic itself passes the Sound > Input level test. Our complete guide to using Dictation on a Mac covers setup, languages, and the on-device versus server modes in detail. The same logic applies to Siri -- if Siri cannot hear you but Dictation can, the problem is Siri's configuration, not the mic.
Screen Time content restrictions can block the mic
This is the surprise culprit on managed and family Macs. Screen Time's content and privacy restrictions include controls over which apps may use the microphone, and a restriction set by you, a profile, or an MDM administrator can silently block mic access. Check System Settings > Screen Time > Content & Privacy > App Privacy (or the Allow Changes section) and make sure microphone access is permitted. On a work or school Mac, a configuration profile may enforce this and require an administrator to change it.
Troubleshooting Common Issues
Below are the most common specific scenarios people hit, paired with the targeted fix for each.
Problem: The mic works in one app but not another
Solution: This is the textbook signature of a per-app permission or app-internal device selection issue. Confirm the failing app is toggled on in Privacy & Security > Microphone, then check that app's own audio settings -- many apps store an independent input-device choice. Relaunch the app after changing any permission. Because the mic works elsewhere, the hardware is fine; the fix is entirely at the app/permission layer.
Problem: The mic works in native apps but not in the browser
Solution: Address both browser permission layers. Ensure the browser is enabled in Privacy & Security > Microphone (macOS layer), then clear any per-site Block and set the specific site to Allow inside the browser's own settings (Safari > Settings > Websites > Microphone, or Chrome site settings). Reload the page and re-accept the in-page prompt.
Problem: Callers say I sound robotic, choppy, or like I keep dropping out
Solution: Open Control Center > Mic Mode during the call and switch from Voice Isolation to Standard. Voice Isolation's noise suppression over-processes quiet or distant speech and is the usual cause of gated, choppy audio. Also disable any ambient-noise-reduction option for that mic.
Problem: My AirPods sound terrible the moment I'm on a call
Solution: macOS selected the AirPods as the input device, forcing the Bluetooth link into low-bandwidth telephony mode. In Sound > Input, switch the input to the built-in microphone (or a wired mic). Playback quality on the AirPods returns to normal immediately. See the AirPods codec fix guide linked above for the full explanation.
Problem: The mic stops working after the Mac wakes from sleep
Solution: This is a Core Audio re-enumeration glitch, frequently reported with USB interfaces. Run sudo killall coreaudiod in Terminal to restart the audio daemon without rebooting. If it recurs after every sleep cycle with a specific interface, update that interface's driver, plug it into a powered hub or direct port, and check Energy/Battery settings that may be cutting USB power during sleep.
Problem: Input level meter is completely flat on the built-in mic
Solution: Verify the built-in MacBook Pro Microphone is the selected device (not a ghost Bluetooth/USB device), raise the Input volume slider, and set Mic Mode to Standard. If still flat, boot into Safe Mode to rule out third-party audio drivers, then test in a fresh user account to isolate account-level corruption before suspecting hardware.
Problem: External display "speakers"/dock are selected and there's no usable mic
Solution: HDMI and DisplayPort connections to external monitors register an audio output device, and some docks also expose a low-quality input. Make sure Sound > Input points to your real microphone rather than the display or dock. Displays generally have no microphone, so selecting one as input yields silence.
Problem: The mic disappeared entirely after a macOS update
Solution: Restart first, since updates often need a clean reboot to finish loading audio drivers. Re-grant per-app permissions, as updates occasionally reset TCC entries. If a USB interface needs a manufacturer driver, reinstall the version validated for macOS Tahoe 26.5. As of macOS 26.5 there are scattered reports of input devices needing a coreaudiod restart after the update -- treat this as widely reported rather than a formally confirmed Apple bug, and run the restart command above.
FAQ
Why can my Mac hear me in System Settings but not in Zoom?
The Sound > Input level meter tests the system mic, which is working. Zoom is being fed silence because it lacks per-app microphone permission. Open System Settings > Privacy & Security > Microphone, switch Zoom on, then completely quit and relaunch Zoom so the new permission takes effect for the running process.
How do I stop my AirPods from being selected as my microphone?
Go to System Settings > Sound > Input and manually select your built-in or wired microphone instead of the AirPods. Using AirPods as the input forces Bluetooth into a low-bandwidth voice mode that wrecks playback quality, so unless you specifically need them as the mic, keep the input on another device.
What does the Mic Mode setting in Control Center do?
Mic Mode controls how macOS processes your voice during calls. Standard applies no processing, Voice Isolation suppresses background noise but can over-process quiet speech, and Wide Spectrum captures the whole room. If you sound choppy or robotic to others, switch back to Standard. Mic Mode only appears while an app is actively using the microphone.
Is running sudo killall coreaudiod safe?
Yes. It restarts the Core Audio daemon, which macOS automatically relaunches within a second or two. It re-enumerates all audio devices and clears transient glitches like crackling or devices that won't switch, without rebooting. Avoid running it during a critical live recording, since audio will briefly cut out as the daemon restarts.
Why does my built-in microphone sound so quiet and muffled?
Three usual causes: the Input volume slider is too low, you are sitting too far from the Mac, or the tiny mic ports are clogged with dust. Raise the slider to around 75 percent, sit closer facing the screen, and gently clear the mic openings with compressed air. Also set Mic Mode to Standard to rule out noise-suppression over-processing.
My USB audio interface isn't recognized on macOS Tahoe 26.5. What now?
Plug it directly into the Mac, not an unpowered hub, and try another cable and port. Install the manufacturer's latest macOS-Tahoe-compatible driver. Open Audio MIDI Setup and match the interface's sample rate (48 kHz is a safe default) to your recording app. If it dropped out mid-session, run sudo killall coreaudiod to re-enumerate devices.
Can Screen Time block my microphone?
Yes. Screen Time's Content & Privacy restrictions include a microphone access control. If you, a family organizer, or an MDM profile restricted it, apps silently get no mic access. Check System Settings > Screen Time > Content & Privacy and allow microphone access. On managed work or school Macs, an administrator may need to change an enforced configuration profile.
How do I know if my Mac's microphone is a hardware problem?
Work through the software triage first: confirm the right device is selected, permissions are granted, Mic Mode is Standard, and the level meter is flat across every app. Then boot into Safe Mode and test in a fresh user account. If the mic fails even in Safe Mode and a clean account after a restart, hardware failure becomes likely -- contact Apple Support or an authorized service provider.
Conclusion
A Mac microphone not working almost never means a broken microphone. On macOS Tahoe 26.5 the real causes are far more mundane and far more fixable: a per-app permission that was silently denied, an input source quietly stuck on AirPods or a disconnected device, an input volume slider dragged to zero, or a Voice Isolation mode over-processing your voice into oblivion. The thirty-second triage at System Settings > Sound > Input tells you which branch you are on -- a moving level meter sends you to permissions and app settings, a flat meter sends you to device selection, volume, and hardware resets. Work through the layers in order, relaunch apps after permission changes, and reach for sudo killall coreaudiod before you reach for a reboot, and you will resolve the overwhelming majority of cases in minutes.
For related audio and connectivity issues, continue with our macOS Tahoe audio complete guide, the Continuity Camera not working fix for webcam-and-mic combos, and the macOS error codes complete guide if a specific audio error number appears.