macOS Tahoe 26 Time Machine Complete Troubleshooting Guide: Fix NAS Backup Failures, APFS Snapshot Issues, and SMB Protocol Problems
Comprehensive Time Machine troubleshooting guide for macOS Tahoe 26. Fix backup failures on Synology and QNAP NAS, resolve non-ASCII character issues, solve APFS snapshot problems, and master terminal diagnostics with tmutil commands.
macOS Tahoe 26 introduces significant changes to Time Machine's underlying architecture that affect backup behavior, particularly for users with network-attached storage devices. Since the release in September 2025, thousands of users have reported backup failures, "Preparing backup" loops, and NAS connectivity issues. This comprehensive guide provides detailed solutions for every Time Machine problem on macOS Tahoe 26, from basic troubleshooting to advanced terminal diagnostics.
Executive Summary: Time Machine on macOS Tahoe 26
What's Changed in macOS Tahoe 26
macOS Tahoe 26 brings several important changes to Time Machine that directly impact backup reliability:
Critical Changes:
- APFS Requirement: Time Machine now strictly requires APFS-formatted backup destinations for new backups
- SMB3 Protocol Enforcement: AFP support is fully deprecated; SMB3 is now mandatory for network backups
- Enhanced Encryption: New encryption protocols affect existing encrypted backup destinations
- iCloud Integration: Changes to how iCloud Drive files interact with Time Machine backups
- Firewall Behavior: Modified firewall rules can block Time Machine network connections
Impact Assessment:
- NAS Users: Most affected group, with reported failure rates up to 40% immediately after upgrade
- External Drive Users: Generally stable, with occasional APFS conversion issues
- iCloud Users: May experience "Cloud Files syncing" delays before backup completion
- Antivirus Users: Third-party security software conflicts increased significantly
Common Error Messages and Quick Fixes
Before diving into detailed solutions, here's a quick reference for the most common Time Machine errors on macOS Tahoe 26:
| Error Message | Quick Fix | Section |
|---|---|---|
| "The network disk disconnected from your Mac" | Check NAS SMB settings, remove special characters | NAS Issues |
| "Time Machine could not create a local snapshot" | Delete old snapshots, check disk space | APFS Issues |
| "Preparing backup" stuck for hours | Delete .inProgress file, restart | Preparing Stuck |
| "Your system has run out of application memory" | Close apps, restart Mac | Memory Issues |
| "An unauthorized app attempted to access your backups" | Configure antivirus exclusions | Security Software |
| "Backup Not Completed. Cloud Files syncing" | Wait for iCloud sync, toggle Optimize Storage | iCloud Issues |
Part 1: Diagnosing Time Machine Problems
Step-by-Step Diagnostic Checklist
Before attempting any fixes, perform this comprehensive diagnostic routine:
1. Check Time Machine Status
# View current Time Machine status
tmutil status

# Check backup destinations
tmutil destinationinfo

# List recent backups
tmutil listbackups | tail -5

# View latest backup path
tmutil latestbackup
2. Verify Disk Health
# Check disk format and health
diskutil info /Volumes/[BackupDrive]

# Verify disk
diskutil verifyDisk /Volumes/[BackupDrive]

# Check SMART status (for physical drives)
diskutil info /Volumes/[BackupDrive] | grep SMART
3. Check System Logs
# View Time Machine logs from last hour
log show --predicate 'subsystem == "com.apple.TimeMachine"' --info --last 1h

# Filter for errors only
log show --predicate 'subsystem == "com.apple.TimeMachine"' --info --last 1h | grep -i error

# Watch backup progress in real-time
tmutil status | grep -E "(Running|Percent|bytes)"
4. Generate Comprehensive Diagnostic Report
# Create full diagnostic archive (takes several minutes)
sudo tmdiagnose -f ~/Documents/

# Output: ~290MB archive containing:
# - Backup destinations analysis
# - Complete logs
# - Daemon settings
# - iCloud information
# - Spotlight diagnostics
# - Exclusion lists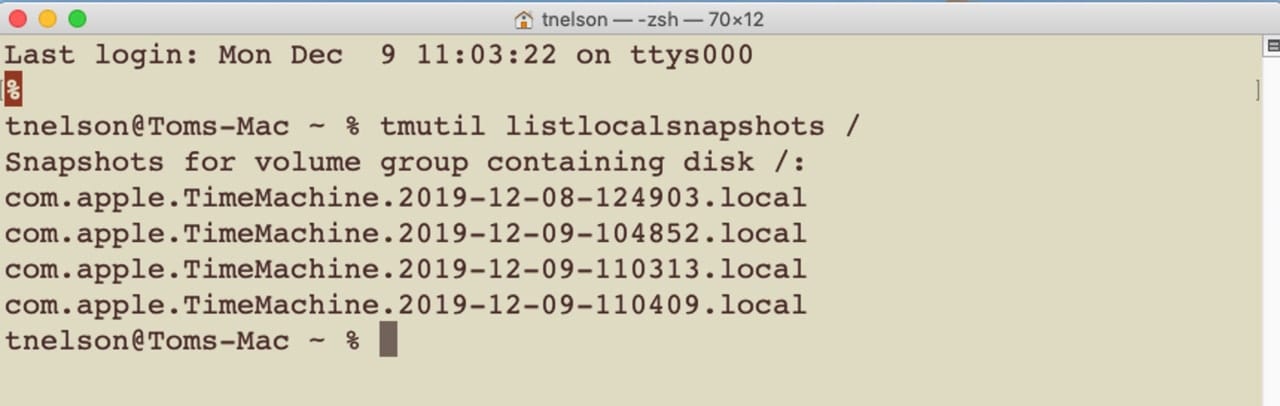
Understanding Time Machine Phases
Time Machine backups progress through several phases. Understanding where your backup stalls helps identify the root cause:
Phase 1: Preparing (0-10 minutes normally)
- Creates local APFS snapshot
- Calculates changes since last backup
- Builds file list for transfer
Phase 2: Copying Files (Variable duration)
- Transfers new and modified files
- Updates metadata and permissions
- Creates hard links for unchanged files
Phase 3: Thinning Old Backups (If needed)
- Removes old hourly backups (after 24 hours)
- Removes old daily backups (after 1 month)
- Frees space for new backup data
Phase 4: Verifying (Brief)
- Confirms backup integrity
- Updates backup metadata
- Marks backup as complete
Part 2: NAS Backup Failures and Solutions
The Non-ASCII Character Problem
This is the #1 cause of Time Machine failures on macOS Tahoe 26 with NAS devices.
Symptoms:
- Error: "The network disk disconnected from your Mac while backing up"
- Backups work on macOS Sequoia but fail after upgrading to Tahoe
- Affects users with localized system languages (Dutch, German, Korean, Japanese, etc.)
Root Cause: macOS Tahoe 26 changed how non-ASCII characters are handled in sparsebundle names. If your Mac name or backup volume contains characters like ö, ü, é, ñ, or Asian characters, the backup will fail.
Solution 1: Rename the Sparsebundle
- Open Finder and navigate to your NAS Time Machine share
- Find the
.sparsebundlefile for your Mac - Right-click and select "Show Package Contents"
- Open the file
com.apple.TimeMachine.MachineID.plistin a text editor - Look for any non-ASCII characters in the name fields
- Replace all special characters with standard a-z characters
- Rename the sparsebundle file itself to match
Solution 2: Change Mac Name Temporarily
# Check current Mac name
scutil --get ComputerName

# Set a new ASCII-only name
sudo scutil --set ComputerName "MyMacBook"
sudo scutil --set LocalHostName "MyMacBook"

# Restart and create new backup
# After successful first backup, you can restore the original name
Solution 3: Create Fresh Backup with ASCII Name
- System Settings > General > Sharing > Edit Mac name to use only ASCII characters
- Forget the existing Time Machine destination
- Delete the old sparsebundle on NAS (backup your data first!)
- Re-add the NAS as a backup destination
- Start fresh backup
SMB Protocol Configuration
Problem: macOS Tahoe 26 requires SMB3 protocol for Time Machine, but many NAS devices default to SMB1 or SMB2.
For Synology NAS:
- Open DSM Control Panel
- Navigate to File Services > SMB
- Under Advanced Settings, set:
- Minimum SMB protocol: SMB2
- Maximum SMB protocol: SMB3
- Enable "Enable Opportunistic Locking"
- Enable "Enable SMB2 lease"
- Click Apply and restart SMB service
For QNAP NAS:
- Open QTS Control Panel
- Navigate to Network & File Services > Win/Mac/NFS/WebDAV > Microsoft Networking
- Under Advanced Options:
- Set Lowest SMB version: SMB 2
- Set Highest SMB version: SMB 3
- Apply changes
For TrueNAS:
- Navigate to Services > SMB
- Click Configure
- Under Auxiliary Parameters, add:
min protocol = SMB2
max protocol = SMB3- Save and restart SMB service
Firewall and Network Issues
macOS Tahoe 26 introduced a confirmed bug affecting Time Machine wireless backups when the Firewall is enabled.
Temporary Workaround:
# Disable firewall temporarily
sudo /usr/libexec/ApplicationFirewall/socketfilterfw --setglobalstate off

# Complete your backup

# Re-enable firewall
sudo /usr/libexec/ApplicationFirewall/socketfilterfw --setglobalstate on
Permanent Solution:
- Open System Settings > Network > Firewall > Options
- Add
/usr/sbin/smbdto allowed applications - Add
/System/Library/CoreServices/backupd.bundle/Contents/Resources/backupdto allowed applications - Enable "Automatically allow built-in software to receive incoming connections"
Manual NAS Destination Configuration
If Time Machine fails to auto-discover your NAS, add it manually via Terminal:
# Add NAS backup destination with authentication
sudo tmutil setdestination -a smb://username:password@nas-ip-address/TimeMachine

# Example for Synology:
sudo tmutil setdestination -a smb://admin:[email protected]/TimeMachine

# Verify destination was added
tmutil destinationinfo
Security Note: This command stores your password in the command history. Clear it with:
history -cPart 3: "Preparing Backup" Stuck Solutions
Understanding Why Preparing Gets Stuck
The "Preparing backup" phase can get stuck for several reasons:
- Previous backup was interrupted: Left behind incomplete files
- Large file changes: Major system updates or large file additions
- Malware scanning: Antivirus scanning backup destination
- Corrupted APFS snapshot: Previous snapshot didn't complete properly
- Full startup disk: Insufficient space for local snapshot
Solution 1: Delete .inProgress File
# Navigate to backup destination
cd /Volumes/[BackupDrive]/Backups.backupdb/[MacName]

# Find and list .inProgress files
ls -la | grep inProgress

# Delete the .inProgress folder/file
sudo rm -rf *.inProgress

# Restart Time Machine
tmutil stopbackup
tmutil startbackup
Solution 2: Reset Time Machine Configuration
# Stop Time Machine
tmutil disable

# Remove all destinations
tmutil removedestination [destination_id]
# Get destination_id from: tmutil destinationinfo

# Clear preferences
sudo rm /Library/Preferences/com.apple.TimeMachine.plist

# Restart Mac
sudo reboot

# After restart, re-add backup destination
# System Settings > General > Time Machine > Add Backup Disk
Solution 3: Delete Local Snapshots
Local snapshots can accumulate and cause issues:
# List all local snapshots
tmutil listlocalsnapshots /

# Delete specific snapshot (oldest first)
sudo tmutil deletelocalsnapshots 2025-11-20-120000

# Delete ALL local snapshots (nuclear option)
for snapshot in $(tmutil listlocalsnapshots / | cut -d'.' -f4); do
    sudo tmutil deletelocalsnapshots $snapshot
done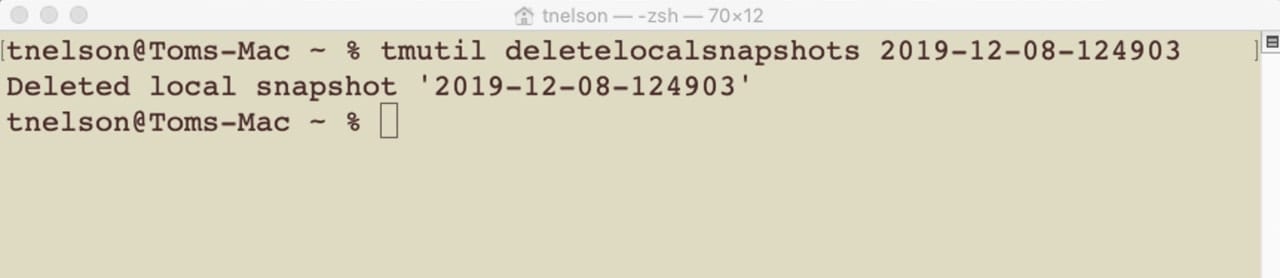
Solution 4: Boot in Safe Mode
Safe Mode disables third-party software that might interfere:
For Apple Silicon Macs:
- Shut down your Mac completely
- Press and hold the power button until "Loading startup options" appears
- Select your startup disk
- Press and hold Shift
- Click "Continue in Safe Mode"
- Open Time Machine and start backup
For Intel Macs:
- Restart your Mac
- Immediately press and hold Shift
- Release when login window appears
- Log in and start Time Machine backup
Part 4: APFS Snapshot Issues
"Could Not Create Local Snapshot" Error
Symptoms:
- Error: "Time Machine could not create a local snapshot to back up from"
- Appears after major OS upgrades or disk changes
- May be intermittent
Diagnostic Steps:
# Check for APFS issues
sudo fsck_apfs -n /dev/disk1s1  # Replace with your disk identifier

# Check disk space
df -h /

# List existing snapshots
tmutil listlocalsnapshots /
Solutions:
1. Free Disk Space
Time Machine requires at least 10% free space to create snapshots:
- Delete large files from Downloads
- Empty Trash
- Remove unused applications
- Clear system caches
2. Repair APFS Volume
# Get disk identifier
diskutil list

# Run APFS repair (requires Recovery Mode for startup disk)
sudo fsck_apfs -y /dev/disk1s1
3. Exclude Problematic Volumes
Some external volumes can cause snapshot failures:
- System Settings > General > Time Machine > Options
- Add problematic volumes to "Exclude from backups"
APFS Snapshot Metadata Invalid
Problem: Console logs show "APFS Snapshot Metadata Tree Is Invalid"
Solution:
# Boot to Recovery Mode (Command+R on Intel, hold Power on Apple Silicon)
# Open Terminal from Utilities menu

# List disks
diskutil list

# Run First Aid on the Data volume
diskutil repairVolume /dev/disk1s1  # Your Data volume

# Run full APFS repair
fsck_apfs -y /dev/disk1s1
Part 5: External Drive Problems
Format Requirements for macOS Tahoe 26
Required Format: APFS (for new Time Machine backups) Legacy Support: HFS+ (Mac OS Extended) only for existing backups
How to Format External Drive for Time Machine:
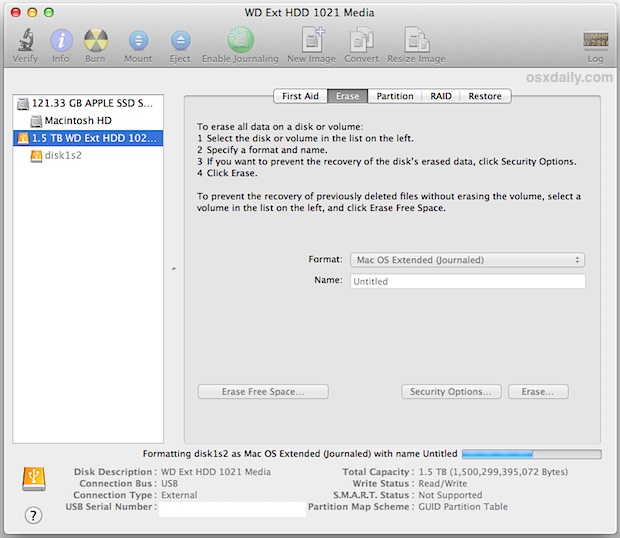
- Open Disk Utility (Applications > Utilities)
- Select your external drive in the sidebar
- Click "Erase"
- Configure:
- Name: Time Machine (or your preference)
- Format: APFS
- Scheme: GUID Partition Map
- Click "Erase"
- Open System Settings > General > Time Machine
- Click "Add Backup Disk" and select your drive
Drive Not Appearing in Time Machine
Checklist:
- Connection: Try different USB/Thunderbolt ports
- Cable: Use a different cable (quality matters!)
- Format: Verify APFS or HFS+ format in Disk Utility
- Partition Scheme: Must be GUID Partition Map (not MBR)
- Permissions: Check Full Disk Access settings
Terminal Fix for Hidden Drives:
# Show all drives including unsupported
defaults write com.apple.systempreferences TMShowUnsupportedNetworkVolumes 1

# Restart System Settings
killall "System Settings"
Drive Ejecting During Backup
Causes:
- Power management disconnecting drive
- USB hub insufficient power
- macOS energy settings
Solutions:
1. Prevent Drive Sleep
# Prevent drive from sleeping
sudo pmset -a disksleep 0

# Check current setting
pmset -g | grep disksleep
2. Use Powered USB Hub
- External drives require 500mA minimum
- Use USB hub with external power supply
- Connect directly to Mac if possible
3. Disable "Put hard disks to sleep"
- System Settings > Energy Saver (Battery and Power Adapter)
- Uncheck "Put hard disks to sleep when possible"
Part 6: iCloud Integration Issues
"Cloud Files Syncing" Backup Delay
Problem: Time Machine shows "Backup Not Completed. Some of the files on your Mac cannot be backed up until Cloud Files syncing has completed"
Root Cause: macOS Tahoe 26 changed iCloud Drive behavior. When "Optimize Mac Storage" is disabled, local copies are automatically downloaded, triggering continuous syncing.
Solutions:
1. Wait for Sync Completion
- Initial sync can take 4+ hours depending on iCloud library size
- Monitor progress: System Settings > Apple ID > iCloud > iCloud Drive (click "Managing...")
2. Enable Optimize Mac Storage
- System Settings > Apple ID > iCloud > iCloud Drive
- Enable "Optimize Mac Storage"
- This prevents downloading all files locally
3. Temporarily Disable iCloud Drive
- System Settings > Apple ID > iCloud
- Uncheck iCloud Drive
- Complete Time Machine backup
- Re-enable iCloud Drive
4. Check Secondary User Accounts If you have multiple user accounts, log into each and wait for iCloud sync to complete.
Large iCloud Files Blocking Backup
Problem: ProRes videos or large files in iCloud continuously download, blocking backups.
Solution:
# Identify large files downloading
brctl log -w | grep download

# Remove specific file from iCloud download queue
# (Transfer large files directly to Mac Photos or external storage)
Part 7: Third-Party Software Conflicts
Antivirus Software Issues
Confirmed Problematic Software:
- Bitdefender: Blocks backupd process
- Norton 360: Interferes with network backup connections
- Sophos: May quarantine Time Machine components
- Avast: Real-time scanning conflicts
Bitdefender Specific Fix:
- Open Bitdefender Preferences
- Navigate to Protection > Firewall
- Add exception for
/System/Library/CoreServices/backupd.bundle - Navigate to Shield > Ransomware Remediation
- Add Time Machine backup destination to exceptions
- Restart Bitdefender
General Antivirus Solution:
# Temporarily disable antivirus for backup
# (Consult your antivirus documentation)

# Add these paths to exclusions:
# /System/Library/CoreServices/backupd.bundle
# /Volumes/[YourBackupDrive]
# ~/.Trash
CleanMyMac and Maintenance Apps
Some system maintenance apps can interfere with Time Machine:
Reset After CleanMyMac Issues:
- Open CleanMyMac > Preferences > Exclusions
- Add your Time Machine backup destination
- If backups still fail:
# Rebuild launch services database
/System/Library/Frameworks/CoreServices.framework/Frameworks/LaunchServices.framework/Support/lsregister -kill -r -domain local -domain system -domain user
Part 8: Terminal Commands Reference
Essential tmutil Commands
Backup Control:
# Start backup immediately
tmutil startbackup

# Start backup with block (wait for completion)
tmutil startbackup --block

# Start backup with rotation (cleans old backups)
tmutil startbackup --rotation

# Stop ongoing backup
tmutil stopbackup

# Enable Time Machine
sudo tmutil enable

# Disable Time Machine
sudo tmutil disable
Status and Information:
# Current backup status
tmutil status

# Destination information
tmutil destinationinfo

# List all backups
tmutil listbackups

# Latest backup path
tmutil latestbackup

# Current phase
tmutil currentphase

# Machine directory
tmutil machinedirectory
Snapshot Management:
# List local snapshots
tmutil listlocalsnapshots /

# Create snapshot
sudo tmutil localsnapshot

# Delete specific snapshot
sudo tmutil deletelocalsnapshots 2025-11-20-120000
Exclusions:
# Add exclusion
sudo tmutil addexclusion /path/to/exclude

# Add sticky exclusion (follows file)
sudo tmutil addexclusion -p /path/to/exclude

# Check if path is excluded
tmutil isexcluded /path/to/check

# Remove exclusion
sudo tmutil removeexclusion /path/to/include
Destination Management:
# Set destination (local)
sudo tmutil setdestination /Volumes/BackupDrive

# Add additional destination
sudo tmutil setdestination -a /Volumes/BackupDrive2

# Set network destination
sudo tmutil setdestination -a smb://user:pass@server/share

# Remove destination
sudo tmutil removedestination [destination_id]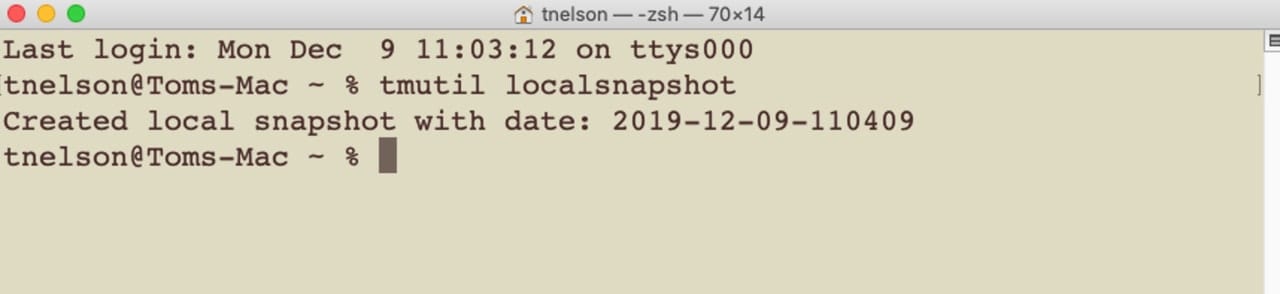
Advanced Diagnostic Commands
Compare Backups:
# Compare two backups
tmutil compare /Volumes/TimeMachine/Backups.backupdb/MacName/2025-11-20-120000 \
               /Volumes/TimeMachine/Backups.backupdb/MacName/2025-11-21-120000
Inherit Backup History:
# When migrating to new Mac
sudo tmutil inheritbackup /Volumes/TimeMachine/Backups.backupdb/OldMacName
Delete Old Backups:
# Delete specific backup (macOS Big Sur and later)
sudo tmutil delete -d /Volumes/Time\ Machine -t 2025-11-15-120000
Monitor Real-Time:
# Watch backup progress
while true; do clear; tmutil status; sleep 5; done
Part 9: Encryption and Security Issues
Encrypted Backup Problems
macOS Tahoe 26 enhanced Time Machine encryption, which can cause issues with existing encrypted backups.
"Disk Could Not Be Unlocked" Error
Symptoms:
- Time Machine asks for password but won't accept it
- Backup disk shows as locked in Finder
- Error: "The disk could not be unlocked with your password"
Solutions:
1. Reset Keychain Password Entry
# Open Keychain Access
# Search for "Time Machine"
# Delete any Time Machine-related entries
# Re-enter password when Time Machine prompts
2. Decrypt and Re-encrypt
- Open Disk Utility
- Select encrypted backup drive
- Click "File" > "Turn Off Encryption"
- Wait for decryption to complete (can take hours)
- Re-enable encryption: Right-click drive > "Encrypt [Drive Name]"
3. Use Recovery Mode
# Boot to Recovery Mode
# Open Terminal
# Mount the encrypted volume manually:
diskutil apfs unlockVolume disk2s1 -passphrase "YourPassword"
FileVault Compatibility
macOS Tahoe 26 FileVault can interact with Time Machine encryption in unexpected ways.
Issue: Time Machine backups fail when FileVault is enabled and using institutional recovery key
Solution:
- Verify FileVault status:
sudo fdesetup status - If using institutional key, ensure Time Machine has separate encryption
- Consider using personal recovery key instead of institutional
Encryption Performance
Problem: Encrypted backups are extremely slow
Explanation: Initial encryption of a large backup can take 24-72 hours depending on backup size and drive speed.
Optimization Tips:
-
Pre-encrypt the drive before first backup (much faster):
- Open Disk Utility
- Erase drive as "APFS (Encrypted)"
- This is significantly faster than encrypting after backup starts
-
Monitor encryption progress:
# Check encryption status
diskutil apfs list | grep -A5 "Encryption"- Don't interrupt encryption
- Keep Mac plugged in
- Don't put Mac to sleep
- Don't disconnect backup drive
Part 10: Restoring from Time Machine
Complete System Restore
When to Use: New Mac setup, disk failure, major system corruption
Apple Silicon Macs:
- Turn off Mac completely
- Press and hold power button until "Loading startup options" appears
- Click "Options" then "Continue"
- Select "Restore From Time Machine Backup"
- Choose your backup disk and select backup date
- Follow prompts to complete restore
Intel Macs:
- Restart Mac and hold Command+R
- In Recovery Mode, select "Restore From Time Machine Backup"
- Choose backup disk and backup date
- Follow prompts to complete restore
Selective File Recovery
Restore Individual Files:
- Click Time Machine icon in menu bar
- Select "Enter Time Machine"
- Navigate through timeline to find file version
- Select files and click "Restore"
Terminal-Based Recovery:
# List available backups
tmutil listbackups

# Mount specific backup for browsing
sudo tmutil mount /Volumes/TimeMachine/Backups.backupdb/MacName/2025-11-20-120000

# Copy files manually from mounted backup
cp -R /Volumes/.timemachine/[MountedBackup]/path/to/file ~/Desktop/
Restore to Different Mac
Migration Assistant Method:
- On new Mac, open Migration Assistant (Applications > Utilities)
- Select "From a Mac, Time Machine backup, or startup disk"
- Select Time Machine backup
- Choose what to transfer:
- Applications
- User accounts
- Other files and folders
- Computer & network settings
Inherit Backup History:
# Associate new Mac with old backup history
sudo tmutil inheritbackup /Volumes/TimeMachine/Backups.backupdb/OldMacName

# Verify association
tmutil destinationinfo
Verify Backup Integrity
Before relying on a backup for restore, verify its integrity:
# Basic verification
tmutil verifychecksums /Volumes/TimeMachine/Backups.backupdb/MacName/Latest

# Compare specific files
tmutil compare /Volumes/TimeMachine/Backups.backupdb/MacName/2025-11-20-120000/Users/username/Documents \
               ~/Documents

# Check backup disk health
diskutil verifyDisk /Volumes/TimeMachine
Test Restore Regularly:
- Quarterly: Restore random files to verify they open correctly
- Annually: Test full system restore on test partition or external drive
Part 11: Advanced Configuration
Multiple Backup Destinations
Time Machine supports multiple backup destinations for redundancy:
# Add second destination
sudo tmutil setdestination -a /Volumes/BackupDrive2

# View all destinations
tmutil destinationinfo

# List backup schedules
tmutil destinationinfo | grep -A10 "Destination"
Rotation Behavior:
- Time Machine alternates between destinations
- Each destination maintains independent backup history
- Use for on-site + off-site backup strategy
Custom Backup Scheduling
Using TimeMachineEditor (Free Third-Party Tool):
- Download TimeMachineEditor from the Mac App Store
- Set custom intervals (every 2 hours, daily, etc.)
- Configure backup windows (only during specific hours)
- Enable/disable Power Nap backups
Terminal-Based Scheduling:
# Disable automatic backups
sudo tmutil disable

# Create launchd plist for custom schedule
# Example: Backup at 2 AM daily
cat << 'EOF' | sudo tee /Library/LaunchDaemons/com.custom.timemachine.plist
<?xml version="1.0" encoding="UTF-8"?>
<!DOCTYPE plist PUBLIC "-//Apple//DTD PLIST 1.0//EN" "http://www.apple.com/DTDs/PropertyList-1.0.dtd">
<plist version="1.0">
<dict>
    <key>Label</key>
    <string>com.custom.timemachine</string>
    <key>ProgramArguments</key>
    <array>
        <string>/usr/bin/tmutil</string>
        <string>startbackup</string>
        <string>--rotation</string>
    </array>
    <key>StartCalendarInterval</key>
    <dict>
        <key>Hour</key>
        <integer>2</integer>
        <key>Minute</key>
        <integer>0</integer>
    </dict>
</dict>
</plist>
EOF

# Load the schedule
sudo launchctl load /Library/LaunchDaemons/com.custom.timemachine.plist
Network Bandwidth Throttling
For NAS backups over limited network connections:
# Throttle Time Machine network bandwidth (not officially supported)
# Use system-wide network throttling instead:

# Install Homebrew if not present
/bin/bash -c "$(curl -fsSL https://raw.githubusercontent.com/Homebrew/install/HEAD/install.sh)"

# Install bandwidth limiting tool
brew install throttled

# Or use built-in pfctl for traffic shaping
# (Advanced - requires firewall configuration)
Excluding System Files
Reduce backup size by excluding unnecessary system files:
# Add common exclusions
sudo tmutil addexclusion ~/Library/Caches
sudo tmutil addexclusion ~/Library/Logs
sudo tmutil addexclusion ~/.Trash
sudo tmutil addexclusion ~/Downloads

# Exclude development folders
sudo tmutil addexclusion ~/node_modules
sudo tmutil addexclusion ~/.npm
sudo tmutil addexclusion ~/.cargo
sudo tmutil addexclusion ~/Library/Developer/CoreSimulator

# Exclude virtual machines (back up separately)
sudo tmutil addexclusion ~/Virtual\ Machines
sudo tmutil addexclusion ~/.parallels

# View all exclusions
sudo mdfind "com_apple_backup_excludeItem = 'com.apple.backupd'"
Part 12: Troubleshooting Quick Reference
Error Message Reference Table
| Error Message | Cause | Solution |
|---|---|---|
| "Backup disk not available" | Drive disconnected or network issue | Check physical connection, verify network |
| "Backup is already in use" | Previous backup didn't complete | Delete .inProgress file |
| "Not enough space on backup disk" | Backup drive full | Use larger drive or delete old backups |
| "Disk could not be unlocked" | Encryption password issue | Reset keychain entry, re-enter password |
| "Network disk disconnected" | NAS/network configuration issue | Check SMB settings, remove special characters |
| "Could not create snapshot" | APFS snapshot failure | Delete old snapshots, check disk space |
| "Backup failed with error 45" | Permission issue | Reset permissions, check Full Disk Access |
| "Backup verification failed" | Corrupted backup data | Run fsck_hfs, verify and repair disk |
| "PKDownloadError error 3" | Software update conflict | Complete pending updates, retry |
| "An error occurred while copying files" | File permission or corruption | Identify problem files, add to exclusions |
| "The backup disk image could not be created" | NAS configuration issue | Check quota, permissions on NAS share |
| "Time Machine preferences error" | Corrupted preferences | Delete com.apple.TimeMachine.plist |
Quick Diagnostic Script
Create a diagnostic script to quickly identify issues:
#!/bin/bash
# Save as ~/tm_diagnose.sh and run: bash ~/tm_diagnose.sh

echo "=== Time Machine Diagnostic Report ==="
echo "Date: $(date)"
echo ""

echo "=== Time Machine Status ==="
tmutil status
echo ""

echo "=== Backup Destinations ==="
tmutil destinationinfo
echo ""

echo "=== Recent Backups ==="
tmutil listbackups | tail -5
echo ""

echo "=== Local Snapshots ==="
tmutil listlocalsnapshots /
echo ""

echo "=== Disk Space ==="
df -h / /Volumes/*
echo ""

echo "=== Recent Time Machine Errors ==="
log show --predicate 'subsystem == "com.apple.TimeMachine"' --info --last 1h | grep -i error | tail -20
echo ""

echo "=== Backup Exclusions Count ==="
sudo mdfind "com_apple_backup_excludeItem = 'com.apple.backupd'" | wc -l
echo ""

echo "=== Diagnostic complete ==="
Emergency Recovery Procedures
Cannot Boot Mac:
- Boot to Recovery Mode (Command+R on Intel, hold Power on Apple Silicon)
- If Recovery Mode fails, use Internet Recovery (Command+Option+R)
- Connect Time Machine drive
- Select "Restore From Time Machine Backup"
Corrupted Time Machine Drive:
# Attempt repair from Terminal in Recovery Mode
# First, identify disk
diskutil list

# Run First Aid
diskutil repairDisk /dev/disk2

# For APFS volumes
fsck_apfs -y /dev/disk2s1

# If repair fails, try data recovery tools
# (Disk Drill, Data Rescue - boot from external drive)
Lost All Backups:
- Check for cloud backups (Backblaze, iCloud, etc.)
- Check archive drives
- Use data recovery software on failed drive
- Contact professional data recovery service for critical data
Part 13: Third-Party Backup Solutions
When Time Machine continues to fail, consider these proven alternatives:
Carbon Copy Cloner
Price: $39.99 (one-time purchase)
Strengths:
- Creates bootable backups
- Network copy capability
- Comprehensive scheduling
- Excellent for NAS backups
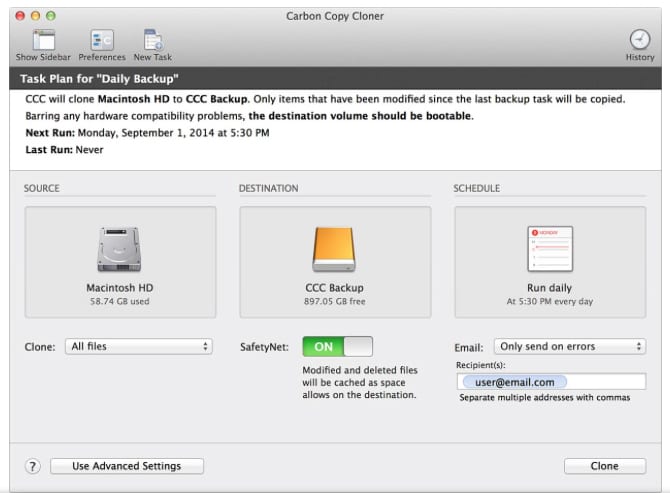
Best For: Users needing bootable clones and reliable network backups
SuperDuper!
Price: Free for basic cloning; paid for scheduling
Strengths:
- Free full clone capability
- Simple, focused interface
- Reliable and well-maintained
- Can be scripted
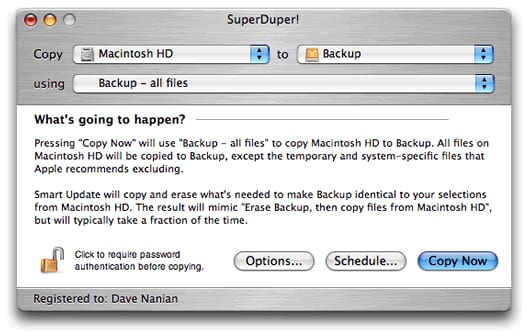
Best For: Users who need simple, reliable cloning
Backblaze
Price: $6/month (unlimited storage)
Strengths:
- Unlimited cloud backup
- Automatic background operation
- Physical drive recovery option
- No file size limits
Best For: Off-site backup protection
Recommended Backup Strategy
The 3-2-1 Rule:
- 3 copies of your data
- 2 different media types
- 1 copy off-site
Practical Implementation:
- Time Machine (hourly local backup)
- Carbon Copy Cloner (weekly bootable clone)
- Backblaze (continuous cloud backup)
Part 10: Prevention and Best Practices
Pre-Upgrade Checklist
Before upgrading to macOS Tahoe 26:
- Complete Full Backup: Ensure Time Machine backup is 100% complete
- Verify Backup: Boot from Time Machine in Recovery Mode to verify
- Check NAS Compatibility: Verify NAS firmware is updated
- Note Special Characters: Document any non-ASCII characters in Mac name
- Update Security Software: Update antivirus before upgrading
Ongoing Maintenance
Weekly:
- Check Time Machine status in menu bar
- Verify most recent backup date
- Monitor backup drive storage
Monthly:
# Verify backup integrity
tmutil verifychecksums [backup_path]

# Check backup disk health
diskutil verifyDisk /Volumes/[BackupDrive]
Quarterly:
- Test restore of random files
- Boot from backup (if using bootable clone)
- Review and update exclusions
Optimal Settings for Reliability
Time Machine Settings:
- System Settings > General > Time Machine
- Options > Back up frequency: Hourly (default)
- Enable "Back up automatically"
- Review exclusions regularly
Recommended Exclusions:
~/Library/Caches~/Downloads(if you store temporary files here)- Virtual machine files (back up separately)
node_modulesfolders (can be recreated)- Cloud sync folders (Dropbox, OneDrive, Google Drive)
Frequently Asked Questions
General Questions
Q: Is Time Machine still reliable on macOS Tahoe 26?
A: Yes, Time Machine remains reliable when properly configured. The main issues stem from NAS compatibility changes and third-party software conflicts. Most problems are resolved by updating NAS firmware to support SMB3 and removing non-ASCII characters from backup names.
Q: How much storage do I need for Time Machine backups?
A: Apple recommends at least 2x your Mac's internal storage, but 3x is ideal. For a 512GB Mac, use a 1TB or larger backup drive. This provides ample room for multiple backup versions and future growth.
Q: Can I use the same drive for Time Machine and file storage?
A: Yes, but it's not recommended. Time Machine will consume available space over time, potentially leaving no room for other files. If you must share a drive, partition it separately for Time Machine and file storage.
Q: Does Time Machine back up iCloud Drive files?
A: Time Machine backs up local copies of iCloud Drive files. If you use "Optimize Mac Storage," only downloaded files are backed up. For complete backup of iCloud content, ensure important files are downloaded locally or use a separate cloud backup service.
NAS-Specific Questions
Q: Why did my NAS backups stop working after upgrading to Tahoe?
A: The most common causes are: (1) Non-ASCII characters in Mac name or backup volume, (2) NAS using SMB1/SMB2 instead of SMB3, (3) Firewall blocking network connections. Check all three in the troubleshooting sections above.
Q: Which NAS brands work best with macOS Tahoe 26?
A: Synology and QNAP have the best compatibility when configured correctly. Both brands regularly update their DSM/QTS software for macOS compatibility. Ensure your NAS firmware is current and SMB3 is enabled.
Q: Can I continue using AFP for Time Machine?
A: AFP is deprecated and no longer recommended. While some existing AFP setups may still work, Apple has ceased AFP development. Convert to SMB3 for best compatibility and future support.
Troubleshooting Questions
Q: How do I know if my Time Machine backup is corrupted?
A: Signs of corruption include: inability to browse backups in Time Machine interface, error messages during restore, files appearing damaged after restoration, and Disk Utility reporting errors on the backup volume.
Q: Why does Time Machine say "Preparing backup" for hours?
A: Extended preparing time indicates issues with creating APFS snapshots, scanning large file changes, or previous backup interruption. See Part 3 of this guide for detailed solutions including deleting .inProgress files and clearing local snapshots.
Q: Should I encrypt my Time Machine backup?
A: Yes, encryption is recommended, especially for portable backup drives. Encryption protects your data if the drive is lost or stolen. Enable encryption when first setting up the backup destination for best performance.
Alternative Backup Questions
Q: Should I use Time Machine alongside other backup software?
A: Yes, following the 3-2-1 backup rule is recommended. Use Time Machine for hourly local backups, a cloning tool like Carbon Copy Cloner for bootable backups, and a cloud service like Backblaze for off-site protection.
Q: Can Carbon Copy Cloner back up to my NAS if Time Machine fails?
A: Yes, Carbon Copy Cloner often works more reliably with NAS devices than Time Machine. It supports multiple network protocols and provides more detailed error reporting for troubleshooting.
Conclusion: Mastering Time Machine on macOS Tahoe 26
Time Machine on macOS Tahoe 26 requires more attention than previous versions, but with proper configuration and understanding, it remains a reliable backup solution. The key challenges—NAS compatibility, APFS snapshot management, and third-party software conflicts—all have proven solutions.
Key Takeaways:
- NAS Users: Update firmware, configure SMB3, remove non-ASCII characters from backup names
- External Drive Users: Format as APFS, use quality cables, prevent drive sleep
- All Users: Disable antivirus interference, monitor iCloud sync status, maintain free disk space
- Power Users: Master tmutil commands for advanced diagnostics and control
For persistent issues, consider supplementing Time Machine with Carbon Copy Cloner or SuperDuper for bootable backups, and Backblaze for cloud protection. The 3-2-1 backup strategy remains the gold standard for data protection.
Related Resources:
- External Storage & Backup Complete Guide - Advanced storage configurations and backup strategies
- General Troubleshooting Guide - Solutions for other macOS Tahoe issues
- Storage Management Guide - Optimize disk space and manage system data