macOS Tahoe 26.3 External Drive Not Mounting: Complete Fix Guide for the Ghost Drive Bug
Fix the macOS Tahoe 26.3 Ghost Drive bug where external USB-C, USB-A, and Thunderbolt drives fail to mount. Step-by-step solutions using diskutil, encryption fixes, and workarounds.
After Apple released macOS Tahoe 26.3 on February 11, 2026, thousands of Mac users discovered that their previously reliable external drives had become invisible. Drives that worked perfectly the day before the update now refuse to mount in Finder, appear as phantom entries in Disk Utility, or eject themselves without warning seconds after connecting. The tech press has dubbed this widespread failure "The Ghost Drive Problem," and it has left professionals, content creators, and everyday Mac users scrambling for solutions while Apple remains publicly silent.
This guide provides every known fix, workaround, and diagnostic technique for the macOS Tahoe 26.3 external drive mounting bug. Whether you use USB-A, USB-C, Thunderbolt, or SD card storage, you will find actionable steps to get your drives working again.
Key Takeaways
- macOS Tahoe 26.3 introduced a widespread external drive mounting failure affecting USB-A, USB-C, Thunderbolt, and SD card readers across all Apple Silicon and Intel Macs.
- Three root causes have been identified: third-party encryption software conflicts (Samsung, LaCie/Seagate bundled utilities), APFS snapshot corruption during the update process, and changes to USB power management in the 26.3 kernel.
- The most effective immediate fix is using Terminal commands (
diskutil listanddiskutil mount) to force-mount drives that the system detects but refuses to mount automatically. - Removing or disabling third-party encryption software (Samsung Portable SSD Software, LaCie Toolkit, Seagate Toolkit) resolves the issue for a significant number of affected users.
- Apple has acknowledged the bug indirectly in the macOS 26.4 beta 1 release notes, listing HFS external media mounting failures as a Known Issue. A fix reportedly landed in macOS 26.4 beta 2.
- Your data is safe in most cases -- the drives are not corrupted; macOS simply cannot communicate with the mount subsystem properly after the 26.3 update.
Understanding the Ghost Drive Bug: What Exactly Is Happening
The Three Symptoms
The macOS Tahoe 26.3 Ghost Drive bug manifests in three distinct ways, and understanding which symptom you are experiencing is critical for selecting the correct fix.
Symptom 1: Complete Mounting Failure
The drive does not appear in Finder at all. The desktop shows no drive icon. Finder's sidebar shows no external volume. However, the drive may still appear in System Information under USB or Thunderbolt, confirming that the hardware connection is functional but the software layer has failed.
Symptom 2: The Phantom Drive (Disk Utility Visibility Without Finder Access)
The drive appears in Disk Utility's sidebar as a recognized device. You can see its capacity, partition scheme, and format type. However, it shows as "unmounted" or "grayed out," and clicking the Mount button either does nothing, produces a brief spinning indicator before reverting to unmounted status, or throws an error code such as -69842 or -69845.
Symptom 3: The Auto-Eject Loop
The drive mounts successfully and appears in Finder for a brief period -- typically 5 to 30 seconds -- before being ejected without warning. No "disk not ejected properly" notification appears. The drive simply vanishes from the desktop and Finder sidebar. Reconnecting the drive repeats the cycle.
Which Drives Are Affected
Reports from AppleInsider, MacRumors forums, and the Apple Community thread (256153505) confirm that the Ghost Drive bug is not limited to any single drive type, manufacturer, or connection interface. Affected configurations include:
| Drive Type | Connection | File System | Confirmed Affected |
|---|---|---|---|
| Samsung T7/T9 Portable SSD | USB-C | exFAT, APFS | Yes |
| WD My Passport | USB-A, USB-C | HFS+, exFAT | Yes |
| LaCie Rugged | USB-C, Thunderbolt | HFS+, APFS | Yes |
| Seagate Backup Plus | USB-A | HFS+ | Yes |
| SanDisk Extreme Portable | USB-C | exFAT | Yes |
| OWC Envoy Pro | Thunderbolt 3/4 | APFS | Yes |
| CalDigit TS4 Hub Drives | Thunderbolt 4 | Mixed | Yes |
| Generic USB-A Flash Drives | USB-A | FAT32, exFAT | Intermittent |
| SD/microSD Cards | SD Slot, USB Reader | exFAT, FAT32 | Yes |
| Apple USB SuperDrive | USB-A (via adapter) | N/A (optical) | Not affected |
If your drive was working before the macOS 26.3 update and stopped working after, the update is almost certainly the cause, regardless of your specific hardware configuration.
Root Causes: Why This Is Happening
Community investigation, led in part by the AppleInsider editorial team, has identified three distinct root causes that contribute to the Ghost Drive bug. Many affected users are experiencing a combination of these issues simultaneously.
Root Cause 1: Third-Party Encryption Software Conflicts
Samsung, LaCie, and Seagate ship their portable drives with bundled encryption and management software. These utilities install kernel extensions or system extensions that intercept the drive mounting process. The macOS 26.3 update changed how the system handles these interception points, causing the encryption software to block the mount operation entirely.
Affected software includes:
- Samsung Portable SSD Software (versions prior to 3.0)
- LaCie Toolkit (all versions as of February 2026)
- Seagate Toolkit (all versions as of February 2026)
- SanDisk SecureAccess (older versions)
Root Cause 2: APFS Snapshot Corruption During Update
The macOS 26.3 update process creates and manipulates APFS snapshots on connected drives. In some cases, the update left behind corrupted or incomplete snapshots that prevent the APFS driver from mounting the volume. This particularly affects drives that were connected during the macOS update process.
Root Cause 3: USB Power Management Changes
macOS 26.3 introduced changes to the IOKit USB power management subsystem. These changes alter how the system negotiates power delivery with USB-connected devices, particularly over USB-C connections. Drives that require more power than the new default allocation may fail to initialize properly, leading to mounting failures or the auto-eject loop behavior.
Diagnostic Flowchart: Identify Your Specific Problem
Before applying fixes, use this diagnostic flowchart to determine exactly what is going wrong with your drive. This will save you time by directing you to the most relevant solution.
START: External drive not working after macOS 26.3 update
│
├─ Q1: Does the drive appear in System Information?
│  │   (Apple Menu > About This Mac > System Report > USB/Thunderbolt)
│  │
│  ├─ NO → Hardware/Connection Issue
│  │  │
│  │  ├─ Try a different cable
│  │  ├─ Try a different port
│  │  ├─ Try a different Mac (if available)
│  │  └─ If still not detected → Drive hardware failure (not related to 26.3 bug)
│  │
│  └─ YES → Software/Driver Issue (Ghost Drive Bug confirmed)
│     │
│     ├─ Q2: Does the drive appear in Disk Utility?
│     │  │
│     │  ├─ NO → Mount subsystem failure
│     │  │  └─ Go to: Fix 1 (Terminal Force Mount)
│     │  │
│     │  └─ YES → Q3: Can you click "Mount" in Disk Utility?
│     │     │
│     │     ├─ Mount succeeds → Check Finder sidebar settings
│     │     │  └─ Finder > Settings > Sidebar > Enable "External disks"
│     │     │
│     │     ├─ Mount fails with error → Q4: What is the error code?
│     │     │  │
│     │     │  ├─ Error -69842 → APFS snapshot corruption
│     │     │  │  └─ Go to: Fix 4 (APFS Snapshot Repair)
│     │     │  │
│     │     │  ├─ Error -69845 → Encryption conflict
│     │     │  │  └─ Go to: Fix 2 (Remove Encryption Software)
│     │     │  │
│     │     │  ├─ Error -69877 → File system verification failed
│     │     │  │  └─ Go to: Fix 5 (First Aid and fsck)
│     │     │  │
│     │     │  └─ Other/no error → Go to: Fix 1 (Terminal Force Mount)
│     │     │
│     │     └─ Mount succeeds but drive auto-ejects
│     │        └─ Go to: Fix 3 (USB Power Management Reset)
│
└─ ADDITIONAL: Is third-party drive software installed?
   │  (Samsung Portable SSD Software, LaCie Toolkit, Seagate Toolkit)
   │
   ├─ YES → Go to: Fix 2 FIRST (Remove Encryption Software)
   └─ NO → Continue with Fix 1
Fix 1: Force-Mount Using Terminal (Works for Most Users)
This is the single most effective workaround for the Ghost Drive bug. Even when macOS refuses to mount a drive through Finder or Disk Utility, the diskutil command-line tool can often force a successful mount.
Step 1: Open Terminal
Launch Terminal from one of these locations:
- Applications > Utilities > Terminal
- Spotlight (Cmd+Space, type "Terminal")
- Launchpad > Other > Terminal
Step 2: List All Connected Drives
diskutil listThis command displays every disk the system can detect, including internal drives and all connected external devices. Look for your external drive in the output.
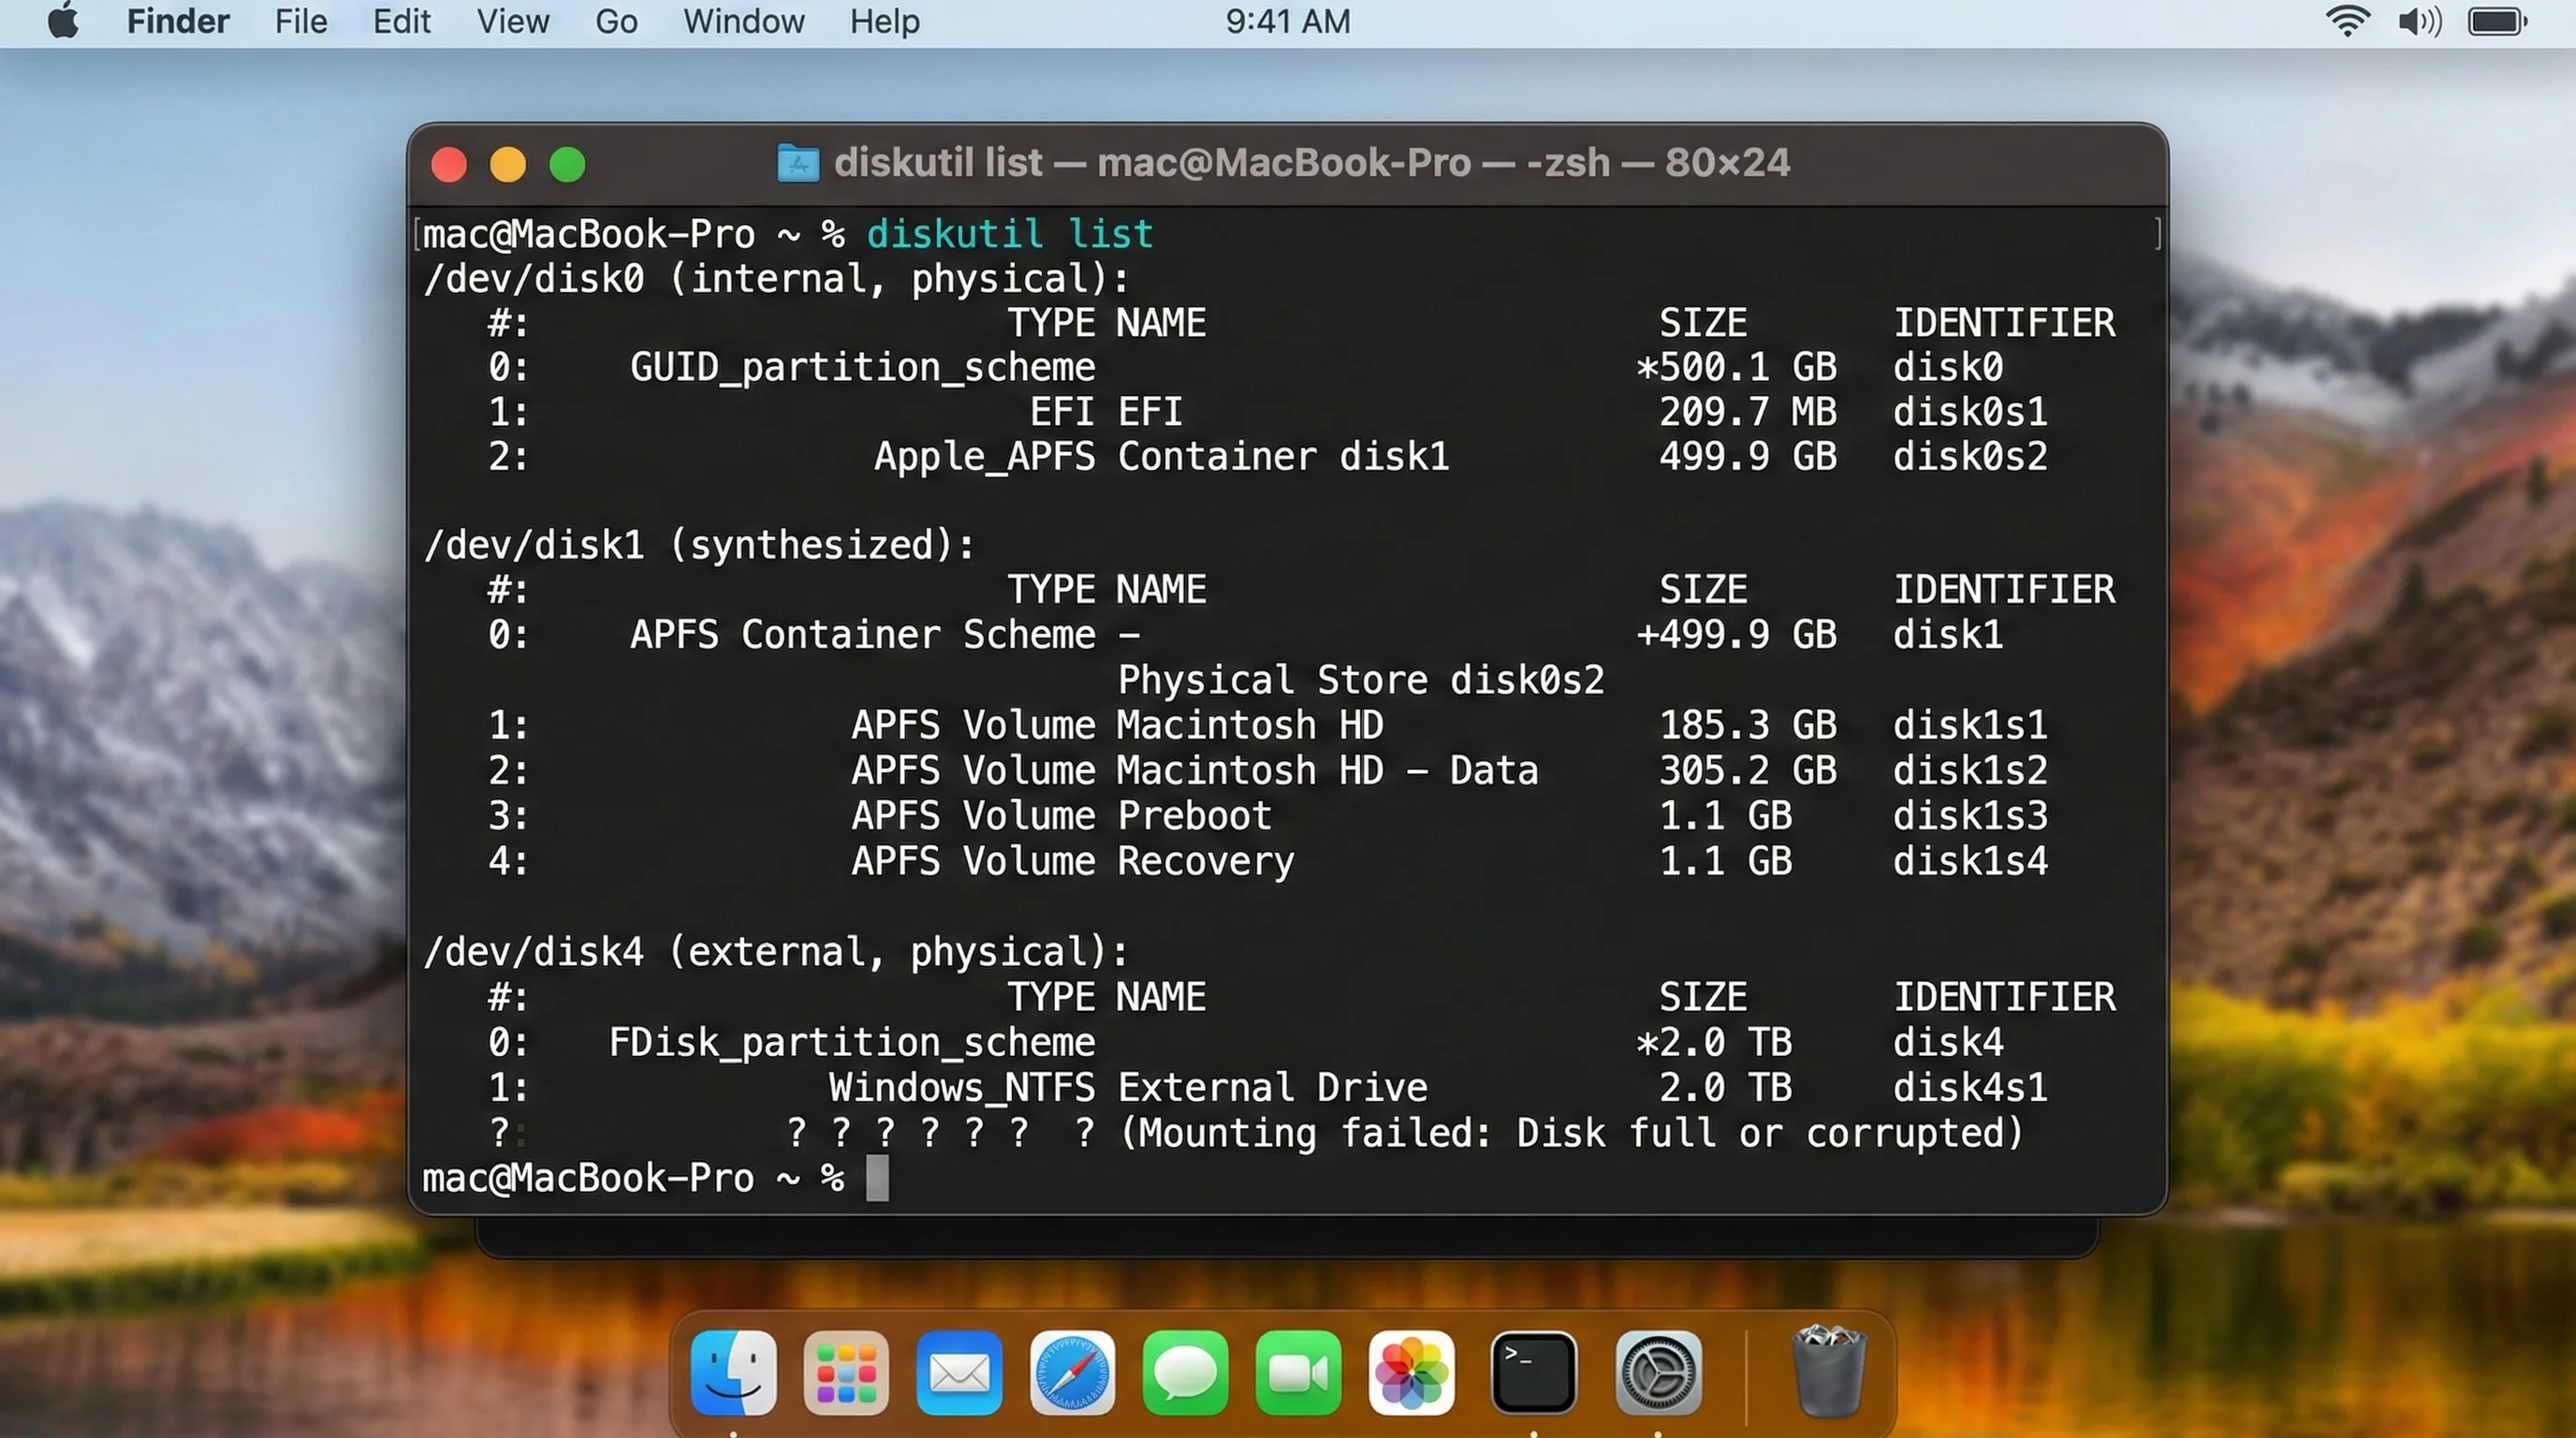
Example output:
/dev/disk0 (internal):
   #:                       TYPE NAME                    SIZE       IDENTIFIER
   0:      GUID_partition_scheme                        *500.1 GB   disk0
   1:             Apple_APFS_ISC Container disk1         524.3 MB   disk0s1
   2:                 Apple_APFS Container disk3         494.4 GB   disk0s2
   3:        Apple_APFS_Recovery Container disk2         5.4 GB     disk0s3

/dev/disk4 (external, physical):
   #:                       TYPE NAME                    SIZE       IDENTIFIER
   0:      GUID_partition_scheme                        *2.0 TB     disk4
   1:                 Apple_APFS Container disk5         2.0 TB     disk4s1

/dev/disk5 (synthesized):
   #:                       TYPE NAME                    SIZE       IDENTIFIER
   0:      APFS Container Scheme -                      +2.0 TB     disk5
   1:                APFS Volume Backup Drive            1.2 TB     disk5s1
In this example, disk4 is the external physical drive and disk5s1 is the APFS volume you want to mount.
Important identification tips:
- External drives are labeled
(external, physical)or(external) - Look for the correct capacity matching your drive
- Note both the physical disk identifier (e.g.,
disk4) and the volume identifier (e.g.,disk5s1)
Step 3: Attempt to Mount the Drive
To mount a specific volume:
diskutil mount /dev/disk5s1Replace disk5s1 with your actual volume identifier from the diskutil list output.
To mount all volumes on a physical disk:
diskutil mountDisk /dev/disk4Replace disk4 with your external drive's physical disk identifier.
Expected success output:
Volume Backup Drive on disk5s1 mountedStep 4: If Standard Mount Fails, Try Force Mount
If the regular mount command fails, try the force option:
sudo diskutil mount force /dev/disk5s1You will be prompted to enter your administrator password. This command bypasses some of the checks that are failing in macOS 26.3.
Step 5: Verify the Mount
After a successful mount, verify the drive is accessible:
ls /Volumes/Your drive name should appear in the list. You can also check Finder -- the drive should now appear in the sidebar and on the desktop.
Step 6: Create an Automated Mount Script (Optional)
If you need to reconnect this drive regularly until Apple releases a fix, create a simple shell script:
#!/bin/bash
# Ghost Drive Auto-Mount Script for macOS 26.3
# Save as: ~/mount-external.sh
# Usage: bash ~/mount-external.sh

echo "Scanning for unmounted external drives..."
diskutil list external

echo ""
echo "Attempting to mount all external volumes..."

# Get all external disk identifiers
for disk in $(diskutil list external | grep "disk[0-9]" | awk '{print $NF}' | sort -u); do
    echo "Mounting /dev/$disk..."
    diskutil mountDisk /dev/$disk 2>/dev/null
done

echo ""
echo "Currently mounted volumes:"
ls /Volumes/
echo ""
echo "Done. If your drive is still not mounted, try:"
echo "  sudo diskutil mount force /dev/diskXsY"
Save this script and run it with bash ~/mount-external.sh whenever you connect an external drive.
Fix 2: Remove or Disable Third-Party Encryption Software
If you have Samsung, LaCie, or Seagate drive management software installed, this fix should be your first step before trying anything else. These bundled utilities are the single most common cause of the Ghost Drive bug.
Identify Installed Drive Software
Check for the following applications in your Applications folder or via Terminal:
# Check for Samsung Portable SSD Software
ls /Applications/Samsung\ Portable\ SSD* 2>/dev/null && echo "FOUND: Samsung SSD Software" || echo "Not found: Samsung SSD Software"

# Check for LaCie Toolkit
ls /Applications/LaCie\ Toolkit* 2>/dev/null && echo "FOUND: LaCie Toolkit" || echo "Not found: LaCie Toolkit"

# Check for Seagate Toolkit
ls /Applications/Seagate\ Toolkit* 2>/dev/null && echo "FOUND: Seagate Toolkit" || echo "Not found: Seagate Toolkit"

# Check for SanDisk SecureAccess
ls /Applications/SanDisk\ SecureAccess* 2>/dev/null && echo "FOUND: SanDisk SecureAccess" || echo "Not found: SanDisk SecureAccess"
Check for Related System Extensions
systemextensionsctl listLook for entries from Samsung, Seagate, or LaCie. Any active system extensions from these vendors could be interfering with the mount process.
Remove Samsung Portable SSD Software
- Open Finder and navigate to Applications
- Locate Samsung Portable SSD and drag it to the Trash
- Open Terminal and remove residual files:
# Remove Samsung SSD kernel extension (if present)
sudo kextunload -b com.samsung.driver.PortableSSD 2>/dev/null

# Remove Samsung system extension data
sudo rm -rf /Library/Application\ Support/Samsung/
rm -rf ~/Library/Application\ Support/Samsung/

# Remove Samsung launch agents
rm -f ~/Library/LaunchAgents/com.samsung.portablessd*
sudo rm -f /Library/LaunchDaemons/com.samsung.portablessd*- Restart your Mac
- Connect your external drive -- it should now mount normally
Remove LaCie/Seagate Toolkit
- Open LaCie Toolkit or Seagate Toolkit
- Go to the app's Settings or Preferences
- Look for an Uninstall option (some versions include one)
- If no uninstaller exists, drag the app to Trash and clean up manually:
# Remove Seagate/LaCie toolkit files
sudo rm -rf /Library/Application\ Support/Seagate/
sudo rm -rf /Library/Application\ Support/LaCie/
rm -rf ~/Library/Application\ Support/Seagate/
rm -rf ~/Library/Application\ Support/LaCie/

# Remove launch agents and daemons
rm -f ~/Library/LaunchAgents/com.seagate.*
rm -f ~/Library/LaunchAgents/com.lacie.*
sudo rm -f /Library/LaunchDaemons/com.seagate.*
sudo rm -f /Library/LaunchDaemons/com.lacie.*

# Unload any running system extensions
sudo systemextensionsctl uninstall com.seagate.toolkit 2>/dev/null
sudo systemextensionsctl uninstall com.lacie.toolkit 2>/dev/null- Restart your Mac
- Reconnect your drive
Important Note About Encrypted Drives
If your drive was encrypted using Samsung or Seagate's proprietary encryption (not Apple's built-in FileVault/APFS encryption), you will need to decrypt the drive before removing the software. To do this:
- Find another Mac running macOS 26.2 or earlier, or a Windows PC
- Connect the drive and use the manufacturer's software to decrypt it
- Once decrypted, remove the software from your macOS 26.3 Mac
- Reconnect the drive -- it should mount normally
- If you want encryption, use macOS's built-in APFS encryption instead (see Fix 7)
Fix 3: Reset USB Power Management
If your drive connects briefly and then ejects (Symptom 3: The Auto-Eject Loop), the issue is likely related to the USB power management changes in macOS 26.3.
Step 1: Check Current Power Settings
pmset -gLook for the sleep and disksleep values. macOS 26.3 may have changed these to aggressive power-saving defaults.
Step 2: Prevent Disk Sleep
sudo pmset -a disksleep 0This prevents macOS from putting external drives to sleep. A value of 0 disables disk sleep entirely.
Step 3: Disable USB Selective Suspend (Apple Silicon Macs)
On Apple Silicon Macs, you can prevent aggressive USB power cycling:
sudo pmset -a hibernatemode 0
sudo pmset -a standby 0
sudo pmset -a powernap 0
These commands prevent the Mac from entering deep sleep states that can disconnect USB devices.
Step 4: Reset the SMC (Intel Macs Only)
If you are on an Intel-based Mac, resetting the System Management Controller can resolve USB power delivery issues:
MacBook with T2 chip:
- Shut down your Mac
- Press and hold Control + Option + Shift (left side) for 7 seconds
- While holding those keys, also press and hold the Power button
- Hold all four keys for another 7 seconds
- Release all keys, wait a few seconds, then press the Power button to start up
Desktop Mac (iMac, Mac Pro, Mac mini) with T2 chip:
- Shut down your Mac
- Unplug the power cord
- Wait 15 seconds
- Plug the power cord back in
- Wait 5 seconds, then press the Power button
Step 5: Reset NVRAM/PRAM
For both Intel and Apple Silicon Macs, resetting NVRAM can resolve hardware communication issues:
Intel Mac:
- Shut down your Mac
- Turn it on and immediately press and hold Option + Command + P + R
- Hold for about 20 seconds (you may hear a startup sound)
- Release the keys
Apple Silicon Mac: NVRAM is automatically reset during a normal restart on Apple Silicon Macs, but you can force it:
- Shut down your Mac completely
- Wait 30 seconds
- Start up your Mac
Step 6: Verify Power Delivery
After completing the power management reset, check that your USB ports are delivering adequate power:
system_profiler SPUSBDataTypeLook for your drive in the output. Check the Current Available (mA) value. If it shows a value lower than your drive requires (most portable SSDs need at least 900mA), the power management changes are likely the cause.
If the available current is too low, try:
- Connecting the drive directly to the Mac (not through a hub)
- Using a powered USB hub
- Using a different USB-C port (the ports closest to the power connection on MacBooks often deliver more power)
Fix 4: Repair APFS Snapshot Corruption
If Disk Utility shows error -69842 when attempting to mount your drive, corrupted APFS snapshots from the macOS 26.3 update process are the likely cause.
Step 1: List APFS Snapshots
diskutil apfs listSnapshots /dev/disk5s1Replace disk5s1 with your volume identifier. This shows all snapshots on the volume.
Example output showing a problematic snapshot:
Snapshots for disk5s1:
+-- 4E2A6B8C-1234-5678-9ABC-DEF012345678
|   Name:    com.apple.os.update-ABC123DEF456
|   XID:     1847263
|   Tag:     com.apple.os.update
|   Created: 2026-02-11 10:23:45
Snapshots with the tag com.apple.os.update that were created around the date of the macOS 26.3 update (February 11, 2026) are the most likely culprits.
Step 2: Delete Corrupted Snapshots
sudo diskutil apfs deleteSnapshot /dev/disk5s1 -uuid 4E2A6B8C-1234-5678-9ABC-DEF012345678Replace the UUID with the actual snapshot UUID from the previous command's output.
Step 3: If You Cannot Delete Snapshots, Try Recovery Mode
- Shut down your Mac
- Apple Silicon: Press and hold the Power button until you see "Loading startup options"
- Intel: Restart and hold Command + R until you see the Apple logo
- Select Disk Utility from the recovery options
- Select your external drive from the sidebar
- Click First Aid and let it complete
- If First Aid succeeds, try mounting the drive
Step 4: Alternative APFS Repair via Terminal in Recovery Mode
If First Aid does not resolve the snapshot corruption, open Terminal from the Recovery Mode menu bar (Utilities > Terminal) and run:
# List all APFS containers
diskutil apfs list

# Run a comprehensive check on the container
diskutil apfs verifyVolume /dev/disk5s1

# If verification finds errors, attempt repair
diskutil apfs repairVolume /dev/disk5s1
Fix 5: Run First Aid and File System Check (fsck)
This fix addresses general file system corruption that may have been introduced or exposed by the macOS 26.3 update.
Step 1: Run First Aid in Disk Utility
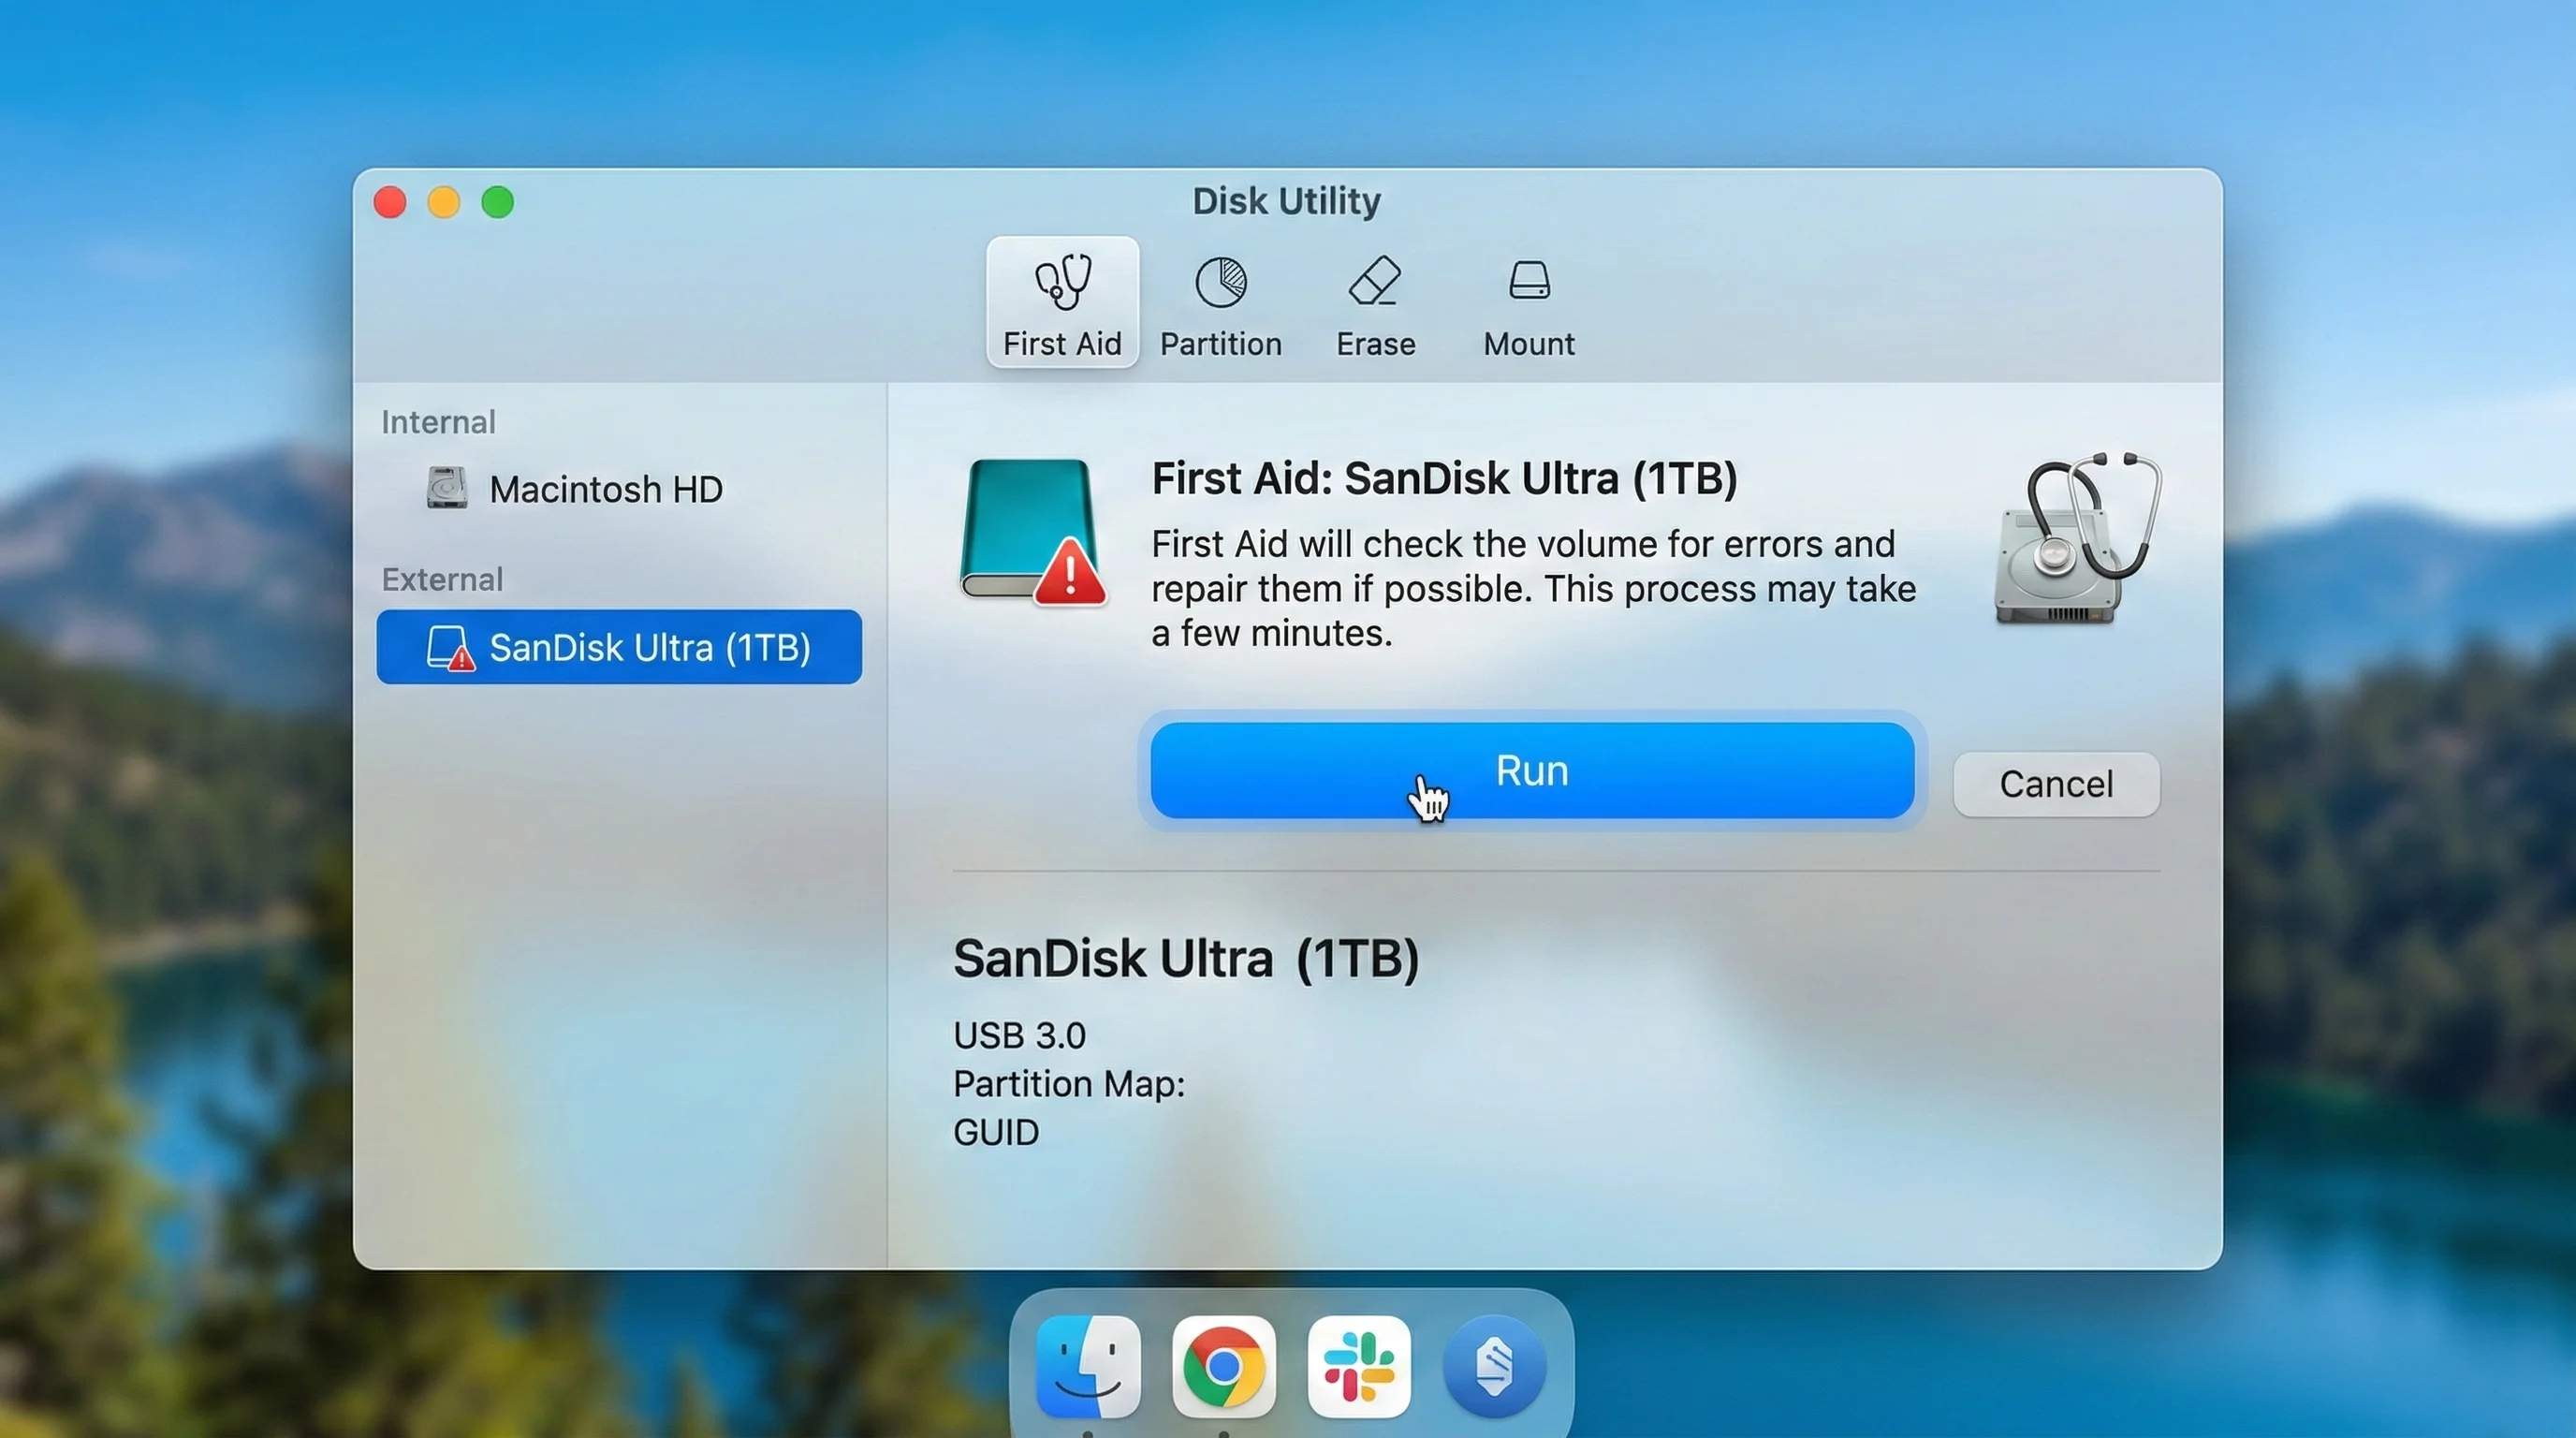
- Open Disk Utility (Applications > Utilities > Disk Utility)
- Select your external drive from the sidebar (select the physical drive, not just a volume)
- Click First Aid in the toolbar
- Click Run to begin the check
- Wait for the process to complete
If First Aid reports that it found and repaired errors, try mounting the drive. If it reports that it cannot repair the disk, proceed to the Terminal-based repair.
Step 2: Terminal-Based File System Check
For HFS+ formatted drives:
sudo fsck_hfs -fy /dev/disk4s1For APFS formatted drives:
sudo fsck_apfs -y /dev/disk5s1For exFAT formatted drives:
sudo fsck_exfat -y /dev/disk4s1Understanding the flags:
-f: Force the check even if the file system appears clean-y: Automatically attempt to repair any issues found
Important: Replace the disk identifiers with your actual drive identifiers from diskutil list.
Step 3: Verify and Repair the Disk Partition Map
If individual volume repairs fail, check the partition map of the entire physical disk:
sudo diskutil verifyDisk /dev/disk4If errors are found:
sudo diskutil repairDisk /dev/disk4Step 4: Attempt Mount After Repair
diskutil mount /dev/disk5s1If the mount succeeds, your drive should now appear in Finder.
Fix 6: Boot in Safe Mode
Safe Mode disables third-party kernel extensions, system extensions, and startup items, which can help identify whether the Ghost Drive bug is caused by software conflicts.
How to Boot in Safe Mode
Apple Silicon Mac (M1, M2, M3, M4, M5):
- Shut down your Mac completely
- Press and hold the Power button until you see "Loading startup options"
- Select your startup disk
- Press and hold Shift, then click Continue in Safe Mode
Intel Mac:
- Shut down your Mac
- Turn on your Mac and immediately press and hold the Shift key
- Release Shift when you see the login window
Test Your Drive in Safe Mode
- Once in Safe Mode, connect your external drive
- Check if it mounts normally in Finder
- If it does mount, the issue is caused by a third-party extension or startup item
If the Drive Works in Safe Mode
If your drive mounts successfully in Safe Mode, the culprit is almost certainly third-party software. Follow these steps:
- Note which third-party extensions are listed:
systemextensionsctl list- Restart normally (without Safe Mode)
- Systematically disable third-party extensions until you identify the conflicting one
- Contact the software vendor for an update compatible with macOS 26.3
If the Drive Does NOT Work in Safe Mode
If the drive still fails to mount in Safe Mode, the issue is at the macOS system level. Proceed to Fix 7 (Reformat the Drive) or wait for the macOS 26.4 update.
Fix 7: Reformat the Drive (Last Resort for Unmountable Drives)
WARNING: This fix erases all data on the drive. Only use this as a last resort, and only after you have exhausted all other options and confirmed that your data is backed up or recoverable.
If no other fix works and you need the drive functional immediately, reformatting it with macOS's native tools (bypassing the problematic third-party encryption and file system layers) can restore full functionality.
Step 1: Back Up Your Data (If Possible)
If you can mount the drive on another Mac or computer:
- Connect the drive to a Mac running macOS 26.2 or earlier, or a Windows/Linux PC
- Copy all important data to another storage location
- Verify the backup is complete
If you cannot access the data at all, consider using a data recovery service before reformatting.
Step 2: Reformat via Disk Utility
- Open Disk Utility
- Click View > Show All Devices to see physical disks
- Select the physical disk (not a volume) in the sidebar
- Click Erase
- Configure the format:
| Setting | Recommended Value | Notes |
|---|---|---|
| Name | Your preferred name | e.g., "External SSD" |
| Format | APFS | Best for SSDs on Mac-only workflows |
| Format | exFAT | Best for cross-platform compatibility (Mac + Windows) |
| Format | Mac OS Extended (Journaled) | Legacy option for HDDs; avoid for SSDs |
| Scheme | GUID Partition Map | Required for modern Macs |
- Click Erase and wait for the process to complete
Step 3: Reformat via Terminal (Alternative)
# For APFS format (recommended for SSDs)
diskutil eraseDisk APFS "External SSD" GPT /dev/disk4

# For exFAT format (cross-platform)
diskutil eraseDisk ExFAT "External Drive" GPT /dev/disk4

# For HFS+ format (legacy Mac)
diskutil eraseDisk JHFS+ "External HDD" GPT /dev/disk4
Step 4: Enable Apple's Built-In Encryption (Optional)
Instead of using Samsung or Seagate's proprietary encryption, use Apple's native APFS encryption:
diskutil apfs encryptVolume /dev/disk5s1 -user diskYou will be prompted to create a password. This encryption is fully compatible with macOS 26.3 and does not require third-party software.
Alternatively, in Finder:
- Right-click the mounted drive
- Select Encrypt [Drive Name]
- Set a password and hint
- Wait for encryption to complete (this can take hours for large drives)
Fix 8: Grant Full Disk Access to Terminal
macOS Tahoe 26.3 has tightened security permissions, and in some cases, Terminal commands fail because the shell does not have permission to interact with the drive mounting subsystem.
Grant Full Disk Access
- Open System Settings
- Navigate to Privacy & Security > Full Disk Access
- Click the + button
- Navigate to
/Applications/Utilities/and select Terminal - If prompted, authenticate with your administrator password
- Restart Terminal
Also Add /bin/bash (If Using Scripts)
Community reports indicate that adding /bin/bash to Full Disk Access can resolve cases where mount commands work interactively but fail when run from scripts:
- In the Full Disk Access panel, click +
- Press Command + Shift + G to open the "Go to Folder" dialog
- Type
/bin/bashand press Enter - Select
bashand click Open
After granting these permissions, retry your diskutil mount commands.
Fix 9: Check and Update Drive Firmware
Some external drive manufacturers have released firmware updates to address compatibility with macOS 26.3. Check for updates from your drive manufacturer:
Samsung Portable SSD Firmware
- Visit Samsung's SSD support page
- Download the latest firmware update tool for your model (T7, T9, etc.)
- Note: Samsung's firmware tool may need to be run on a Windows PC or another Mac
Western Digital / SanDisk Firmware
- Download the WD Dashboard utility
- Connect your drive and check for firmware updates
- Install any available updates
Seagate / LaCie Firmware
- Download Seagate's firmware update utility
- Run the update with the drive connected
- Restart after the update completes
OWC Drive Firmware
- Visit the OWC support page for your specific drive model
- Download and install the latest firmware
After updating firmware, restart your Mac and reconnect the drive.
Fix 10: Create a New APFS Container (For Persistent APFS Issues)
If your APFS-formatted drive continues to exhibit the Ghost Drive behavior even after snapshot repair, creating a fresh APFS container can resolve deeply embedded corruption.
WARNING: This erases all data on the drive.
# Step 1: Identify the physical disk
diskutil list external

# Step 2: Erase the disk and create a new GUID partition table
sudo diskutil eraseDisk Free\ Space Untitled GPT /dev/disk4

# Step 3: Create a new APFS container
sudo diskutil apfs createContainer /dev/disk4

# Step 4: Add a new APFS volume to the container
sudo diskutil apfs addVolume disk5 APFS "My External Drive"
This creates a completely fresh APFS structure that is not tainted by any remnants of the pre-26.3 file system state.
Special Scenarios and Connection-Specific Fixes
USB-C Drives Not Mounting
USB-C connections are the most commonly affected by the Ghost Drive bug due to the power management changes in macOS 26.3. For detailed USB-C troubleshooting beyond the Ghost Drive bug, see our M4 Mac mini USB-C troubleshooting guide.
USB-C specific steps:
- Try every USB-C port on your Mac -- different ports may have different power delivery capabilities
- Avoid daisy-chaining -- connect the drive directly to the Mac, not through a hub or dock
- Check the cable -- not all USB-C cables support data transfer; some are charge-only
- Try a Thunderbolt cable -- if your drive and Mac both support Thunderbolt, a Thunderbolt cable may work where a USB-C cable fails
# Check USB-C port status
system_profiler SPUSBDataType

# Check Thunderbolt port status
system_profiler SPThunderboltDataType
Thunderbolt Drives Not Mounting
Thunderbolt drives connect through a different subsystem than USB, and they are less commonly affected. However, if your Thunderbolt drive is experiencing the Ghost Drive bug:
- Check the Thunderbolt bridge status:
system_profiler SPThunderboltDataType-
Disconnect all other Thunderbolt devices and test with only the external drive connected
-
Try a different Thunderbolt port -- on MacBook Pro models with multiple Thunderbolt ports, each port connects to a different controller
-
Verify Thunderbolt firmware:
system_profiler SPThunderboltDataType | grep "Firmware Version"USB-A Drives Not Mounting (Via Adapter)
If you are using a USB-A to USB-C adapter:
- Try a different adapter -- some adapters are not fully compatible with macOS 26.3's updated USB stack
- Connect the USB-A drive through a powered USB hub rather than a passive adapter
- Check that the adapter supports data transfer -- some cheap adapters only support charging
SD Cards Not Mounting
SD cards connected through the built-in SD card slot or a USB card reader are also affected:
- Remove and reinsert the SD card -- the contact points may need reseating
- Check the SD card's lock switch -- if the physical lock is engaged, macOS may refuse to mount
- Try an external USB card reader instead of the built-in slot
- Force-mount via Terminal:
diskutil list | grep -i "sd"
diskutil mount /dev/diskXsY
Time Machine Drives Not Mounting
If your Time Machine backup drive is affected by the Ghost Drive bug, this requires special attention because an improper fix could corrupt your backup history. For comprehensive Time Machine troubleshooting, see our macOS Tahoe Time Machine troubleshooting guide.
Critical steps for Time Machine drives:
- Do NOT reformat the drive -- this destroys all backup history
- Force-mount via Terminal first:
diskutil mount /dev/diskXsY- If the mount succeeds, immediately run a new backup to verify integrity:
tmutil startbackup- Verify the backup:
tmutil verifychecksum /Volumes/[Your Time Machine Drive]Understanding macOS Error Codes Related to the Ghost Drive Bug
When Disk Utility or Terminal commands fail, they often return error codes that indicate the specific nature of the failure. For a comprehensive reference, see our macOS error codes guide. Here are the most common error codes associated with the Ghost Drive bug:
| Error Code | Meaning | Most Likely Cause | Recommended Fix |
|---|---|---|---|
| -69842 | Resource busy | APFS snapshot conflict or locked volume | Fix 4 (APFS Snapshot Repair) |
| -69845 | Could not mount volume | Encryption software conflict | Fix 2 (Remove Encryption Software) |
| -69877 | File system verification failed | File system corruption | Fix 5 (First Aid and fsck) |
| -69825 | Erase failed | Disk is locked or in use | Boot to Safe Mode or Recovery Mode |
| -69888 | Permission denied | Insufficient access rights | Fix 8 (Full Disk Access) |
| -69620 | External media not found | USB power management issue | Fix 3 (USB Power Management Reset) |
| -69854 | Resource temporarily unavailable | Mount subsystem overloaded | Wait 30 seconds and retry |
| -50 | Parameter error | Disk identifier incorrect | Verify with diskutil list |
Advanced Troubleshooting: Collecting Diagnostic Information
If none of the above fixes work, you may need to collect detailed diagnostic information to share with Apple Support or community forums.
Collect USB/Thunderbolt Diagnostic Data
# Full USB device tree
system_profiler SPUSBDataType > ~/Desktop/usb-report.txt

# Full Thunderbolt device tree
system_profiler SPThunderboltDataType > ~/Desktop/thunderbolt-report.txt

# Disk information
diskutil list > ~/Desktop/disk-list.txt
diskutil info -all > ~/Desktop/disk-info-all.txt
Collect System Logs Related to Drive Mounting
# Search for disk-related errors in the last hour
log show --last 1h --predicate 'subsystem == "com.apple.diskarbitrationd"' > ~/Desktop/disk-arbitration-log.txt

# Search for USB-related errors
log show --last 1h --predicate 'subsystem == "com.apple.iokit.IOUSBHostFamily"' > ~/Desktop/usb-log.txt

# Search for storage-related kernel messages
log show --last 1h --predicate 'subsystem == "com.apple.kernel" AND category == "disk"' > ~/Desktop/kernel-disk-log.txt
Generate an IORegistry Dump
ioreg -l -w 0 > ~/Desktop/ioregistry-dump.txtThis file contains the complete hardware tree as seen by the kernel and can help Apple engineers or advanced community members identify the exact point of failure.
Check the Disk Arbitration Daemon Status
The Disk Arbitration daemon (diskarbitrationd) is responsible for automatically mounting drives. If it has crashed or entered a bad state, no drives will mount:
# Check if diskarbitrationd is running
ps aux | grep diskarbitrationd

# Check its status
sudo launchctl list | grep diskarbitrationd
If the daemon is not running or shows an error status, you can restart it:
sudo launchctl kickstart -k system/com.apple.diskarbitrationdWarning: This may temporarily unmount all external drives before remounting them.
Preventing the Ghost Drive Bug: Best Practices for External Storage on macOS
For comprehensive guidance on managing external storage, see our macOS Tahoe external storage backup guide and our macOS external SSD troubleshooting guide.
Before Installing macOS Updates
- Disconnect all external drives before starting any macOS update
- Remove third-party drive encryption software before updating (you can reinstall compatible versions after)
- Create a backup of your external drives on separate media
- Wait 48-72 hours after a macOS release before updating, to allow the community to identify any breaking bugs
General External Storage Hygiene
- Always eject drives properly using the eject button in Finder or the
diskutil ejectcommand - Use Apple's native encryption (APFS encryption) instead of third-party alternatives
- Keep drive firmware updated by periodically checking manufacturer websites
- Avoid bus-powered hubs for drives that need more than 500mA
- Use high-quality cables -- cable quality is the most common physical cause of intermittent drive issues
- Regularly run First Aid on your external drives (monthly is a good cadence)
Recommended File System Formats for macOS 26.3
| Use Case | Recommended Format | Reason |
|---|---|---|
| Mac-only SSD | APFS | Best performance and feature support |
| Mac-only HDD | APFS or Mac OS Extended (Journaled) | HFS+ has fewer mounting issues in 26.3 |
| Mac + Windows | exFAT | Universal compatibility |
| Mac + Linux | exFAT | Broad support across platforms |
| Time Machine | APFS | Required for local Time Machine on macOS Tahoe |
| Bootable installer | Mac OS Extended (Journaled) | Required for Intel Mac boot drives |
What Apple Is Doing About It
Official Acknowledgment
As of February 28, 2026, Apple has not publicly acknowledged the Ghost Drive bug through its support pages or press channels. However, indirect acknowledgment appeared in the macOS 26.4 beta 1 release notes, which list two external drive-related Known Issues:
- Using an external disk to boot some M1 Mac configurations may cause a kernel panic at boot. Workaround: install to a secondary volume in an APFS container instead of an external disk.
- HFS external media might fail to mount automatically. Workaround: use the Terminal tool
diskutilto mount the disk manually.
macOS 26.4 Beta Progress
Community testing of macOS 26.4 beta 2 (released to developers in late February 2026) indicates that the most severe Ghost Drive symptoms are resolved. Specifically:
- APFS and HFS+ external drives mount automatically again without requiring Terminal intervention
- Third-party encryption software no longer blocks the mount process (though updated versions of Samsung and Seagate software are still recommended)
- The auto-eject loop behavior has been fixed through revised USB power management
The general release of macOS 26.4 is expected in March 2026. Until then, the workarounds in this guide remain the primary solutions.
How to File a Bug Report with Apple
If you are experiencing the Ghost Drive bug, filing a Feedback report helps Apple prioritize the fix:
- Open Feedback Assistant (search for it in Spotlight)
- Click New Feedback
- Select macOS as the product
- Select Disk Utility / Storage as the area
- Title your report: "macOS 26.3: External drive fails to mount (Ghost Drive bug)"
- Include:
- Your Mac model and chip (M1, M2, M3, M4, M5, Intel)
- The drive model and connection type
- The drive format (APFS, HFS+, exFAT)
- Which symptom you experience (complete failure, phantom drive, auto-eject)
- The output of
diskutil listandsystem_profiler SPUSBDataType - Any error codes from Disk Utility
- Attach the diagnostic files collected in the Advanced Troubleshooting section
Complete Step-by-Step Resolution Guide
If you have read through the individual fixes above and want a streamlined approach, follow this master resolution path:
Phase 1: Quick Wins (5 Minutes)
- Try a different cable and port. This eliminates hardware issues.
- Check Finder settings. Go to Finder > Settings > Sidebar and ensure "External disks" is checked.
- Open Disk Utility and check if the drive appears. If it does, click Mount.
Phase 2: Terminal Intervention (10 Minutes)
- Open Terminal and run
diskutil listto verify the system detects the drive. - Force-mount:
diskutil mount /dev/diskXsYordiskutil mountDisk /dev/diskX. - If mount fails:
sudo diskutil mount force /dev/diskXsY.
Phase 3: Software Cleanup (15 Minutes)
- Check for third-party drive software (Samsung, LaCie, Seagate).
- Remove any found software and restart your Mac.
- Grant Full Disk Access to Terminal in System Settings > Privacy & Security.
Phase 4: File System Repair (30 Minutes)
- Run First Aid on the drive in Disk Utility.
- If First Aid fails, run
fsckin Terminal. - Check for corrupted APFS snapshots and delete them.
- Verify and repair the partition map.
Phase 5: Power and Hardware Reset (15 Minutes)
- Reset USB power management:
sudo pmset -a disksleep 0. - Reset NVRAM (Intel) or restart (Apple Silicon).
- Boot in Safe Mode and test the drive.
Phase 6: Last Resort (Variable)
- Reformat the drive if data is backed up elsewhere.
- Update drive firmware from the manufacturer's website.
- Wait for macOS 26.4 which is expected to fix the issue.
Frequently Asked Questions
Is my data lost if my drive will not mount after the macOS 26.3 update?
Almost certainly not. The Ghost Drive bug is a mounting/communication issue between macOS and the drive, not a data corruption issue. Your files are still on the drive. In the vast majority of cases, force-mounting via Terminal (diskutil mount) successfully accesses the data. If Terminal mounting also fails, connecting the drive to a Mac running macOS 26.2 or earlier, or to a Windows/Linux computer, should allow full data access. The data itself is intact; it is the macOS 26.3 software layer that is failing to communicate with the drive's file system correctly.
Does this bug affect internal drives or only external drives?
The Ghost Drive bug specifically affects external drives connected via USB-A, USB-C, Thunderbolt, and SD card interfaces. Internal drives (the built-in SSD in your Mac) are not affected by this bug. However, if you are using an external drive as a boot volume for an M1 Mac, the macOS 26.4 beta 1 release notes warn that this configuration may cause a kernel panic, which is a separate but related issue.
Should I update to macOS 26.3 if I rely heavily on external drives?
If you have not yet updated to macOS 26.3 and you depend on external drives for your workflow, it is reasonable to wait until macOS 26.4 is released (expected March 2026). The 26.3 update primarily delivered security patches, performance improvements, and machine learning enhancements for M5 chips. If these are not critical to your workflow, the risk of the Ghost Drive bug may outweigh the benefits. For more details about the 26.3 update's features and changes, see our macOS Tahoe 26.3 release guide.
I reformatted my drive but it still will not mount. What should I do?
If reformatting via Disk Utility fails, try reformatting via Terminal with the diskutil eraseDisk command, which bypasses some of the GUI-layer issues. If Terminal reformatting also fails, boot into Recovery Mode and attempt the reformat from there. If even Recovery Mode reformatting fails, the issue may have progressed beyond the typical Ghost Drive bug -- check the drive on another computer to rule out hardware failure. In rare cases, the drive's firmware may need updating before macOS 26.3 can communicate with it properly.
Will the macOS 26.4 update fix this bug automatically, or do I need to do something?
Based on community testing of the macOS 26.4 beta 2, the update appears to fix the core Ghost Drive bug automatically. After updating, drives that were affected should mount normally without any additional user action. However, if you removed third-party encryption software as part of your workaround, you should only reinstall it if the manufacturer has released an updated version confirmed compatible with macOS 26.3 or later. It is also recommended to run First Aid on your external drives after updating to 26.4 to ensure the file systems are in a clean state.
Can I use a USB hub or dock with external drives on macOS 26.3?
USB hubs and docks are more prone to triggering the Ghost Drive bug than direct connections, primarily because they add another layer to the USB power negotiation process that macOS 26.3 changed. If you must use a hub, choose a powered hub that provides its own power supply to connected devices. Avoid daisy-chaining hubs. If your drive works when connected directly to the Mac but not through a hub, the hub's power delivery or the changed USB protocol negotiation in 26.3 is the issue. Consider temporarily connecting drives directly until macOS 26.4 is released.
Conclusion
The macOS Tahoe 26.3 Ghost Drive bug is one of the most disruptive external storage failures in recent macOS history, affecting a wide range of drive types, manufacturers, and connection interfaces. While Apple has not officially acknowledged the issue, the fix is in progress -- macOS 26.4 beta 2 testing confirms that the core problems are being resolved.
In the meantime, the Terminal-based force mount (diskutil mount) and the removal of third-party encryption software are the two most effective workarounds for the majority of affected users. For drives with APFS snapshot corruption or USB power management issues, the more advanced fixes in this guide should restore functionality.
The single most important thing to remember: your data is almost certainly safe. The Ghost Drive bug is a mounting failure, not a data loss event. Take a measured approach, start with the simplest fixes, and work through the diagnostic flowchart before attempting any destructive operations like reformatting.
If you are experiencing related issues with your external storage setup, these guides may also help:
- macOS external SSD troubleshooting -- general SSD troubleshooting beyond the 26.3 bug
- macOS Tahoe external storage backup guide -- best practices for external drive backups
- macOS Tahoe Time Machine troubleshooting -- specific fixes for Time Machine backup drives
- M4 Mac mini USB-C troubleshooting -- USB-C connectivity issues on M4 hardware
- macOS error codes guide -- comprehensive reference for all macOS error codes