macOS Tahoe Storage Management & Optimization Master Guide 2025: Free Up Space, Optimize APFS, Manage System Data
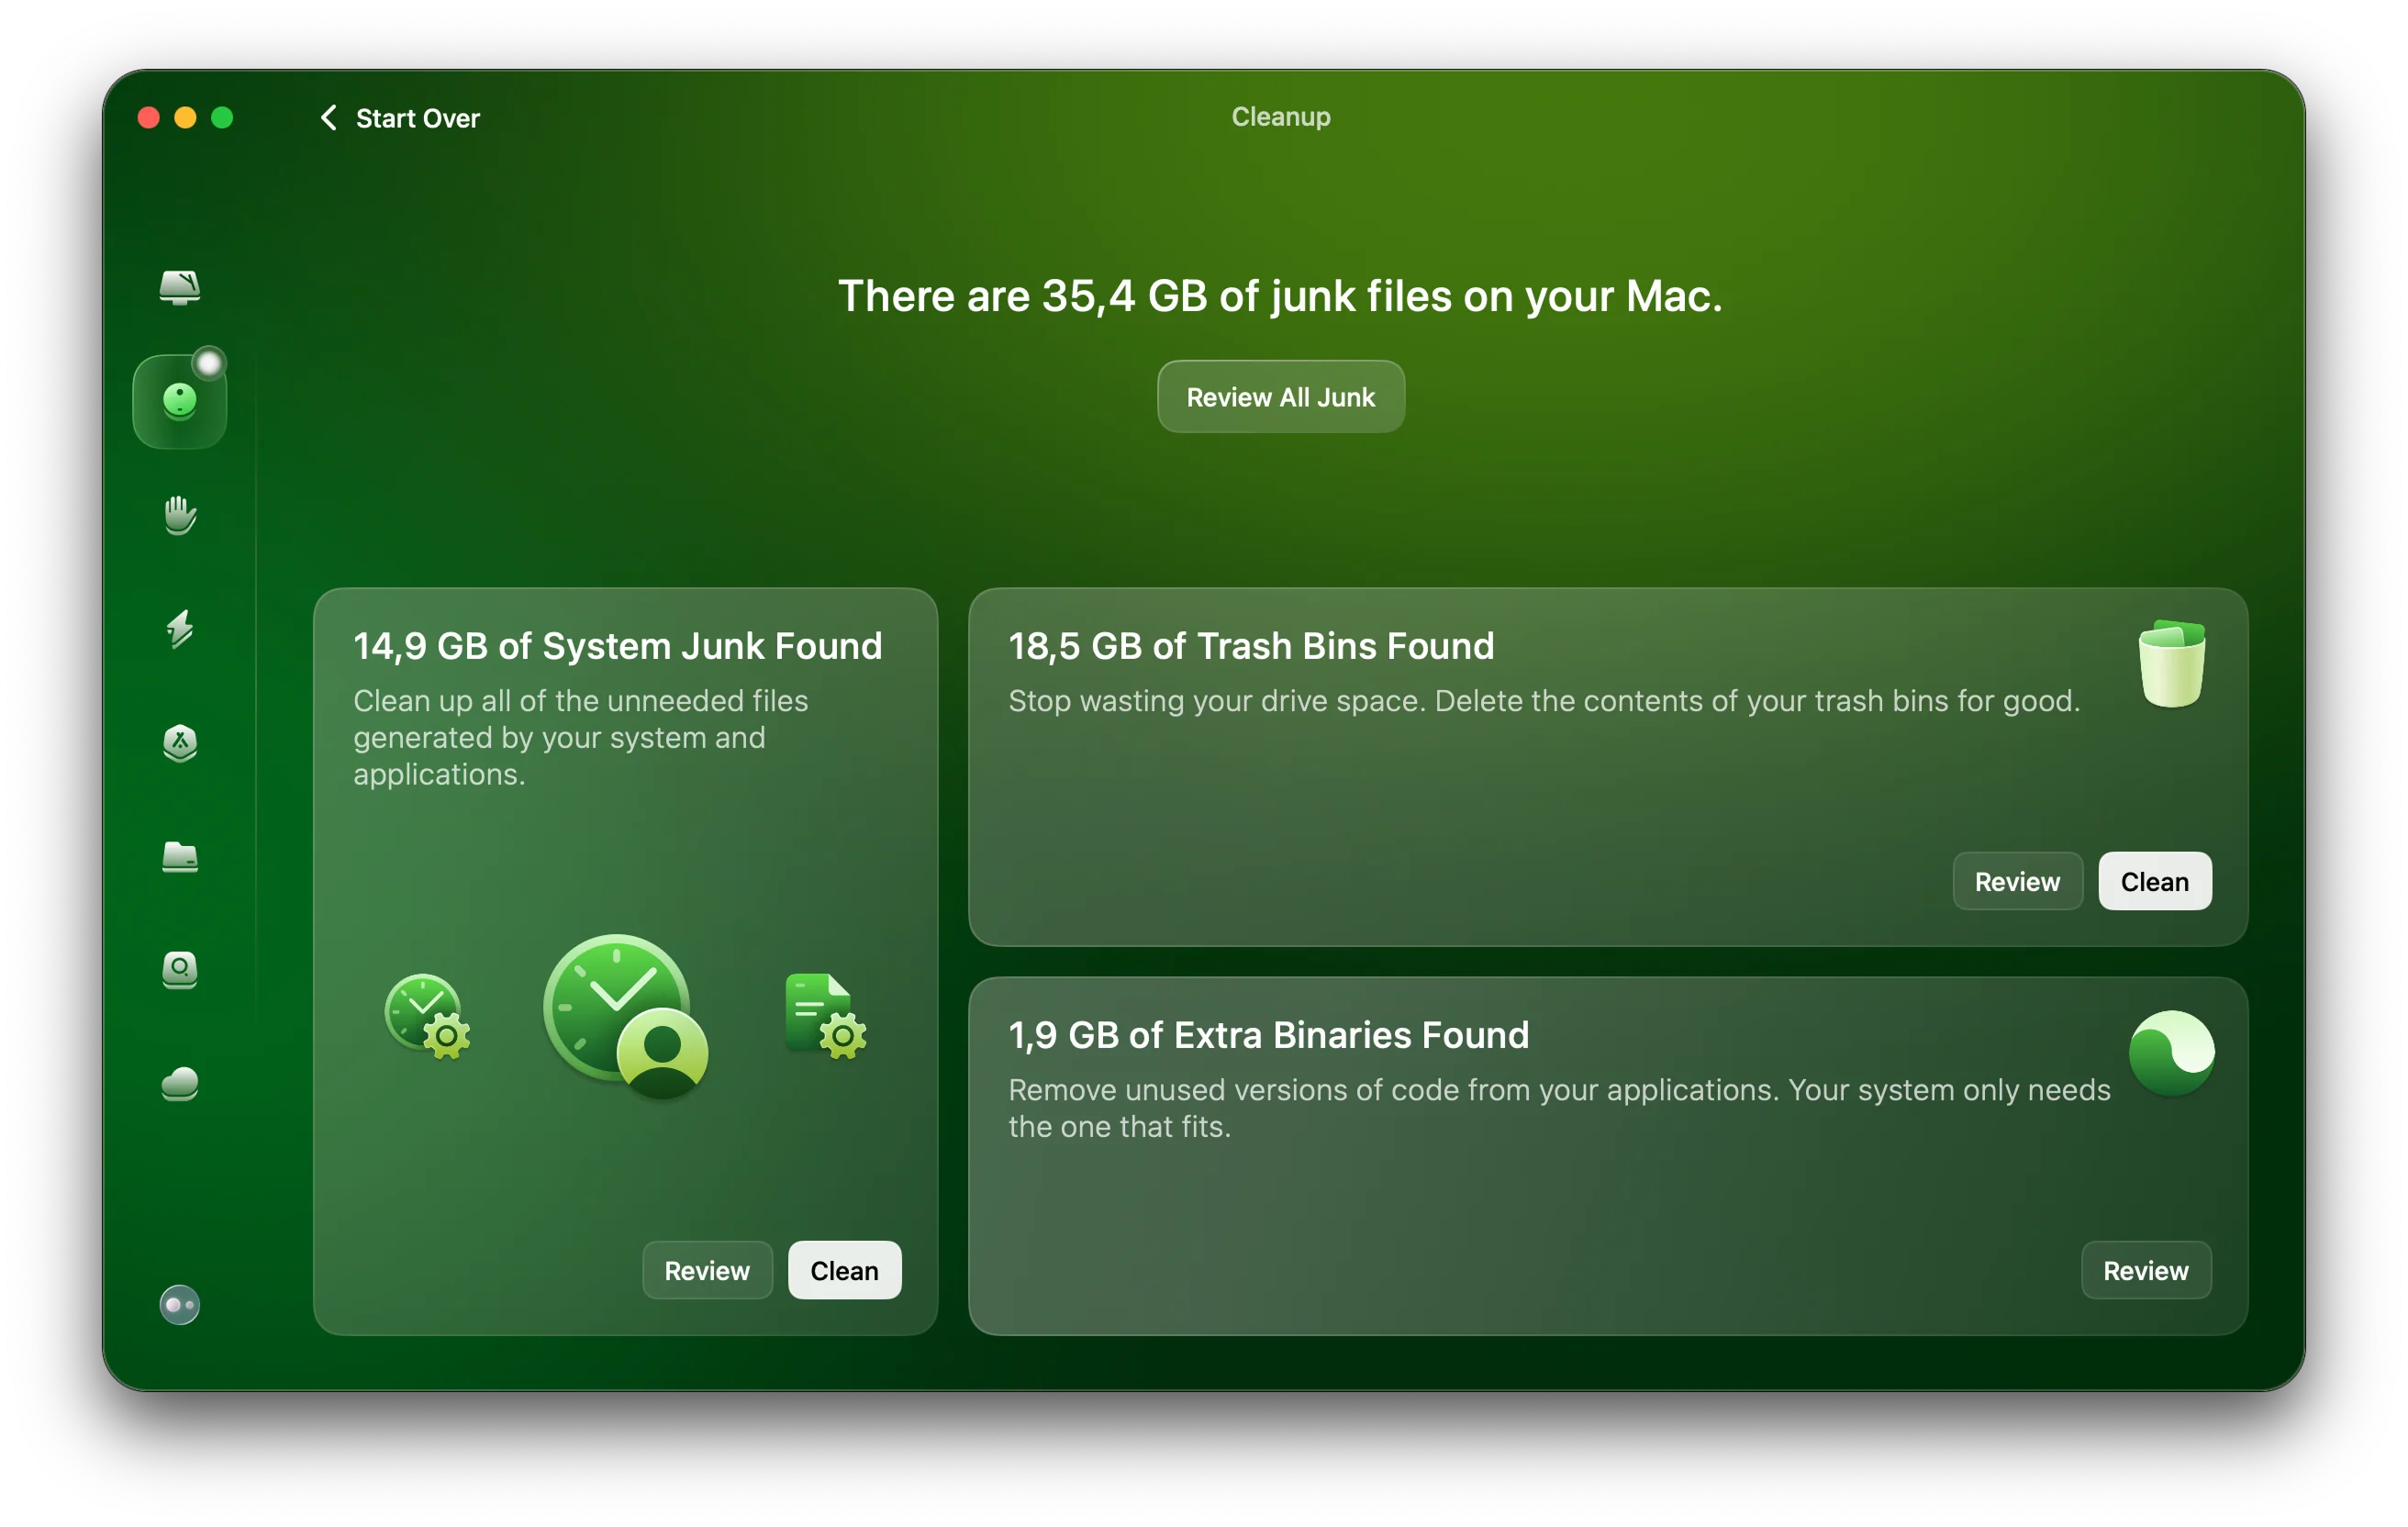
Complete guide to solving macOS Tahoe 26 storage problems: free up space, reduce massive System Data bloat, manage APFS snapshots, optimize iCloud storage, and use powerful Terminal commands. Expert strategies to reclaim 100GB+ disk space.
Is your Mac's storage mysteriously full after upgrading to macOS Tahoe 26? Are you seeing "System Data" consuming 100GB or more of precious disk space? You're not alone. This comprehensive guide reveals proven strategies to diagnose storage problems, safely reclaim disk space, optimize APFS snapshots, and prevent future storage bloat on macOS Tahoe.
The macOS Tahoe Storage Crisis: Understanding the Problem
macOS Tahoe 26 has introduced a new wave of storage management challenges that have left countless Mac users struggling with critically low disk space. The primary culprit? A mysterious category called "System Data" that can balloon to consuming 100-260GB of storage without clear explanation.
What's Different in macOS Tahoe?
Critical Storage Issues Identified in 2025:
- Massive System Data bloat: Widespread reports of 100GB+ of unexplained "System Data" consumption
- Post-upgrade storage consumption: Users finding critically low free space immediately after Tahoe installation
- Snapshot accumulation: Some Macs discovered with 400GB+ consumed by unnecessary APFS snapshots
- Spotlight indexing bugs: Early beta versions had issues with excessive disk writes from
mds_stores - 4K screensaver downloads: New 4K video screensavers can consume up to 20GB without user awareness
Storage Requirements for macOS Tahoe
Understanding macOS Tahoe's storage demands is the first step to managing your Mac's disk space effectively:
Installation Requirements:
- Minimum free space: 50GB (17GB installer + 20-25GB temporary files)
- Recommended free space: 10-15% of total capacity for optimal performance
- Clean install advantage: Can reclaim 100GB+ compared to upgrade installations
Normal vs. Problematic System Data:
- Normal range: 15-40GB of System Data
- Warning zone: 60GB+ indicates potential issues
- Critical cases: 100-260GB reported in extreme situations
What Exactly is "System Data"?
System Data is a catch-all category that encompasses multiple types of files:
- Time Machine local snapshots (can grow to hundreds of GB)
- Cache files (system, application, and browser caches)
- Log files (system logs, crash reports, diagnostic data)
- 4K screen savers (up to 20GB for high-resolution video screensavers)
- iOS device backups (stored locally on your Mac)
- Spotlight index files (search database and metadata)
- System files not categorized elsewhere
- Downloaded updates and installers (macOS and application updates)
- App support files (databases, preferences, temporary files)
- Developer files (if you use Xcode: simulators, derived data, archives)
The problem is that macOS doesn't provide granular visibility into which components are consuming the most space within System Data, making it challenging to target cleanup efforts effectively.
Diagnosing Your Storage Situation
Before jumping into cleanup strategies, you need to understand exactly where your storage is going.
Check Storage Breakdown in System Settings
Access Storage Information:
- Click the Apple menu () in the top-left corner
- Select System Settings (macOS Ventura/Tahoe) or About This Mac (earlier versions)
- Navigate to General > Storage
- Wait for the storage calculation to complete (may take 1-2 minutes)
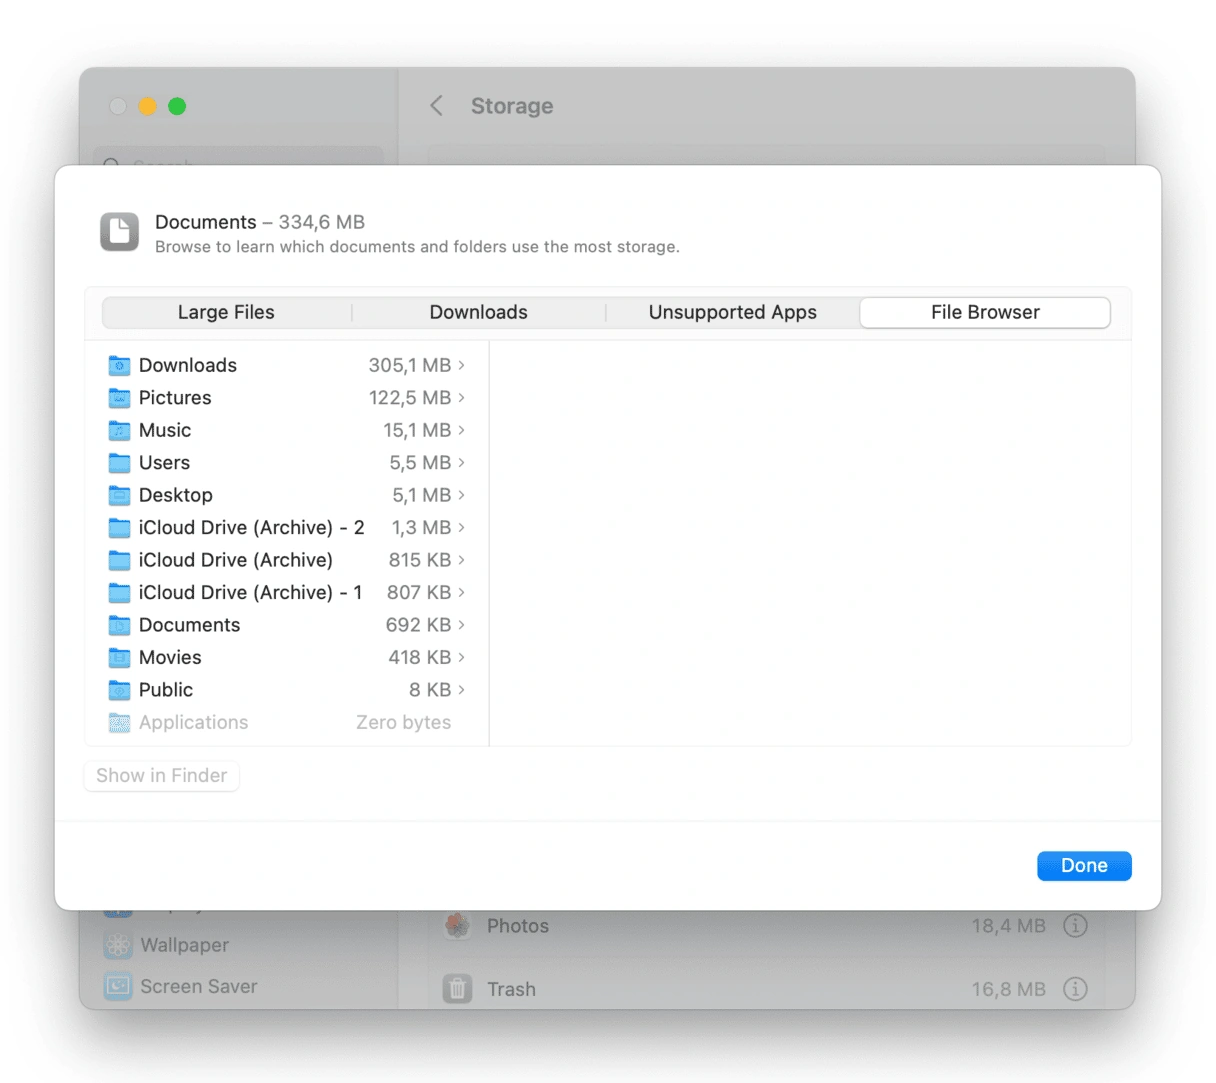
Understanding the Storage Visualization:
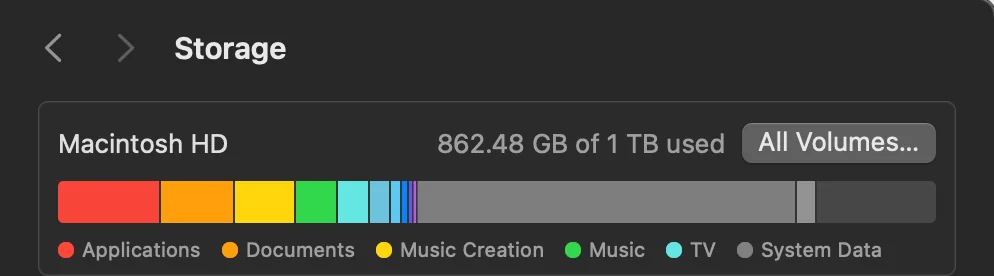
The storage bar shows color-coded categories:
- Applications (blue): Installed applications
- Documents (purple): User files, downloads, desktop items
- System Data (yellow/orange): The mysterious category we're targeting
- iCloud Drive (light blue): Locally stored iCloud files
- Photos (pink): Photos library (local storage)
- Messages (green): iMessage attachments and data
- Mail (gray): Email and attachments
- Books (orange): Apple Books content
- Other Users (if applicable): Additional user accounts
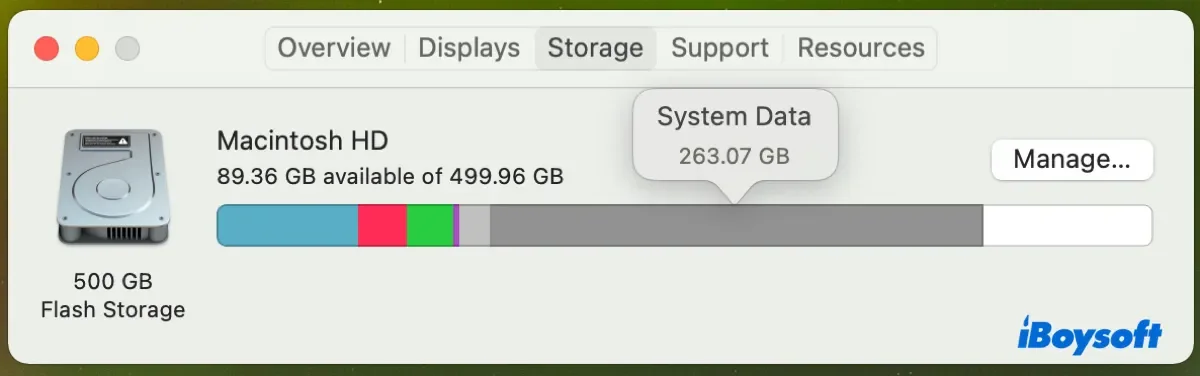
When System Data Size is Problematic
Benchmarks for Normal Storage:
| Total Drive Capacity | Normal System Data | Warning Level | Critical Level |
|---|---|---|---|
| 256GB SSD | 15-25GB | 40GB+ | 60GB+ |
| 512GB SSD | 20-35GB | 50GB+ | 80GB+ |
| 1TB SSD | 25-40GB | 60GB+ | 100GB+ |
| 2TB+ SSD | 30-50GB | 80GB+ | 120GB+ |
Red Flags Indicating Storage Problems:
- System Data exceeds 50% of your total capacity
- Free space drops below 20GB on any drive
- "Your disk is almost full" warnings appear
- Applications becoming slow to launch or save files
- macOS performance degradation (beach ball cursor, sluggish UI)
Advanced Diagnosis with About This Mac
Detailed Storage Analysis:
Click "Manage..." in the Storage pane to access powerful built-in tools:
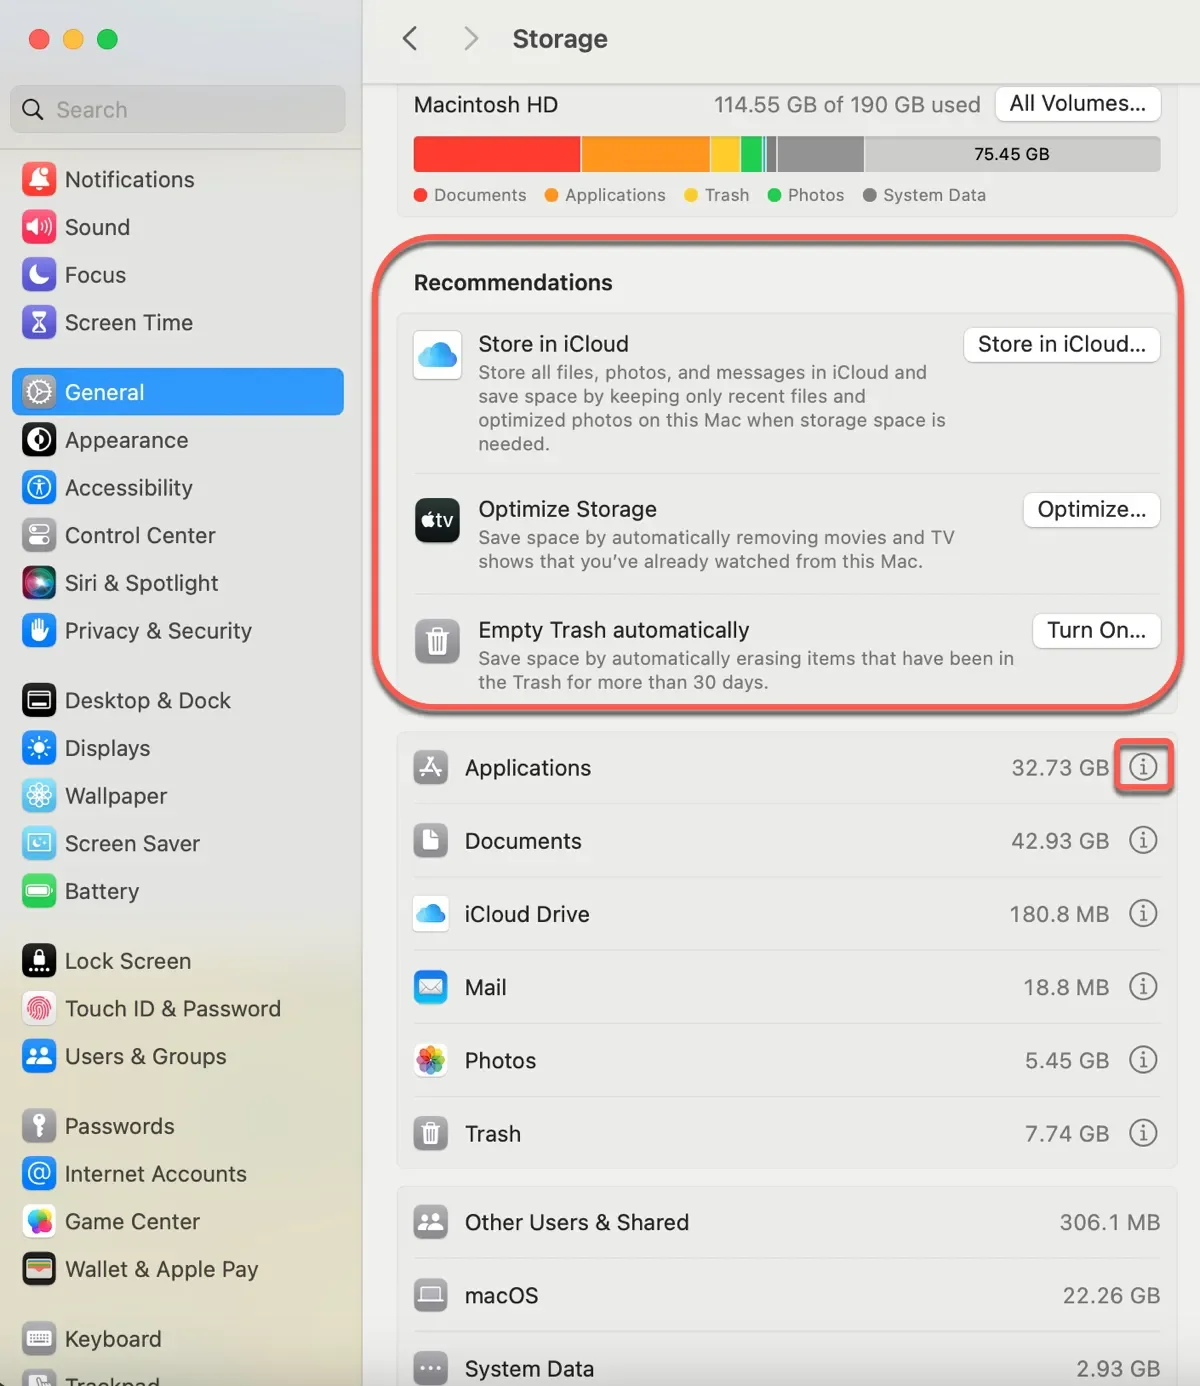
Four Key Sections:
- Recommendations - Apple's automated cleanup suggestions
- Documents - Large files sorted by size
- Applications - Apps sorted by size with uninstall options
- Bins - Downloads, trash, and temporary files
The Recommendations section is particularly valuable, offering one-click solutions like:
- Store in iCloud (offload Desktop and Documents)
- Optimize Storage (auto-remove watched TV shows and movies)
- Empty Trash Automatically (delete items older than 30 days)
- Reduce Clutter (find and review large files)
Understanding APFS Snapshots: The Hidden Storage Consumer
APFS (Apple File System) snapshots are one of the most common causes of unexplained storage consumption, yet many Mac users don't even know they exist.
What Are APFS Snapshots?
Technical Definition: APFS snapshots are point-in-time, read-only instances of your file system. They capture the state of your entire volume at a specific moment, allowing Time Machine and macOS to preserve system states for backup and recovery purposes.
How Snapshots Work:
- Each snapshot stores only file system changes (incremental backups)
- Unchanged data blocks are linked to the original, keeping initial snapshots small
- Snapshots grow large after major changes (e.g., deleting large files or installing updates)
- Time Machine or system updates create hidden snapshots automatically
- Snapshots are stored within the APFS container, consuming "System Data" space
Why Snapshots Can Become Problematic:
- macOS is supposed to auto-delete snapshots older than 24 hours when space is needed
- This auto-deletion mechanism sometimes fails, especially after beta upgrades
- Multiple failed macOS upgrade attempts can leave orphaned snapshots
- Some users have discovered 400GB+ consumed by unnecessary snapshots
Viewing Your APFS Snapshots
Method 1: Disk Utility (GUI)
- Open Disk Utility (Applications > Utilities > Disk Utility)
- Go to View > Show APFS Snapshots
- Select your system volume (typically "Macintosh HD")
- Look for snapshot entries with dates and sizes
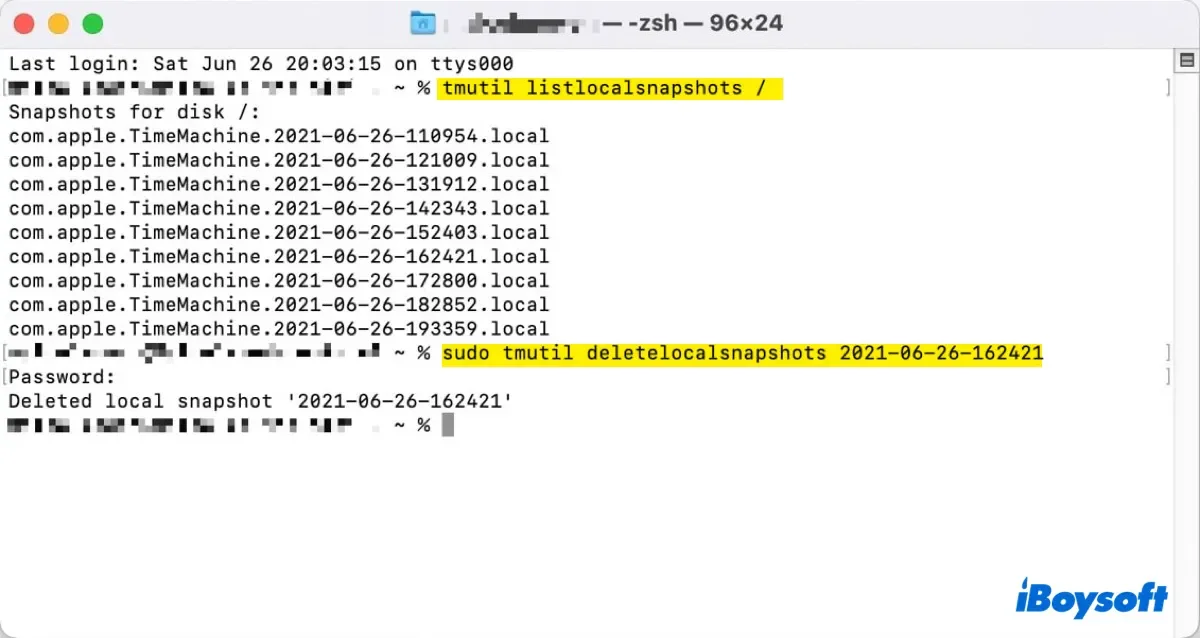
Method 2: Terminal (Command Line)
Open Terminal (Applications > Utilities > Terminal) and run:
tmutil listlocalsnapshots /This command lists all Time Machine local snapshots on your boot volume. Output looks like:
com.apple.TimeMachine.2025-10-05-143022.local
com.apple.TimeMachine.2025-10-05-223015.local
com.apple.TimeMachine.2025-10-06-073041.local
Understanding Snapshot Naming:
- Format:
com.apple.TimeMachine.[DATE]-[TIME].local - Date format: YYYY-MM-DD
- Time format: HHMMSS (24-hour)
.localsuffix indicates local (not backup drive) snapshot
Snapshot Best Practices
When Snapshots Are Helpful:
- Recovery: Roll back accidental file deletions within 24 hours
- System stability: Revert problematic macOS updates
- Time Machine efficiency: Enable fast local backups
When to Delete Snapshots:
- System Data consuming excessive space (60GB+)
- Free space critically low (less than 20GB)
- Multiple orphaned snapshots from failed upgrades
- Preparing for major macOS reinstallation
Important Warning: Deleting snapshots is generally safe, but understand that you're removing restore points. If you accidentally delete important files, you won't be able to recover them from deleted snapshots.
Safe Manual Cleanup Methods: Reclaim Storage Step-by-Step
These proven methods are safe, reversible, and recommended by Apple support. Work through them sequentially for maximum storage reclamation.
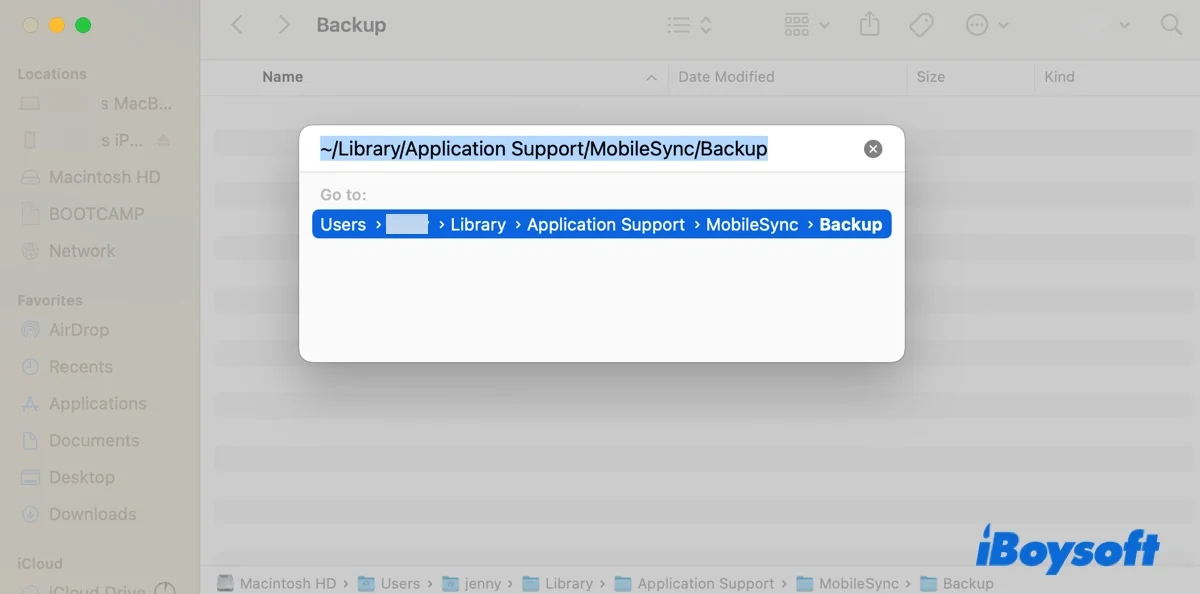
Method 1: Delete Old iOS Device Backups
iOS device backups stored on your Mac can consume 20-80GB per device, especially if you haven't cleaned them in years.
Step-by-Step Process:
- Open System Settings > General > Storage
- Wait for storage calculation to complete
- Click iOS Files or look for device backups in the breakdown
- Review backup dates and device names
- Select outdated backups (especially for devices you no longer own)
- Click Delete to remove
Alternative Method via Finder:
- Open Finder > Preferences
- Click Sidebar tab
- Ensure your iPhone/iPad appears under Locations
- Connect your iOS device (or access backups without device)
- Click on the device in Finder sidebar
- Under Backups section, click Manage Backups
- Select old backups and click Delete Backup
Storage Savings Potential: 20-80GB per backup
Method 2: Clear Time Machine Local Snapshots
This is the most effective method for reclaiming massive amounts of System Data storage.
GUI Method (Disk Utility):
- Open Disk Utility
- View > Show APFS Snapshots
- Select your system volume
- Select snapshots (Cmd+Click for multiple)
- Click Delete button (minus sign)
- Confirm deletion
Terminal Method (Bulk Deletion):
For power users who want to delete all local snapshots at once:
# List all snapshots first (to see what will be deleted)
tmutil listlocalsnapshots /

# Delete all local snapshots (requires sudo password)
tmutil listlocalsnapshots / | cut -d "." -f 4 | while read s; do sudo tmutil deletelocalsnapshots "$s"; done
What This Command Does:
tmutil listlocalsnapshots /- Lists all snapshotscut -d "." -f 4- Extracts the date-time portionwhile read s- Loops through each snapshotsudo tmutil deletelocalsnapshots "$s"- Deletes each snapshot (requires admin password)
Delete Specific Snapshot:
If you want to delete only certain snapshots:
# Delete snapshot from October 5, 2025 at 14:30:22
sudo tmutil deletelocalsnapshots 2025-10-05-143022
Storage Savings Potential: 50-400GB (depending on how many accumulated)
Important Note: After deleting snapshots, it may take a few minutes for macOS to recalculate storage. Restart your Mac if the storage bar doesn't update immediately.
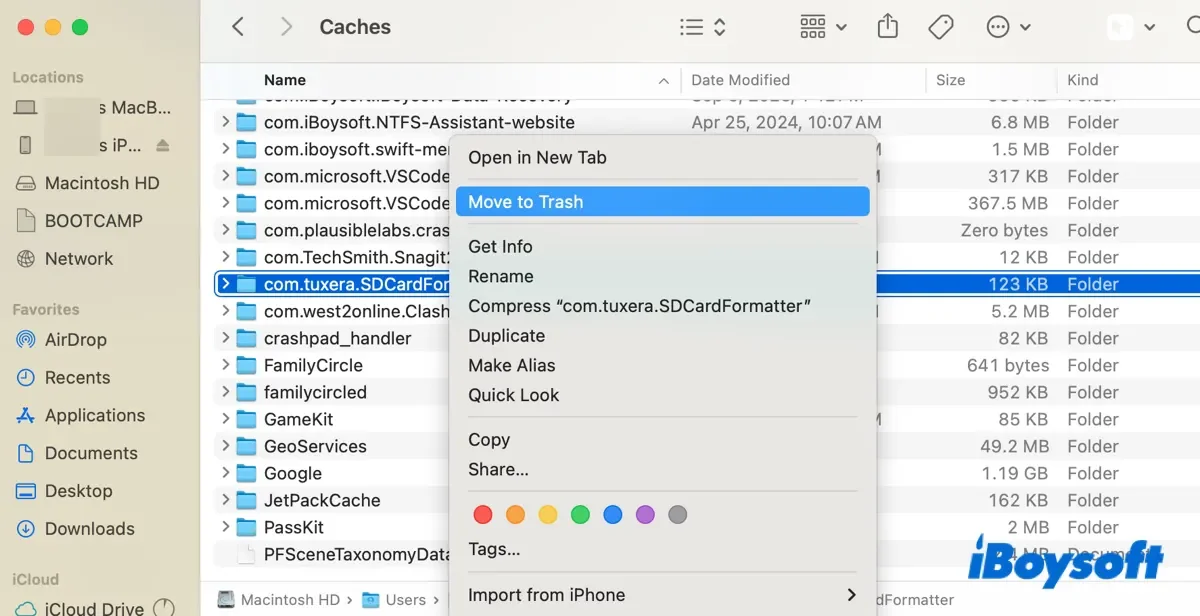
Method 3: Remove System Caches
Caches are temporary files that speed up applications but can accumulate to consume 10-30GB over time.
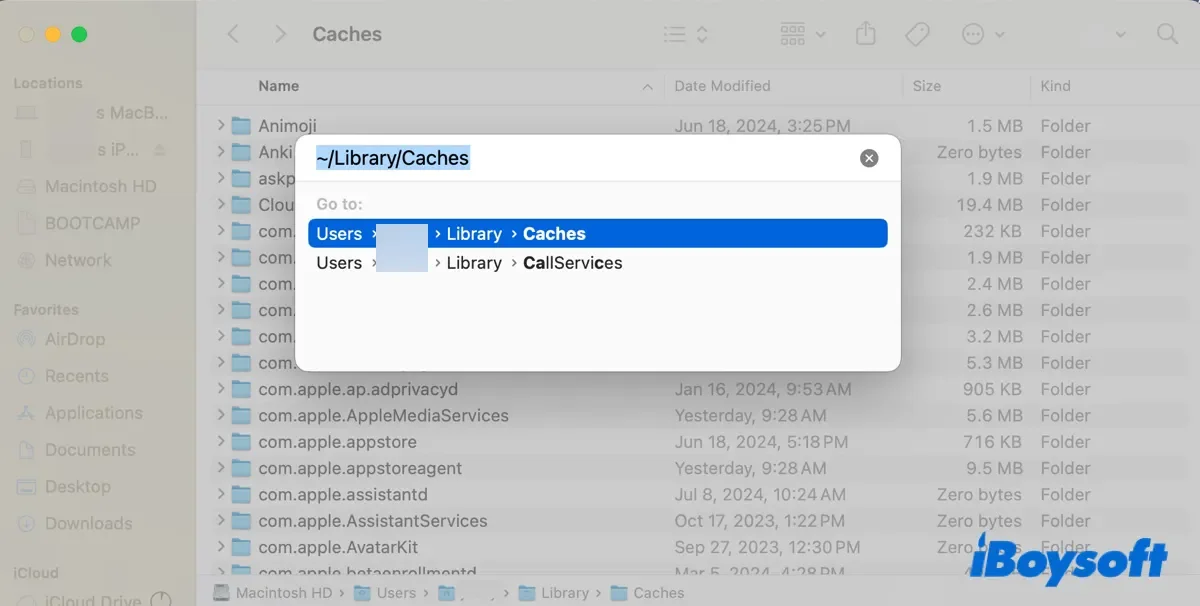
User Cache Cleanup:
- Open Finder
- Press Cmd + Shift + G (Go to Folder)
- Type:
~/Library/Caches/ - Press Enter
Safe Cache Folders to Delete:
Safe to clear (application-specific, will regenerate):
com.apple.Safari/- Safari browser cachecom.google.Chrome/- Chrome browser cachecom.microsoft.VSCode/- Visual Studio Code cachecom.spotify.client/- Spotify cacheAdobe/- Adobe application cachesFirefox/Profiles/- Firefox cache
Caches to AVOID:
- Anything with "Keychain" in the name (password storage)
- System preference caches (ending in
.plist) com.apple.nsurlsessiond/(download manager)
System Cache Cleanup (Advanced):
Only for experienced users - requires Terminal:
# Clear DNS cache
sudo dscacheutil -flushcache; sudo killall -HUP mDNSResponder

# Clear font cache (fixes font issues)
sudo atsutil databases -remove

# Clear launch services database (fixes "Open With" issues)
/System/Library/Frameworks/CoreServices.framework/Frameworks/LaunchServices.framework/Support/lsregister -kill -r -domain local -domain system -domain user
Storage Savings Potential: 10-30GB
Method 4: Delete 4K Screen Savers
macOS Tahoe includes stunning 4K video screensavers, but they consume significant storage.
Location:
~/Library/Application Support/com.apple.idleassetsd/Customer/entries.jsonManual Deletion Process:
- Open Finder
- Press Cmd + Shift + G
- Paste:
~/Library/Application Support/com.apple.idleassetsd/ - Delete the Customer folder
- Empty Trash
Alternative: Disable Auto-Download:
- Open System Settings > Screen Saver
- Choose a non-video screen saver (like "Flurry" or "Message")
- Existing 4K videos will remain but won't auto-update
Storage Savings Potential: 5-20GB
Method 5: Optimize macOS Built-in Storage
Apple provides automated optimization tools that safely manage storage:
Access Optimization:
- System Settings > General > Storage
- Click Recommendations section
- Review and enable recommended options:
Store in iCloud:
- Automatically uploads Desktop and Documents to iCloud
- Keeps only recently used files locally
- Savings: Varies (can be 100GB+ if you have large document folders)
- Requirement: Sufficient iCloud storage plan
Optimize Storage:
- Auto-removes watched movies and TV shows from Apple TV app
- Keeps only recent email attachments
- Savings: 10-50GB (depends on media consumption)
Empty Trash Automatically:
- Deletes items in Trash after 30 days
- Savings: Ongoing maintenance (prevents buildup)
Reduce Clutter:
- Identifies large files and downloads
- Provides one-click deletion for unnecessary items
- Savings: 5-20GB (user-dependent)
Method 6: Clear Browser Data
Browsers accumulate massive caches, especially Safari and Chrome.
Safari Cleanup:
- Open Safari > Settings (or Preferences)
- Go to Advanced tab
- Enable Show Develop menu in menu bar
- Click Develop in menu bar > Empty Caches
- For complete cleanup: History > Clear History (select "all history")
Chrome Cleanup:
- Open Chrome > Settings
- Privacy and security > Clear browsing data
- Select All time from time range
- Check: Browsing history, Cookies, Cached images and files
- Click Clear data
Firefox Cleanup:
- Firefox > Settings > Privacy & Security
- Scroll to Cookies and Site Data
- Click Clear Data
- Select both checkboxes and confirm
Storage Savings Potential: 5-15GB per browser
Method 7: Remove Old Downloads
The Downloads folder is a common culprit for forgotten large files.
Quick Review:
- Open Finder > Downloads
- Click View > as List
- Click Size column to sort by size (largest first)
- Review and delete:
- Old installers (.dmg files)
- Duplicate downloads
- Archived files you've already extracted
- Large videos or projects
Terminal Method (List Large Files):
# Find files larger than 100MB in Downloads
find ~/Downloads -type f -size +100M -exec ls -lh {} \; | awk '{ print $9 ": " $5 }'
Storage Savings Potential: 10-50GB
Terminal Power User Methods: Advanced Storage Analysis
For users comfortable with command-line tools, Terminal provides the most powerful storage analysis capabilities.
du (Disk Usage) Command
The du command analyzes disk usage at the directory level.
Basic Usage:
# View disk usage in current directory (human-readable)
du -sh *

# Output example:
# 4.2G    Applications
# 156M    Desktop
# 2.1G    Documents
# 892M    Downloads
# 68G     Library
# 1.2G    Movies
# 3.4G    Pictures
Sorted by Size (Largest First):
du -sh * | sort -hrAnalyze Specific Directories:
# Check Library folder (common storage hog)
du -sh ~/Library/*

# Find largest subdirectories in Library
du -sh ~/Library/* | sort -hr | head -20

# Analyze Application Support (app caches and data)
du -sh ~/Library/Application\ Support/*
Find Files Larger Than Specific Size:
# Find files larger than 1GB in home directory
find ~ -type f -size +1G -exec ls -lh {} \; 2>/dev/null

# Find files larger than 500MB
find ~ -type f -size +500M -exec ls -lh {} \; 2>/dev/null
tmutil (Time Machine) Advanced Commands
List All Backups with Dates:
tmutil listbackupsCheck Time Machine Status:
tmutil statusDisable/Enable Time Machine:
# Disable Time Machine
sudo tmutil disable

# Enable Time Machine
sudo tmutil enable
Delete Specific Backup:
# List backups first
tmutil listbackups

# Delete specific backup (replace path with actual backup path)
sudo tmutil delete /Volumes/Time\ Machine\ Backups/Backups.backupdb/MacBook\ Pro/2025-09-15-120000
Thin Out Old Backups:
Time Machine automatically manages backup thinning, but you can force it:
# Thin backups older than specified date
sudo tmutil thinlocalsnapshots / 10000000000 4
df (Disk Free) Command
Check available space across all mounted volumes:
# Show disk usage for all mounted volumes
df -h

# Output example:
# Filesystem      Size   Used  Avail Capacity  Mounted on
# /dev/disk1s1   500Gi  380Gi  120Gi    76%    /
# /dev/disk2s1   2.0Ti  1.2Ti  800Gi    60%    /Volumes/External
Check Specific Volume:
df -h /ncdu (NCurses Disk Usage) - Interactive Analysis
ncdu is a third-party tool that provides an interactive, visual disk usage analyzer.
Installation (via Homebrew):
# Install Homebrew if not already installed
/bin/bash -c "$(curl -fsSL https://raw.githubusercontent.com/Homebrew/install/HEAD/install.sh)"

# Install ncdu
brew install ncdu
Usage:
# Analyze home directory
ncdu ~

# Analyze specific directory
ncdu ~/Library
Interactive Controls:
- Arrow keys: Navigate directories
- Enter: Drill into selected directory
d: Delete selected file/folder (use with caution!)q: Quit
Complete Storage Analysis Script
Save this as storage-analysis.sh for comprehensive storage reporting:
#!/bin/bash

echo "=== macOS Storage Analysis Report ==="
echo ""

echo "1. Overall Disk Usage:"
df -h /
echo ""

echo "2. Top 10 Largest Directories in Home:"
du -sh ~/* 2>/dev/null | sort -hr | head -10
echo ""

echo "3. Library Folder Breakdown:"
du -sh ~/Library/* 2>/dev/null | sort -hr | head -10
echo ""

echo "4. Time Machine Local Snapshots:"
tmutil listlocalsnapshots /
echo ""

echo "5. Files Larger Than 1GB:"
find ~ -type f -size +1G -exec ls -lh {} \; 2>/dev/null | awk '{print $5, $9}'
echo ""

echo "6. Cache Folder Sizes:"
du -sh ~/Library/Caches/* 2>/dev/null | sort -hr | head -10
echo ""

echo "=== Analysis Complete ==="
Run the script:
chmod +x storage-analysis.sh
./storage-analysis.sh > storage-report.txt
open storage-report.txt
Third-Party Storage Tools: When and Which to Use
While manual cleanup and Terminal commands provide complete control, third-party tools offer visual interfaces and automated cleanup.
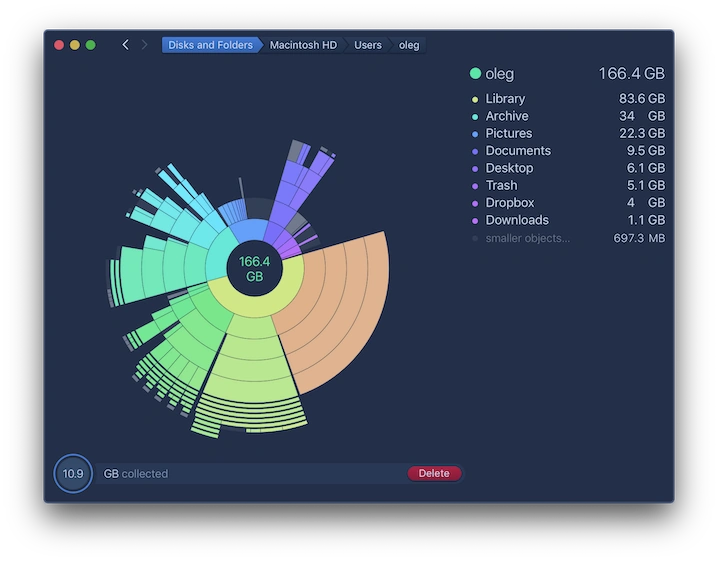
DaisyDisk ($10-20) - Best Visual Analyzer
Pros:
- Beautiful circular visualization: Instantly see what's consuming space
- Very fast scanning: Analyzes entire drives in seconds
- Intuitive interface: No technical knowledge required
- Safe deletion: Visual feedback before removing files
- APFS snapshot support: Handles snapshots effectively
- Local and cloud storage: Works with iCloud and external drives
Cons:
- Paid application ($10-20 one-time purchase)
- Visualization-only (no automated cleanup)
- Doesn't handle app leftover files
Best For: Visual learners and users who want immediate insights into storage distribution
How to Use:
- Download from daisydiskapp.com
- Launch and select your system drive
- Wait for scan to complete (1-2 minutes)
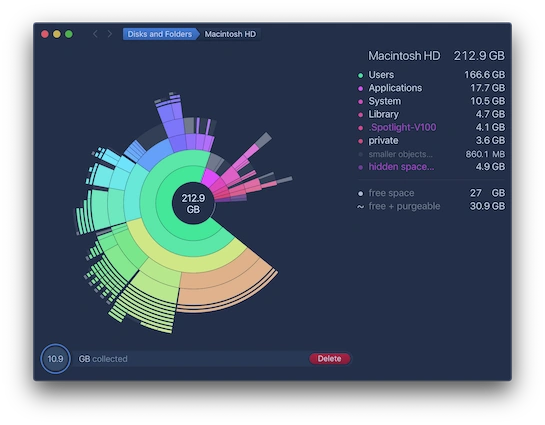
- Click on segments to drill down into folders
- Preview files before deletion
- Drag files to "Collector" at bottom
- Click "Delete" to remove collected files
DaisyDisk Unique Features:
- Hidden file visibility: Shows hidden system files other tools miss
- Administrator mode: Scan protected system directories
- Export reports: Generate storage reports for documentation
- Quick Look integration: Preview files before deletion
OmniDiskSweeper (FREE) - Best Free Alternative
Pros:
- Completely free: No cost, no trial limitations
- Simple list interface: Like Finder Column view
- Fast scanning: Quick analysis of entire drives
- Files sorted by size: Descending order (largest first)
- Straightforward: No complicated features
Cons:
- No graphical visualization (text list only)
- Less intuitive than DaisyDisk
- Manual deletion only (no batch operations)
- No snapshot management
Best For: Budget-conscious users who prefer simplicity over visual flair
Download: omnigroup.com/more
CleanMyMac X (Subscription/One-time) - All-in-One Suite
Pros:
- Comprehensive cleanup: System, apps, caches all in one
- Automated suggestions: Smart cleanup recommendations
- App uninstaller: Removes leftover files when uninstalling apps
- Malware scanner: Included security scanning
- Regular updates: Maintains macOS compatibility
Cons:
- Expensive: $35/year subscription or $90 lifetime
- Can be aggressive: Sometimes removes files you may want
- Redundant features: Overlaps with built-in macOS tools
Best For: Users wanting an all-in-one maintenance suite with security features
Tool Comparison Table
| Feature | DaisyDisk | OmniDiskSweeper | CleanMyMac X | Terminal (du/ncdu) |
|---|---|---|---|---|
| Cost | $10-20 | FREE | $35/year | FREE |
| Visualization | Excellent | None | Good | ncdu: Good |
| Ease of Use | Excellent | Good | Excellent | Advanced |
| Speed | Very Fast | Fast | Medium | Fast |
| Snapshot Support | Yes | No | Yes | Yes (tmutil) |
| Safe Deletion | Yes | Manual | Yes | Manual |
| App Cleanup | No | No | Yes | Manual |
| Best For | Visual learners | Budget users | All-in-one | Power users |
Recommendation: Start with free tools (OmniDiskSweeper, Terminal commands). If you need visual feedback, DaisyDisk is worth the investment. CleanMyMac X is best for users who want comprehensive system maintenance beyond just storage.
iCloud Storage Optimization Strategies
iCloud can either solve or create storage problems, depending on how you configure it.
Understanding iCloud Drive Storage
How iCloud Optimization Works:
macOS Tahoe offers "Optimize Mac Storage" which:
- Uploads your Desktop and Documents to iCloud
- Keeps only recently used files locally
- Stores older files in iCloud only (shown with cloud icon)
- Downloads files automatically when accessed
- Removes local copies when space is needed
Access iCloud Settings:
- System Settings > Apple ID > iCloud
- Click Manage next to iCloud storage bar
- Review storage breakdown by category
iCloud Optimization Best Practices
Photos Optimization:
- System Settings > Apple ID > iCloud > Photos
- Enable Optimize Mac Storage
- Results:
- Full-resolution photos stored in iCloud
- Thumbnails and smaller versions kept locally
- Full versions download on-demand when editing
Storage Savings: Can reclaim 50-200GB depending on photo library size
Desktop & Documents:
- System Settings > Apple ID > iCloud > iCloud Drive
- Enable Desktop & Documents Folders
- Results:
- All Desktop and Documents files sync to iCloud
- Recent files remain local
- Older files move to cloud-only storage
Storage Savings: Varies widely (10-100GB+ common)
iCloud Storage Tiers and Recommendations
Free Tier (5GB):
- Insufficient for most users
- Only suitable for email, contacts, calendars
- Photos and Desktop sync will quickly fill capacity
50GB Tier ($0.99/month):
- Suitable for iPhone backup + small photo library
- Not enough for Mac Desktop/Documents sync
- Good for basic iCloud users
200GB Tier ($2.99/month):
- Recommended minimum for Mac users
- Supports Desktop/Documents sync
- Handles medium photo library (10,000-20,000 photos)
- Family sharing possible
2TB Tier ($9.99/month):
- Best for creative professionals
- Supports multiple Macs + devices
- Large photo/video libraries
- Family sharing with multiple users
12TB Tier ($59.99/month):
- Professional/business use
- Video production workflows
- Multiple family members with large libraries
Monitoring iCloud Storage Usage
Check What's Using iCloud Space:
- System Settings > Apple ID > iCloud
- Click Manage next to storage bar
- Review categories:
- Photos (usually largest)
- Documents (Desktop & Documents sync)
- Messages (attachments and photos)
- Backups (iPhone/iPad backups)
- Mail (email attachments)
Optimize Specific Categories:
Messages:
- Review and delete large attachments
- Settings > Messages > Keep Messages > 30 Days (instead of Forever)
Backups:
- Delete old device backups you no longer need
- Only keep backups for currently owned devices
Mail:
- Delete emails with large attachments
- Empty Mail trash regularly
iCloud vs. Local Storage Decision Framework
When to Use iCloud Optimization:
✅ Limited local storage (256GB or less) ✅ Always connected to reliable internet ✅ Don't need instant access to all files ✅ Work across multiple devices ✅ Willing to pay for iCloud storage
When to Keep Files Local:
✅ Ample local storage (1TB+) ✅ Frequently work offline ✅ Need instant access to all files (video editing, development) ✅ Slow or unreliable internet connection ✅ Privacy concerns about cloud storage
Prevention & Maintenance: Long-Term Storage Health
Preventing storage bloat is easier than cleaning up after the fact.
Recommended Free Space Percentages
Optimal Storage Health:
| Total Drive Capacity | Minimum Free Space | Recommended Free Space | Optimal Free Space |
|---|---|---|---|
| 256GB | 20GB (8%) | 40GB (16%) | 60GB (23%) |
| 512GB | 40GB (8%) | 80GB (16%) | 120GB (23%) |
| 1TB | 80GB (8%) | 160GB (16%) | 230GB (23%) |
| 2TB | 160GB (8%) | 320GB (16%) | 460GB (23%) |
Why These Numbers:
- macOS breathing room: System needs space for virtual memory and caches
- Update installation: macOS updates require substantial temporary space
- Performance: SSD performance degrades when more than 80% full
- Time Machine: Local snapshots need room to function properly
Monthly Maintenance Checklist
First of Every Month (15 minutes):
□ Empty Downloads folder (review and delete)
□ Empty Trash (Finder > Empty Trash)
□ Clear browser caches (Safari, Chrome, Firefox)
□ Review Desktop (file or delete loose items)
□ Check System Settings > Storage (ensure >15% free)
□ Delete old iOS backups (if applicable)
□ Review and delete unused applications
Quarterly Deep Cleaning (1-2 hours)
Every 3 Months:
□ Run complete storage analysis (Terminal or DaisyDisk)
□ Delete Time Machine local snapshots (if space needed)
□ Clear user caches: ~/Library/Caches/
□ Review and organize Documents folder
□ Clean up Photos library (delete duplicates, blurry photos)
□ Uninstall unused applications completely
□ Review large files: find ~ -type f -size +1G
□ Verify iCloud optimization working correctly
□ Update macOS to latest version (includes storage optimizations)
Automated Maintenance Tips
Enable Built-in Optimization:
- System Settings > General > Storage > Recommendations
- Enable:
- ✅ Empty Trash Automatically (30 days)
- ✅ Optimize Storage (auto-remove watched content)
- ✅ Reduce Clutter (when appropriate)
Third-Party Automation:
Hazel ($32 - file automation):
- Auto-organize Downloads folder
- Delete files older than X days
- Move files to appropriate folders
- Empty Trash on schedule
CleanMyMac X (subscription):
- Scheduled automatic maintenance
- Smart cleanup suggestions
- Background monitoring
Storage Monitoring Tools
Built-in Activity Monitor:
- Open Activity Monitor (Applications > Utilities)
- Click Disk tab
- Monitor disk activity and I/O
- Sort by Bytes Written to find processes writing excessive data
Menu Bar Monitoring:
iStat Menus ($12 - comprehensive monitoring):
- Real-time storage usage in menu bar
- Alerts when free space drops below threshold
- Detailed disk activity graphs
DaisyDisk (menu bar helper):
- Quick storage overview
- One-click scanning from menu bar
macOS Tahoe-Specific Tips
Post-Upgrade Optimization (After Updating to Tahoe):
# Wait 72 hours after upgrade before cleanup
# macOS performs background optimization during this period

# After 72 hours, run:
sudo tmutil deletelocalsnapshots / 2>/dev/null
# Clear upgrade caches
rm -rf ~/Library/Caches/*
# Rebuild Spotlight index (if indexing issues occur)
sudo mdutil -E /
4K Screensaver Management:
- System Settings > Screen Saver
- Choose lightweight screensaver (Message, Flurry, Drift)
- Disable automatic screensaver downloads
Prevent System Data Bloat:
- Regularly restart Mac (weekly recommended)
- Don't let Time Machine local snapshots accumulate
- Keep macOS updated (bug fixes for storage issues)
- Maintain 15%+ free space at all times
Troubleshooting Persistent Storage Issues
Issue 1: System Data Still Huge After Cleanup
Symptoms:
- Followed all cleanup steps
- System Data still shows 80GB+
- No obvious large files found
Advanced Solutions:
1. Force Storage Recalculation:
# Reboot to Safe Mode
# Restart Mac, hold Shift key until login screen
# Login and check Storage in System Settings
# Reboot normally
Safe Mode clears caches and forces storage recalculation.
2. Reset Spotlight Index:
Corrupt Spotlight indexes can inflate System Data.
# Disable Spotlight indexing
sudo mdutil -i off /

# Delete Spotlight index
sudo rm -rf /.Spotlight-V100

# Re-enable Spotlight (triggers rebuild)
sudo mdutil -i on /

# Wait 1-2 hours for reindexing to complete
3. Check for Hidden Large Files:
# Find files larger than 1GB (including hidden)
sudo find / -type f -size +1G 2>/dev/null | grep -v "/Volumes"

# Check system logs
du -sh /private/var/log

# Check crash reports
du -sh ~/Library/Logs/DiagnosticReports
4. Nuclear Option - Clean Install:
If System Data remains above 100GB after all cleanup attempts:
- Backup all important data (Time Machine or manual)
- Create bootable USB installer for macOS Tahoe
- Boot from USB (hold Option key during startup)
- Erase main drive completely
- Reinstall macOS Tahoe fresh
- Restore user data manually (avoid restoring System files)
Expected Result: Clean install typically reduces System Data to 20-30GB.
Issue 2: "Purgeable" Space Not Being Purged
Symptoms:
- Storage shows "Purgeable" space (e.g., 50GB)
- System won't free up this space when needed
- "Disk almost full" warnings despite purgeable space
Understanding Purgeable Space:
Purgeable space includes:
- Time Machine local snapshots
- Cached files macOS thinks it can delete
- Downloaded but unwatched Apple TV content
- Optimized iCloud files
Force Purge Methods:
Method 1: Create Large File (Triggers Auto-Purge):
# Create large file to force macOS to purge space
mkfile 50g ~/largefile

# Wait 1-2 minutes for macOS to purge purgeable space

# Delete the large file
rm ~/largefile
Method 2: Disable/Re-enable Time Machine:
# Disable Time Machine
sudo tmutil disable

# Delete all local snapshots
tmutil listlocalsnapshots / | cut -d "." -f 4 | while read s; do sudo tmutil deletelocalsnapshots "$s"; done

# Re-enable Time Machine
sudo tmutil enable
Method 3: Terminal Purge Command:
# Force macOS to purge purgeable space
sudo purge
This command may take 5-10 minutes to complete.
Issue 3: Storage Calculation Incorrect or Stuck
Symptoms:
- Storage bar in System Settings shows wrong amounts
- Categories don't add up to total used space
- Storage calculation hangs at "Calculating..."
Solutions:
1. Restart Storage Calculation:
# Quit System Settings
killall "System Settings"

# Reset storage calculation daemon
killall -9 storagehelper

# Reopen System Settings > General > Storage
2. Boot to Safe Mode:
- Restart Mac
- Hold Shift key immediately after startup chime
- Release when you see login window
- Login and check storage
- Restart normally
Safe Mode forces storage recalculation from scratch.
3. Reset NVRAM/PRAM:
- Shut down Mac
- Turn on and immediately hold Option + Command + P + R
- Hold for about 20 seconds (Mac may restart multiple times)
- Release keys and allow normal boot
4. Check Disk with Disk Utility:
- Boot to Recovery Mode (hold Command + R during startup)
- Open Disk Utility
- Select system drive
- Click First Aid
- Run verification and repair
Issue 4: Xcode and Developer Storage Bloat
Symptoms:
- Developer (uses Xcode, iOS development)
- System Data exceeding 100GB
- Derived data and simulators consuming massive space
Xcode-Specific Cleanup:
1. Delete Derived Data:
# Check size of derived data
du -sh ~/Library/Developer/Xcode/DerivedData

# Delete all derived data (will regenerate)
rm -rf ~/Library/Developer/Xcode/DerivedData/*
Storage Savings: 20-80GB
2. Remove Old iOS Simulators:
# List all simulators
xcrun simctl list devices

# Delete unavailable simulators
xcrun simctl delete unavailable

# Delete specific simulator
xcrun simctl delete [simulator-UUID]
3. Delete Old Archives:
# Check archive size
du -sh ~/Library/Developer/Xcode/Archives

# Delete all archives older than 6 months
find ~/Library/Developer/Xcode/Archives -type d -mtime +180 -exec rm -rf {} \;
4. Clear Device Support Files:
# Check size
du -sh ~/Library/Developer/Xcode/iOS\ DeviceSupport

# Delete old iOS versions you no longer support
rm -rf ~/Library/Developer/Xcode/iOS\ DeviceSupport/[old-version]
Total Developer Storage Savings Potential: 50-200GB
When to Consider Hardware Upgrade vs. Software Optimization
Signs You've Outgrown Your Storage
Upgrade Recommended If:
✅ You've cleaned everything possible and still have less than 50GB free ✅ You routinely work with large files (4K/8K video, large datasets) ✅ You have a 256GB drive and constantly manage space ✅ iCloud optimization doesn't fit your workflow ✅ External drives are inconvenient for your use case
Software Optimization Sufficient If:
✅ You have more than 100GB free after cleanup ✅ Your workflow doesn't involve massive files ✅ iCloud optimization works for you ✅ Regular maintenance keeps storage healthy ✅ You have 512GB+ storage capacity
Storage Upgrade Options
Internal Storage Upgrade:
For Mac Studio, Mac Pro, iMac (2020 and earlier):
- Some models support aftermarket SSD upgrades
- Check ifixit.com for compatibility
- Typical cost: $200-500 for 1TB-2TB upgrade
For MacBook Air, MacBook Pro (Apple Silicon):
- ⚠️ Storage NOT upgradeable (soldered to logic board)
- Must purchase correct configuration initially
- Consider when buying: 512GB minimum, 1TB+ recommended for professionals
External Storage Solutions:
Thunderbolt 3/4 SSD (Fastest):
- Speed: 2,000-3,000 MB/s (nearly internal speed)
- Use cases: Video editing, Time Machine, large projects
- Examples: Samsung X5, SanDisk Pro-G40
- Cost: $200-600 for 1-2TB
USB-C SSD (Fast & Affordable):
- Speed: 500-1,000 MB/s
- Use cases: General storage, backup, archives
- Examples: Samsung T7, SanDisk Extreme Portable
- Cost: $100-250 for 1-2TB
HDD External Drives (Budget):
- Speed: 100-150 MB/s
- Use cases: Time Machine, archives, infrequent access
- Examples: WD My Passport, Seagate Backup Plus
- Cost: $50-120 for 2-5TB
Network Attached Storage (NAS):
- Use cases: Multiple Macs, family sharing, media server
- Examples: Synology DiskStation, QNAP
- Cost: $300-800+ (drive cost additional)
Conclusion: Mastering macOS Tahoe Storage Management
macOS Tahoe's storage challenges are real, but with the comprehensive strategies outlined in this guide, you can reclaim substantial disk space and maintain optimal system performance.
Quick Reference: Maximum Impact Actions
If You Have 1 Hour:
- ✅ Delete Time Machine local snapshots (50-400GB potential)
- ✅ Clear iOS device backups (20-80GB per backup)
- ✅ Remove user caches (10-30GB)
- ✅ Delete old downloads (10-50GB)
- ✅ Empty Trash
Expected Reclaim: 100-500GB
If You Have 15 Minutes:
- ✅ Empty Trash
- ✅ Delete old downloads
- ✅ Clear browser caches
- ✅ Enable "Empty Trash Automatically"
Expected Reclaim: 20-80GB
Essential Terminal Commands Reference
# Check overall disk usage
df -h /

# List Time Machine snapshots
tmutil listlocalsnapshots /

# Delete all Time Machine snapshots
tmutil listlocalsnapshots / | cut -d "." -f 4 | while read s; do sudo tmutil deletelocalsnapshots "$s"; done

# Find files larger than 1GB
find ~ -type f -size +1G -exec ls -lh {} \;

# Analyze directory sizes
du -sh ~/* | sort -hr

# Force purge purgeable space
sudo purge

# Reset Spotlight index
sudo mdutil -E /
Monthly Maintenance Schedule
Week 1: Quick cleanup (15 min)
- Empty Downloads, Trash, browser caches
Week 2: Storage review (30 min)
- Check System Settings > Storage
- Review large files
Week 3: Cache cleanup (45 min)
- Clear ~/Library/Caches/
- Review app-specific caches
Week 4: Deep analysis (1-2 hours)
- Run Terminal storage analysis
- Delete unnecessary snapshots
- Review and organize files
When to Get Professional Help
Consider Professional Data Recovery If:
- You've deleted important files during cleanup
- Critical snapshots removed accidentally
- System won't boot after storage cleanup
Reputable Services:
- DriveSavers (driversavers.com)
- Ontrack (ontrack.com)
- Apple Authorized Service Providers
Additional Resources
Official Apple Documentation:
Related Guides on This Site:
- macOS Tahoe Troubleshooting Guide 2025 - General troubleshooting
- macOS Tahoe Battery Drain: Complete Fix Guide - Battery optimization
- macOS Tahoe Ultimate Upgrade Guide 2025 - Clean install strategies
- macOS Tahoe WiFi Dropping: Complete Fix Guide - Network troubleshooting
By implementing these storage management strategies, you'll transform your Mac from a frustrating "disk almost full" nightmare into a well-optimized, high-performance machine with ample breathing room for macOS Tahoe to operate at peak efficiency.
Ready to optimize your entire macOS Tahoe experience? Explore our complete macOS Tahoe guide for advanced tips, performance tuning, and productivity enhancements.