macOS Tahoe開発者向け究極ガイド2025:Xcode 16、SwiftUI Liquid Glass、Foundation Models、Apple Intelligence統合
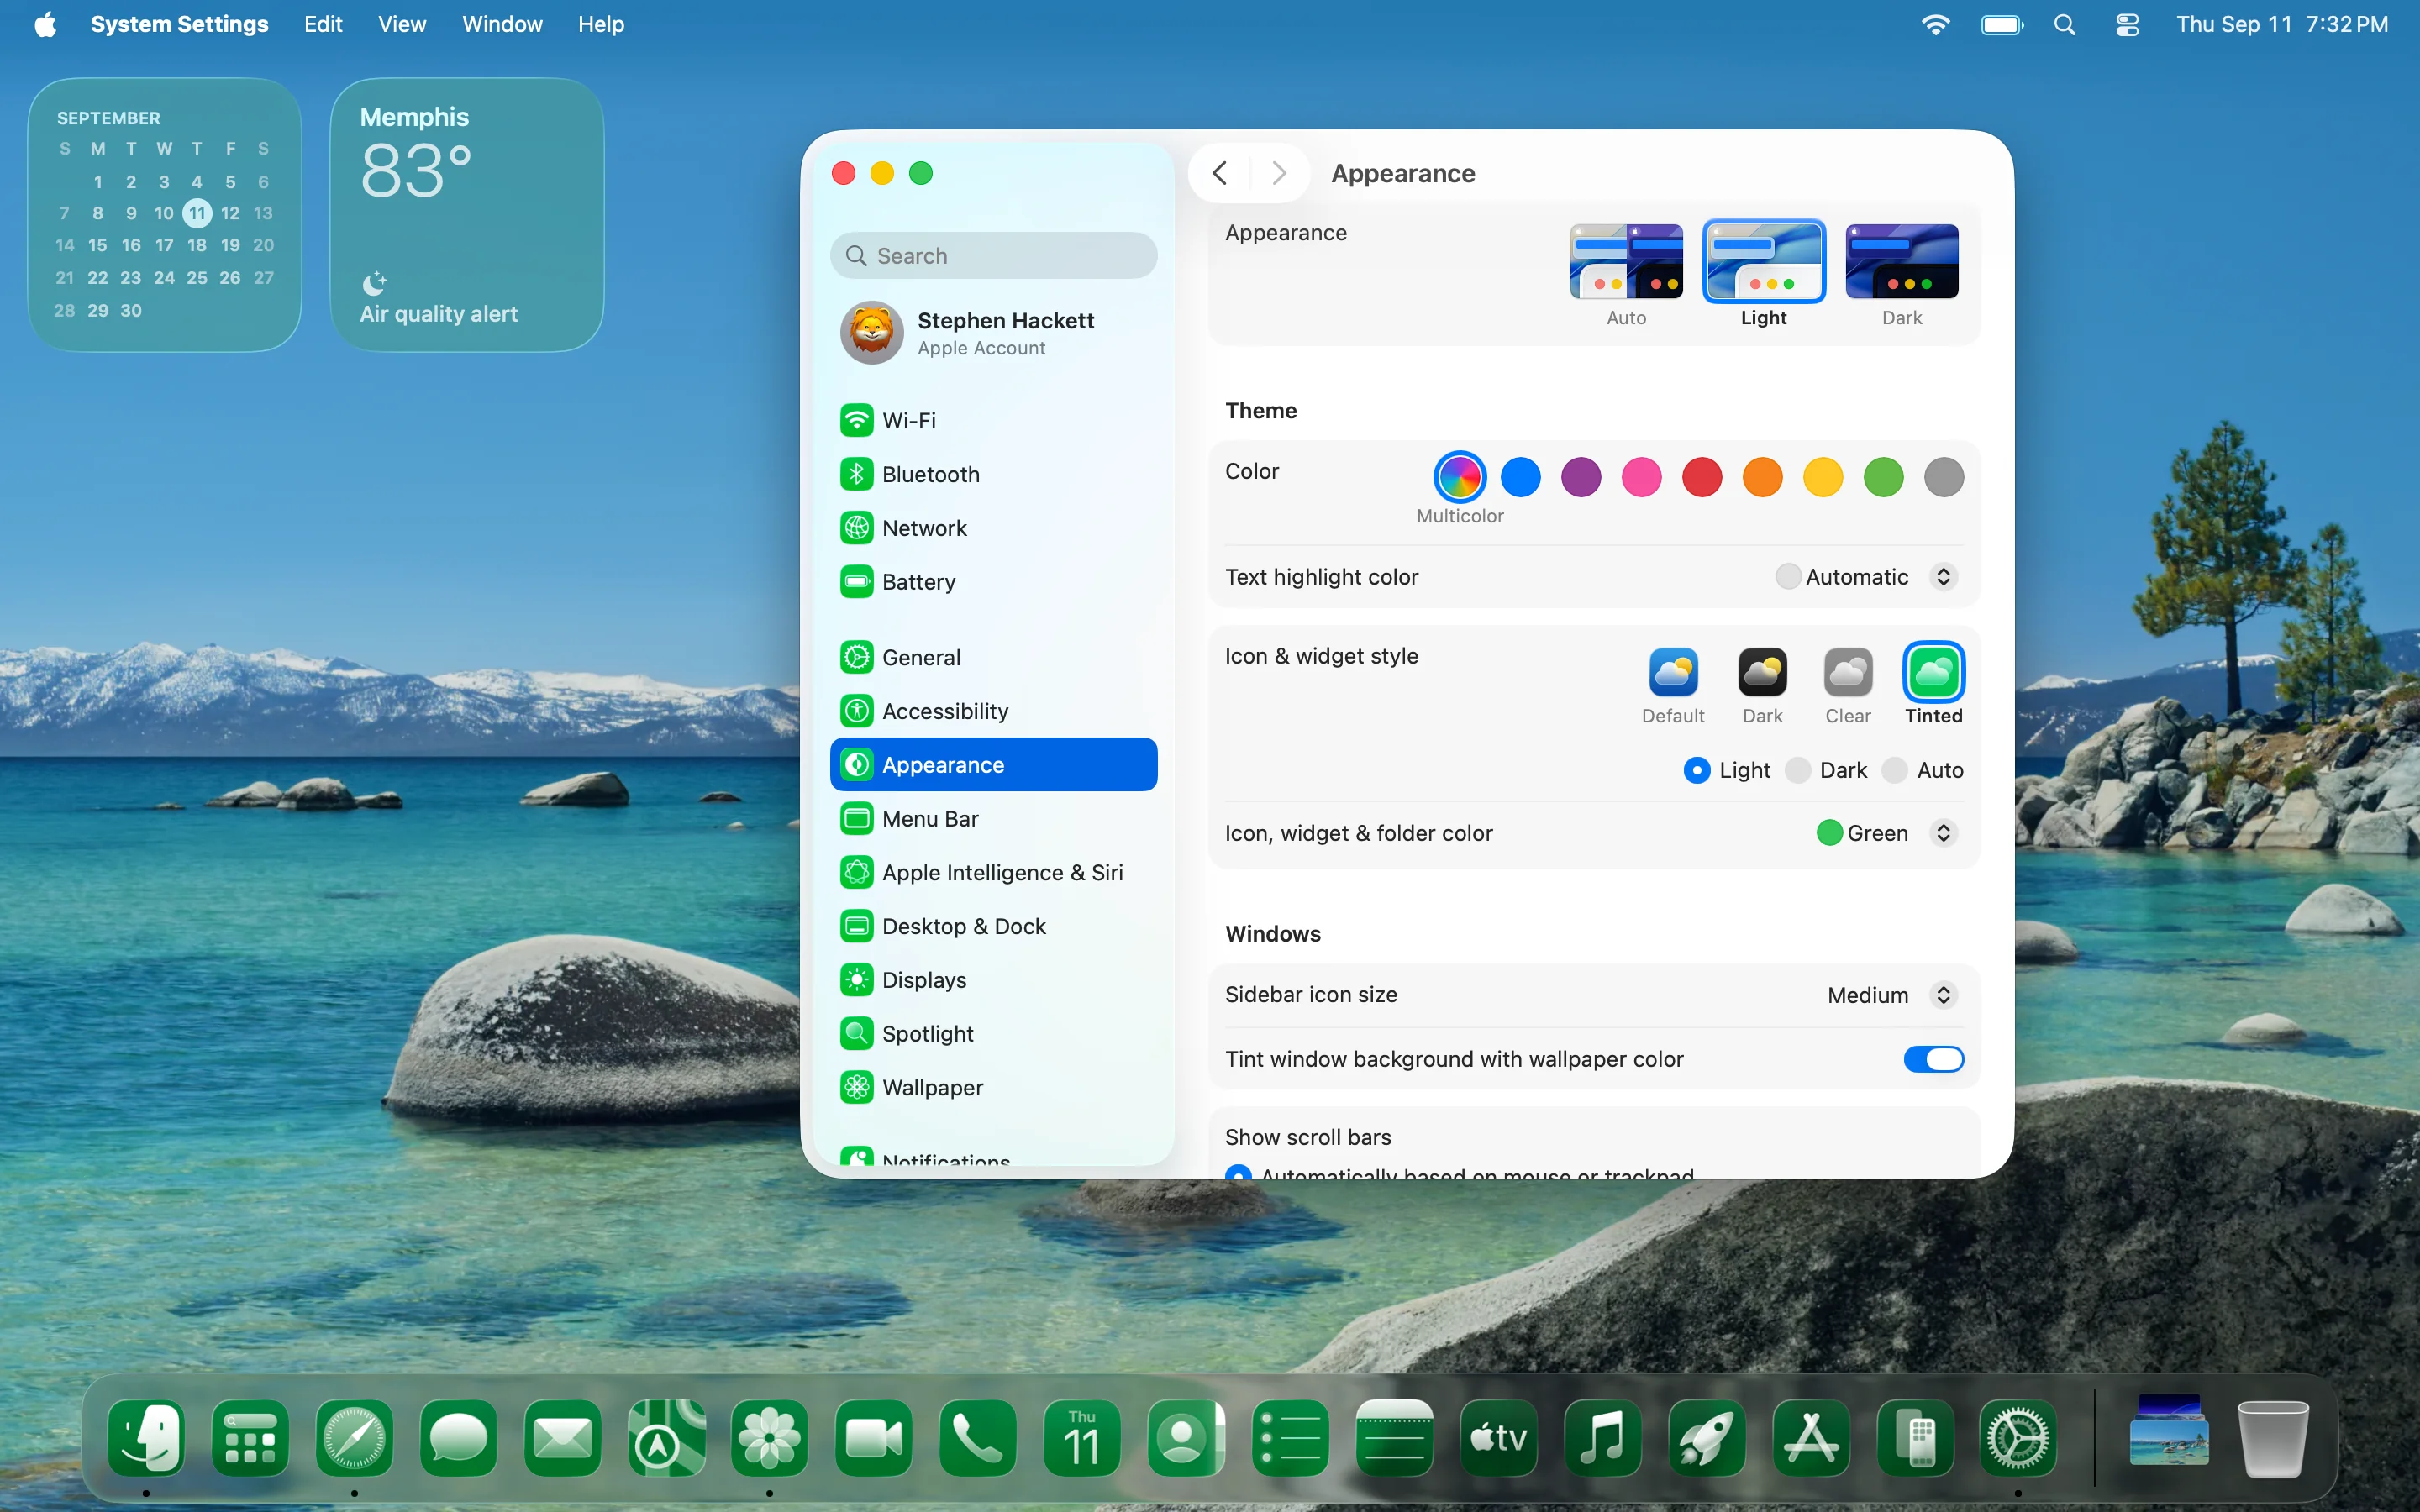
Xcode 16のAI統合、SwiftUI Liquid Glassデザインシステム、Foundation Modelsフレームワーク、新API、パフォーマンスツール、Appleの革新的オペレーティングシステムでのクロスプラットフォーム開発戦略を含むmacOS Tahoe 26の完全開発者ガイド。
macOS Tahoe 26は、SwiftUI導入以来、Apple開発エコシステムにおける最も重要な進化を表しています。この包括的なガイドでは、Xcode 16のAI統合から画期的なLiquid Glassデザインシステム、オンデバイスFoundation Modelsフレームワークまで、macOS Tahoeの革新的なツール、フレームワーク、機能について開発者が知るべきすべてを探求します。
エグゼクティブサマリー:macOS Tahoe 26開発革命
macOS Tahoe 26が開発者にとって画期的である理由
macOS Tahoe 26は、革新的なビジュアルデザインと強力な人工知能機能を組み合わせ、Apple開発におけるパラダイムシフトを導入します。Intelハードウェアをサポートする最後のmacOSバージョンとして、TahoeはApple Siliconへの完全な移行を示すと同時に、Macの開発の次の10年を定義する技術を導入し、終わりと始まりの両方を表しています。
重要な開発変更点:
- Xcode 16 (Xcode 26):AI搭載コーディング支援機能付きネイティブChatGPT統合
- Liquid Glassデザインシステム:全Apple プラットフォームにわたる革新的な半透明UIフレームワーク
- Foundation Modelsフレームワーク:Swift統合付きオンデバイス30億パラメータ言語モデル
- Metal 4グラフィックス:フレーム補間とデノイジング機能付き高度グラフィックス機能
- 強化されたパフォーマンスツール:関数レベル解析付きProcessor Trace instrument
- クロスプラットフォーム統合:iOS、iPadOS、macOS、watchOS、tvOS間での一貫した開発体験
戦略的意味:
- 最後のIntel互換性により、Apple Silicon移行計画の緊急性が生まれる
- AI優先の開発ワークフローがコーディングプラクティスを根本的に変更
- 統一されたデザインシステムがクロスプラットフォーム開発の複雑性を軽減
- オンデバイスインテリジェンスがAI機能の外部API依存を排除
開発環境要件
システム互換性:
- Apple Silicon Mac:AI統合やパフォーマンスツールを含む全機能へのアクセス
- Intel Mac(最終サポート):2019-2020年の一部モデルでの限定互換性
- メモリ要件:プロフェッショナル開発では16GB RAM最小、32GB+推奨
- ストレージ:最適なXcodeパフォーマンスとAIモデルキャッシングのため1TB+ SSD推奨
対応Intel モデル(最終世代):
- Mac Pro (2019)
- MacBook Pro 16インチ (2019)
- MacBook Pro 13インチ (2020、Thunderbolt 3ポート4つ)
- iMac 27インチ (2020)
Xcode 16:AI搭載開発革命
ChatGPT統合とコーディングインテリジェンス
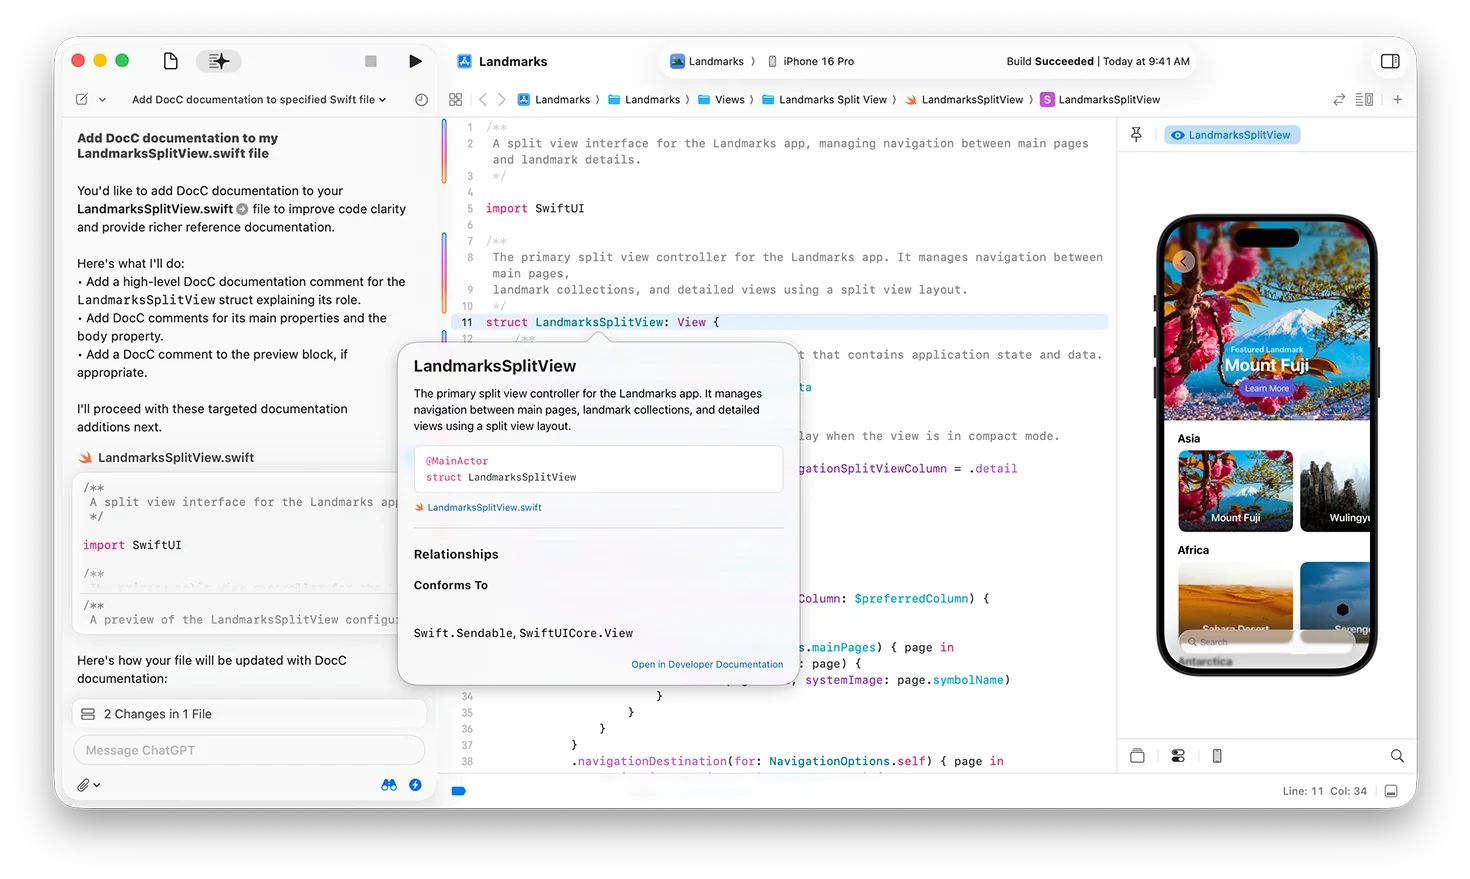
Xcode 16は、ネイティブ大規模言語モデル統合を通じて、IDE史上最も重要な生産性向上をもたらします。AI搭載コーディング支援機能は、プロジェクト全体を理解するコンテキストヘルプを提供し、開発ワークフローを根本的に変革します。
コアAI機能:
コンテキスト・コード生成:
// AIはコメントから完全な関数を生成できます
// TODO: 正規表現でメールアドレスを検証する関数を作成
func validateEmail(_ email: String) -> Bool {
    let emailRegex = "^[A-Z0-9a-z._%+-]+@[A-Za-z0-9.-]+\\.[A-Za-z]{2,64}$"
    let emailPredicate = NSPredicate(format:"SELF MATCHES %@", emailRegex)
    return emailPredicate.evaluate(with: email)
}
インテリジェント・ドキュメンテーション:
- 自動ドキュメントコメント:関数やクラスの包括的なドキュメントをAIが生成
- コード説明:複雑なコードセグメントのリアルタイム説明
- APIドキュメンテーション:Appleフレームワークとサードパーティライブラリのコンテキストヘルプ
- ベストプラクティス:コード改善と最適化の提案
エラー解決とデバッグ:
// AIはコンパイルエラーの修正を提案できます
struct ContentView: View {
    @State private var isPresented = false

    var body: some View {
        VStack {
            Text("Hello, World!")
            Button("Show Sheet") {
                isPresented = true
            }
        }
        // AI提案: .sheet(isPresented: $isPresented) { }
        .sheet(isPresented: $isPresented) {
            DetailView()
        }
    }
}
パフォーマンス要件:
- macOS Tahoe 26:ChatGPT統合に必要
- Apple Silicon:専用Neural Engineでの最適パフォーマンス
- インターネット接続:クラウドベースAI機能に必要
- ローカル処理:一部AI機能はオンデバイスモデルでオフライン動作
強化された開発ツールとインターフェース
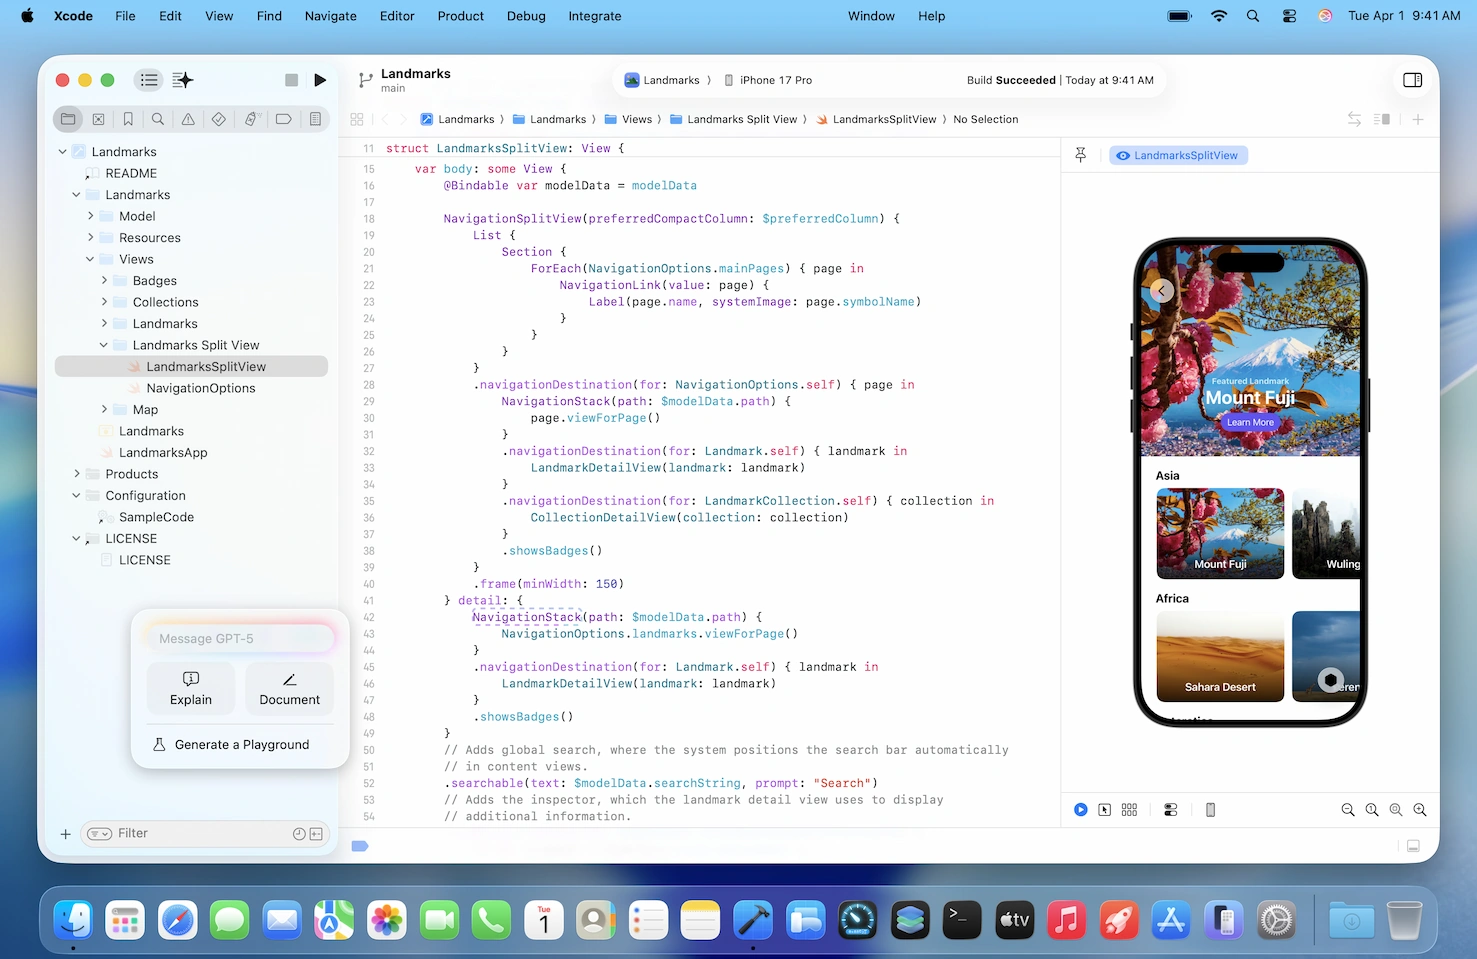
再設計されたナビゲーションシステム:
- 強化されたタブ体験:タブ内ナビゲーション付き改良されたタブ管理
- ピン機能:頻繁にアクセスするファイルとリソースのピン
- コンテキストナビゲーション:関連ファイルとリソースのAI搭載提案
- クイックアクション:一般的な開発タスクへの高速アクセス
コンパイルとビルドの改善:
- コンパイルキャッシング:ブランチ切り替え時のビルド時間高速化
- クリーンビルド最適化:インテリジェントキャッシングによる高速クリーンビルド
- インクリメンタルコンパイル:大規模プロジェクトの強化されたインクリメンタルコンパイル
- バックグラウンド処理:ワークフロー改善のためのノンブロッキングコンパイル
音声制御統合:
# Xcodeナビゲーション音声コマンド
"ContentViewに移動"
"import Foundation追加"
"ビルドして実行"
"プレビューを表示"
"この行をコメント"
Icon Composerツール:
- 単一デザイン入力:1つのデザインファイルからアイコンを作成
- 調整可能な深度:動的な深度と照明効果
- プラットフォーム最適化:iPhone、iPad、Mac、Apple Watch向け自動最適化
- Liquid Glass統合:半透明アイコン効果のネイティブサポート
Swift 6.1言語拡張
生産性機能の強化:
- 改良された診断:修正提案付きより良いエラーメッセージ
- 強化されたパッケージ管理:より良い依存関係管理のためのパッケージ特性
- データ競合安全性:コンパイル時安全性の改善
- クロスプラットフォームサポート:マルチプラットフォーム開発のより良いサポート
Foundation Models統合:
import FoundationModels

struct AIAssistant {
    let model = FoundationModel.shared

    func generateResponse(to prompt: String) async throws -> String {
        let response = try await model.generate(
            prompt: prompt,
            maxTokens: 150,
            temperature: 0.7
        )
        return response.text
    }
}
SwiftUIとLiquid Glassデザインシステム
革新的デザイン言語の実装
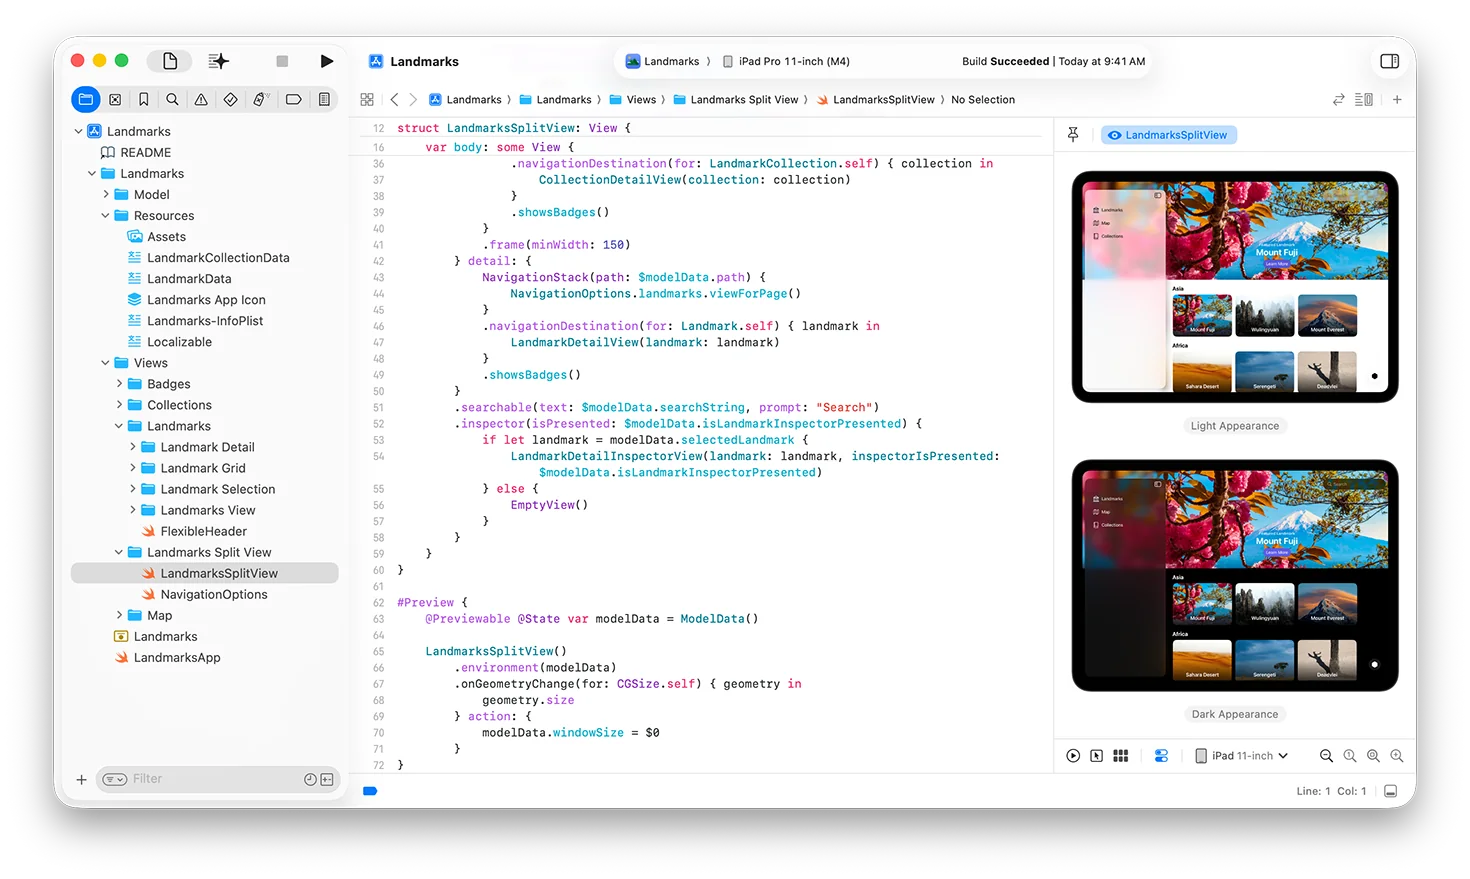
Liquid Glassは、フラットデザイン導入以来最も重要なデザインの進化を表しています。この半透明マテリアルシステムは、Appleの明確性と機能性へのコミットメントを維持しながら、深度と視覚的階層を作成します。
コアLiquid Glass原則:
- 半透明性:下層コンテンツを反射・屈折するガラス効果
- 動的適応:コンテンツに基づく自動ライト・ダーク遷移
- 深度知覚:多層視覚的階層
- インタラクティブ応答性:ユーザーインタラクション中のガラス変形
SwiftUI実装:
基本ガラス効果:
struct GlassCard: View {
    var body: some View {
        VStack {
            Text("Glass Effect")
                .font(.headline)
            Text("Content with translucent background")
                .font(.body)
        }
        .padding()
        .glassEffect() // SwiftUIの新しいmodifier
        .cornerRadius(12)
    }
}
高度なガラスカスタマイゼーション:
struct CustomGlassView: View {
    var body: some View {
        Rectangle()
            .fill(.clear)
            .glassEffect(
                style: .prominent,
                blendMode: .overlay,
                opacity: 0.8
            )
            .overlay {
                VStack {
                    Image(systemName: "star.fill")
                        .font(.largeTitle)
                    Text("Premium Feature")
                        .font(.headline)
                }
                .foregroundStyle(.primary)
            }
    }
}
インタラクティブガラスコンポーネント:
struct LiquidGlassButton: View {
    @State private var isPressed = false

    var body: some View {
        Button("Liquid Glass Button") {
            // アクション
        }
        .padding()
        .glassEffect(
            style: isPressed ? .regular : .prominent,
            animated: true
        )
        .scaleEffect(isPressed ? 0.95 : 1.0)
        .onPressGesture(
            pressing: { pressing in
                withAnimation(.easeInOut(duration: 0.1)) {
                    isPressed = pressing
                }
            },
            perform: {}
        )
    }
}
クロスプラットフォームデザインの一貫性
統一ガラスフレームワーク:
// 単一実装が全プラットフォームで動作
struct UniversalGlassContainer<Content: View>: View {
    let content: Content

    init(@ViewBuilder content: () -> Content) {
        self.content = content()
    }

    var body: some View {
        content
            .padding()
            .glassEffect()
            .cornerRadius(platformSpecificRadius())
    }

    private func platformSpecificRadius() -> CGFloat {
        #if os(iOS)
        return 16
        #elseif os(macOS)
        return 12
        #elseif os(watchOS)
        return 8
        #else
        return 12
        #endif
    }
}
プラットフォーム適応コンポーネント:
- ナビゲーションバー:プラットフォーム適切な動作を持つフローティングガラスナビゲーション
- タブバー:iPhoneでのコンパクトな外観、iPadとMacでの拡張
- ツールバー:状態遷移中の動的ガラス変形
- サイドバー:コンテンツ密度に適応する半透明サイドバー
高度なガラス効果とアニメーション
コーナー同心性:
struct ConcentricGlassView: View {
    var body: some View {
        RoundedRectangle(cornerRadius: 16)
            .fill(.clear)
            .glassEffect()
            .overlay {
                RoundedRectangle(cornerRadius: 12)
                    .stroke(.white.opacity(0.2), lineWidth: 1)
                    .padding(4)
            }
            .overlay {
                RoundedRectangle(cornerRadius: 8)
                    .stroke(.white.opacity(0.1), lineWidth: 0.5)
                    .padding(8)
            }
    }
}
動的ガラス遷移:
struct TransitioningGlass: View {
    @State private var isExpanded = false

    var body: some View {
        VStack {
            if isExpanded {
                DetailContent()
                    .transition(.glassSlide)
            }
        }
        .glassEffect(
            style: isExpanded ? .prominent : .regular,
            animated: true
        )
        .animation(.glassSpring(duration: 0.6), value: isExpanded)
    }
}

extension AnyTransition {
    static var glassSlide: AnyTransition {
        .asymmetric(
            insertion: .move(edge: .top).combined(with: .opacity),
            removal: .move(edge: .bottom).combined(with: .opacity)
        )
    }
}

extension Animation {
    static func glassSpring(duration: Double) -> Animation {
        .interpolatingSpring(
            mass: 0.8,
            stiffness: 100,
            damping: 10,
            initialVelocity: 0
        )
        .speed(1 / duration)
    }
}
Foundation Modelsフレームワーク:オンデバイスAI統合
フレームワークアーキテクチャと機能
Foundation Modelsフレームワークは、ユーザーデータセキュリティを損なうことなく強力なオンデバイス言語理解を提供する、Appleのプライバシー優先人工知能へのコミットメントを表しています。
技術仕様:
- モデルサイズ:Apple Silicon用に最適化された約30億パラメータ
- パフォーマンス:0.6ms最初のトークンまでのレイテンシ、30トークン/秒生成
- 圧縮:高度なLoRAアダプターを使用した3.7ビット/重み
- プラットフォーム:macOS、iOS、iPadOS、visionOS(Apple Silicon必須)
コアフレームワーク機能:
基本テキスト生成:
import FoundationModels

class AITextGenerator {
    private let model = FoundationModel.shared

    func generateText(prompt: String) async throws -> String {
        let request = TextGenerationRequest(
            prompt: prompt,
            maxTokens: 200,
            temperature: 0.7,
            topP: 0.9
        )

        let response = try await model.generateText(request)
        return response.generatedText
    }
}
制約付きガイド生成:
@Generable
struct EmailResponse {
    let subject: String
    let body: String
    let tone: EmailTone
    let priority: Priority
}

enum EmailTone: String, CaseIterable {
    case formal, casual, friendly, professional
}

enum Priority: String, CaseIterable {
    case low, medium, high, urgent
}

class EmailAssistant {
    func generateEmail(context: String) async throws -> EmailResponse {
        let prompt = "Generate an email response for: \(context)"
        return try await FoundationModel.shared.generate(
            EmailResponse.self,
            prompt: prompt
        )
    }
}
ツール呼び出し実装:
protocol AITool {
    var name: String { get }
    var description: String { get }
    func execute(parameters: [String: Any]) async throws -> String
}

struct WeatherTool: AITool {
    let name = "get_weather"
    let description = "Get current weather for a location"

    func execute(parameters: [String: Any]) async throws -> String {
        guard let location = parameters["location"] as? String else {
            throw AIError.invalidParameters
        }

        // 天気サービスと統合
        let weather = try await WeatherService.current(for: location)
        return "Current weather in \(location): \(weather.description)"
    }
}

class AIAssistantWithTools {
    private let tools: [AITool] = [WeatherTool()]

    func processRequest(_ input: String) async throws -> String {
        let response = try await FoundationModel.shared.processWithTools(
            input: input,
            availableTools: tools
        )
        return response.finalAnswer
    }
}
マルチモーダル機能と画像理解
画像解析統合:
import Vision
import FoundationModels

class MultimodalAI {
    func analyzeImage(_ image: UIImage, question: String) async throws -> String {
        // 画像を適切な形式に変換
        guard let imageData = image.jpegData(compressionQuality: 0.8) else {
            throw AIError.imageProcessingFailed
        }

        let request = MultimodalRequest(
            image: imageData,
            prompt: question,
            maxTokens: 150
        )

        let response = try await FoundationModel.shared.processMultimodal(request)
        return response.analysis
    }
}

// 使用例
let imageAnalyzer = MultimodalAI()
let result = try await imageAnalyzer.analyzeImage(
    userImage,
    question: "この建物にはどのような建築様式が示されていますか?"
)
カスタムモデル訓練:
// SwiftでのPython風訓練設定
struct CustomTrainingConfig {
    let baseModel: String = "foundation-3b"
    let trainingData: URL
    let rank: Int = 32
    let learningRate: Double = 0.0001
    let epochs: Int = 10
}

class CustomModelTrainer {
    func trainSpecializedModel(config: CustomTrainingConfig) async throws -> URL {
        let trainer = FoundationModelTrainer(config: config)

        // プライバシーのためオンデバイスで訓練
        let modelURL = try await trainer.train()

        // 後で使用するために保存
        try await FoundationModel.shared.loadCustomModel(from: modelURL)

        return modelURL
    }
}
プライバシーとパフォーマンス最適化
プライバシー優先実装:
- 外部API呼び出しなし:すべての処理が完全にオンデバイスで実行
- データセキュリティ:ユーザー入力がデバイスから出ることがない
- モデル更新:モデル改善のための差分プライバシー
- キャッシュ管理:一時データの自動クリーンアップ
パフォーマンス最適化戦略:
class OptimizedAIService {
    private let cache = NSCache<NSString, AIResponse>()
    private let queue = DispatchQueue(label: "ai.processing", qos: .userInitiated)

    func processWithCaching(_ input: String) async throws -> String {
        let cacheKey = NSString(string: input.hash.description)

        if let cachedResponse = cache.object(forKey: cacheKey) {
            return cachedResponse.text
        }

        let response = try await FoundationModel.shared.generate(
            prompt: input,
            cachePolicy: .preferCache
        )

        cache.setObject(response, forKey: cacheKey)
        return response.text
    }
}
Metal 4グラフィックスとパフォーマンス向上
高度なグラフィックス機能
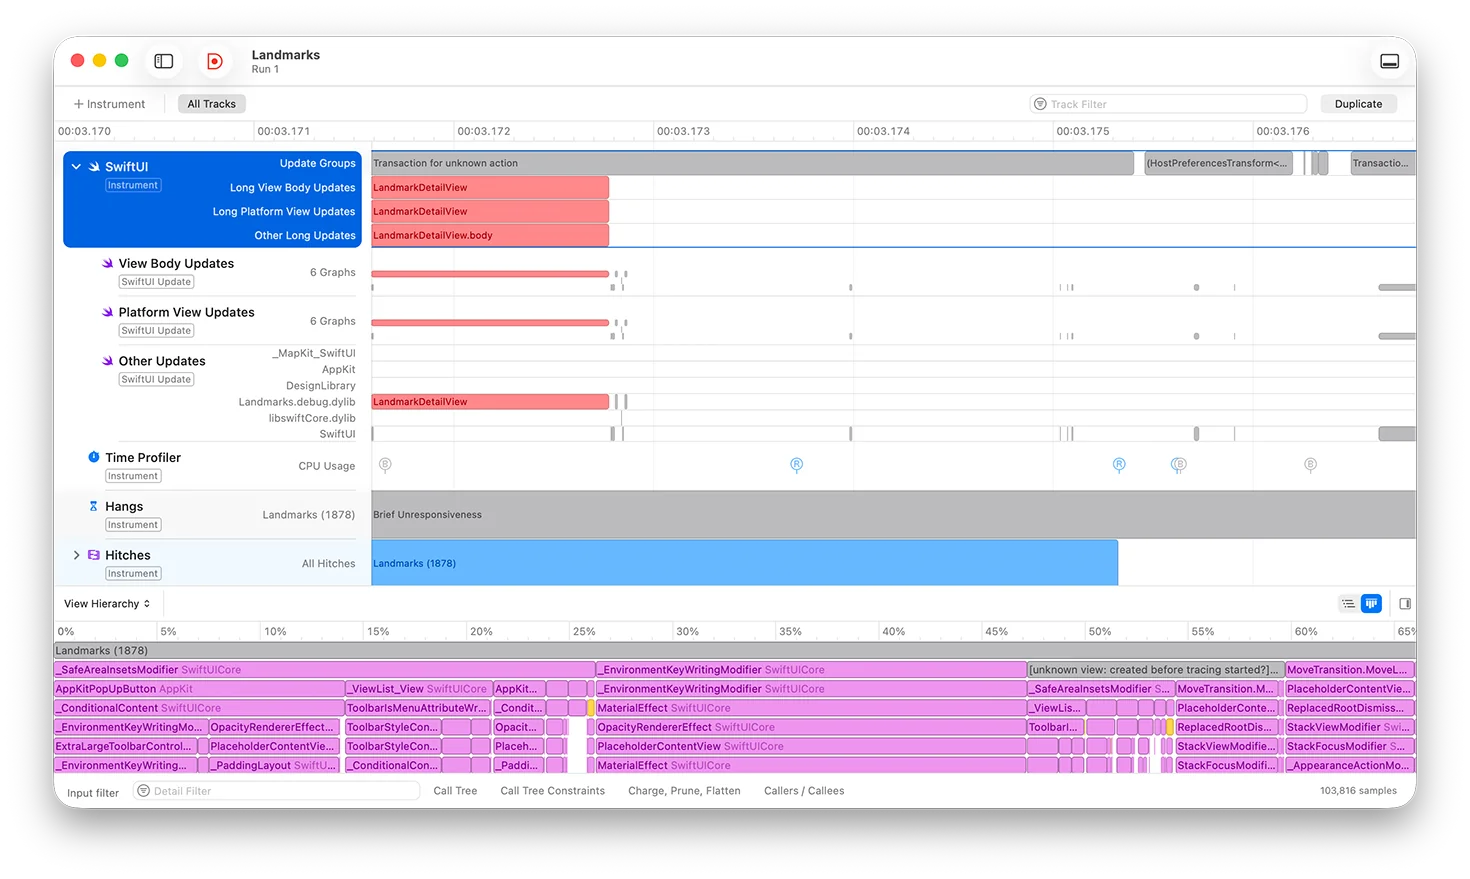
Metal 4は、リアルタイムレイトレーシングから高度な機械学習加速まで、macOSアプリケーションで可能なことを根本的に変える革新的なグラフィックス機能を導入します。
主要Metal 4機能:
- MetalFXフレーム補間:AI搭載フレームレート向上
- MetalFXデノイジング:レイトレーシングのリアルタイムノイズ除去
- 強化されたレイトレーシング:Apple Siliconでのハードウェア加速レイトレーシング
- 機械学習統合:Core MLとFoundation Modelsとのシームレス統合
MetalFX実装:
import Metal
import MetalFX

class MetalFXRenderer {
    private var device: MTLDevice
    private var upscaler: MTLFXTemporalScaler?

    init() {
        guard let device = MTLCreateSystemDefaultDevice() else {
            fatalError("Metal not available")
        }
        self.device = device
        setupUpscaler()
    }

    private func setupUpscaler() {
        let descriptor = MTLFXTemporalScalerDescriptor()
        descriptor.colorTextureFormat = .bgra8Unorm
        descriptor.depthTextureFormat = .depth32Float
        descriptor.motionVectorTextureFormat = .rg16Float
        descriptor.outputTextureFormat = .bgra8Unorm
        descriptor.inputWidth = 1920
        descriptor.inputHeight = 1080
        descriptor.outputWidth = 3840
        descriptor.outputHeight = 2160

        upscaler = descriptor.makeTemporalScaler(device: device)
    }

    func renderFrame(commandBuffer: MTLCommandBuffer,
                    colorTexture: MTLTexture,
                    depthTexture: MTLTexture,
                    motionTexture: MTLTexture) -> MTLTexture? {

        guard let upscaler = upscaler else { return nil }

        let outputTexture = createOutputTexture()

        upscaler.colorTexture = colorTexture
        upscaler.depthTexture = depthTexture
        upscaler.motionVectorTexture = motionTexture
        upscaler.outputTexture = outputTexture

        upscaler.encode(commandBuffer: commandBuffer)

        return outputTexture
    }
}
リアルタイムレイトレーシング:
import MetalPerformanceShaders

class RayTracingRenderer {
    private var device: MTLDevice
    private var raytracer: MPSRayIntersector?
    private var accelerationStructure: MPSTriangleAccelerationStructure?

    func setupRayTracing() {
        raytracer = MPSRayIntersector(device: device)
        raytracer?.rayDataType = .originMaskDirectionMaxDistance
        raytracer?.rayStride = MemoryLayout<Ray>.stride

        // シーンジオメトリの加速構造設定
        accelerationStructure = MPSTriangleAccelerationStructure(device: device)
        accelerationStructure?.rebuild()
    }

    func renderRayTracedFrame() {
        guard let commandBuffer = commandQueue.makeCommandBuffer() else { return }

        // プライマリレイ生成
        generatePrimaryRays(commandBuffer: commandBuffer)

        // レイとシーンの交差
        raytracer?.encodeIntersection(
            commandBuffer: commandBuffer,
            intersectionType: .nearest,
            rayBuffer: rayBuffer,
            rayBufferOffset: 0,
            intersectionBuffer: intersectionBuffer,
            intersectionBufferOffset: 0,
            rayCount: rayCount,
            accelerationStructure: accelerationStructure!
        )

        // 交差のシェーディング
        shadeIntersections(commandBuffer: commandBuffer)

        commandBuffer.commit()
    }
}
パフォーマンスプロファイリングと最適化
Processor Trace統合:
import os.signpost

class PerformanceProfiler {
    private let subsystem = "com.app.performance"
    private let category = "rendering"

    func profileRenderingPerformance() {
        let log = OSLog(subsystem: subsystem, category: category)
        let signpostID = OSSignpostID(log: log)

        os_signpost(.begin, log: log, name: "Frame Rendering", signpostID: signpostID)

        // ここにレンダリングコード
        renderFrame()

        os_signpost(.end, log: log, name: "Frame Rendering", signpostID: signpostID)
    }

    func profileWithProcessorTrace<T>(_ operation: () throws -> T) rethrows -> T {
        // Processor Traceは、Instrumentsで有効化された際に
        // 関数呼び出しを自動的にキャプチャします
        return try operation()
    }
}
GPU パフォーマンス最適化:
class GPUOptimizer {
    private var device: MTLDevice
    private var commandQueue: MTLCommandQueue

    func optimizeForThermalState() {
        let thermalState = ProcessInfo.processInfo.thermalState

        switch thermalState {
        case .nominal:
            // フルパフォーマンスモード
            setRenderQuality(.high)
            setFrameRate(120)

        case .fair:
            // バランスパフォーマンス
            setRenderQuality(.medium)
            setFrameRate(60)

        case .serious, .critical:
            // 省電力モード
            setRenderQuality(.low)
            setFrameRate(30)

        @unknown default:
            setRenderQuality(.medium)
        }
    }

    private func setRenderQuality(_ quality: RenderQuality) {
        // シェーダー複雑度、テクスチャ解像度などを調整
    }

    private func setFrameRate(_ fps: Int) {
        // レンダーループタイミングを調整
    }
}
高度な開発ツールとデバッグ
Instrumentsとパフォーマンス解析
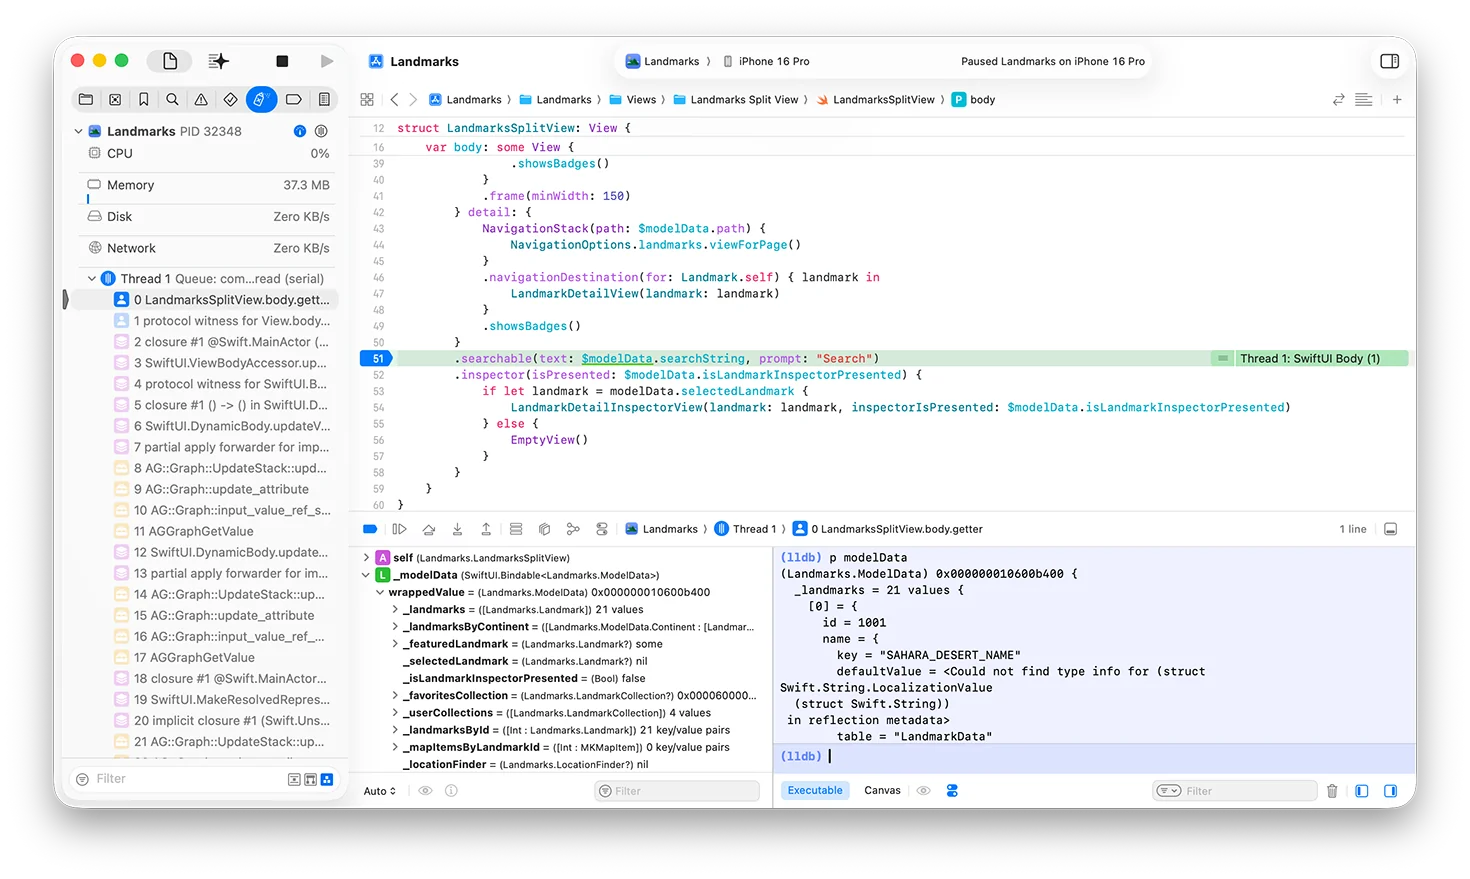
macOS Tahoe 26は、アプリケーションの動作とパフォーマンス特性に対して前例のない洞察を提供する革新的なデバッグとパフォーマンス解析ツールを導入します。
Tahoeの新しいInstruments:
Processor Trace Instrument:
// アプリでprocessor traceを有効化
class ProcessorTraceProfiler {
    func enableHighFidelityProfiling() {
        // Processor Traceは最小オーバーヘッドで
        // M4とiPhone 16のすべての関数呼び出しをキャプチャ

        #if DEBUG
        // 開発ビルドで詳細トレーシングを有効化
        os_trace_set_mode(.enabled)
        #endif
    }

    func profileCriticalPath() {
        // このブロック内のすべての関数呼び出しがトレースされる
        performCriticalOperation()
    }
}
SwiftUI Viewプロファイリング:
import SwiftUI

struct OptimizedListView: View {
    @State private var items: [Item] = []

    var body: some View {
        List(items) { item in
            ItemRow(item: item)
                .id(item.id) // SwiftUI更新最適化をサポート
        }
        .animation(.default, value: items)
        // SwiftUI InstrumentはView更新パフォーマンスを追跡
        .task {
            await loadItems()
        }
    }
}

// 最小View更新用に最適化
struct ItemRow: View {
    let item: Item

    var body: some View {
        HStack {
            AsyncImage(url: item.imageURL) { image in
                image
                    .resizable()
                    .aspectRatio(contentMode: .fill)
            } placeholder: {
                RoundedRectangle(cornerRadius: 8)
                    .fill(.gray.opacity(0.3))
            }
            .frame(width: 50, height: 50)
            .clipped()

            VStack(alignment: .leading) {
                Text(item.title)
                    .font(.headline)
                Text(item.subtitle)
                    .font(.caption)
                    .foregroundColor(.secondary)
            }
        }
    }
}
電力・熱プロファイリング:
import IOKit.ps

class PowerProfiler {
    func monitorPowerConsumption() {
        let thermalNotificationCenter = NotificationCenter.default

        thermalNotificationCenter.addObserver(
            forName: ProcessInfo.thermalStateDidChangeNotification,
            object: nil,
            queue: .main
        ) { _ in
            self.adjustPerformanceForThermalState()
        }
    }

    private func adjustPerformanceForThermalState() {
        let state = ProcessInfo.processInfo.thermalState

        switch state {
        case .critical:
            // CPU/GPU使用率を即座に削減
            reduceBackgroundProcessing()
            lowerRenderQuality()

        case .serious:
            // 適度なパフォーマンス削減
            optimizeForEfficiency()

        default:
            // 通常動作
            restoreFullPerformance()
        }
    }

    func measureBatteryImpact() {
        // 特定の操作中のバッテリー消耗を監視
        let startLevel = getBatteryLevel()

        performOperation()

        let endLevel = getBatteryLevel()
        let consumption = startLevel - endLevel

        logPowerConsumption(consumption)
    }
}
強化されたデバッグ機能
LLDB改善:
# Tahoeデバッグ用の強化されたLLDBコマンド
(lldb) po yourSwiftUIView.body
# Liquid Glass効果付きの完全ビュー階層を表示

(lldb) memory read --format instruction --count 20 $pc
# Processor Trace統合で実行パスを表示

(lldb) script
# カスタムデバッグワークフロー用Pythonスクリプト
import lldb
import os

def print_view_hierarchy(debugger, command, result, internal_dict):
    target = debugger.GetSelectedTarget()
    process = target.GetProcess()
    thread = process.GetSelectedThread()
    frame = thread.GetSelectedFrame()

    # カスタムビュー階層解析
    print("SwiftUI View Hierarchy:")
    # 実装詳細...

lldb.debugger.HandleCommand('command script add -f custom_debug.print_view_hierarchy vh')
ライブビューデバッグ:
#if DEBUG
extension View {
    func debugViewHierarchy() -> some View {
        self.overlay(
            Rectangle()
                .stroke(Color.red, lineWidth: 1)
                .opacity(0.3)
        )
        .onTapGesture(count: 2) {
            // デバッグモードでダブルタップしてビューを検査
            print("Debug view: \(String(describing: type(of: self)))")
            print("Frame: \(UIScreen.main.bounds)")
        }
    }
}
#endif
メモリデバッグ:
import os

class MemoryProfiler {
    private let logger = Logger(subsystem: "com.app.memory", category: "profiling")

    func trackMemoryUsage() {
        let memoryInfo = mach_task_basic_info()
        var count = mach_msg_type_number_t(MemoryLayout<mach_task_basic_info>.size)/4

        let kerr: kern_return_t = withUnsafeMutablePointer(to: &memoryInfo) {
            $0.withMemoryRebound(to: integer_t.self, capacity: 1) {
                task_info(mach_task_self_, task_flavor_t(MACH_TASK_BASIC_INFO), $0, &count)
            }
        }

        if kerr == KERN_SUCCESS {
            let memoryUsage = memoryInfo.resident_size
            logger.info("Memory usage: \(memoryUsage / 1024 / 1024) MB")
        }
    }

    func detectMemoryLeaks() {
        // リーク検出のためのInstruments統合
        #if DEBUG
        if let leakDetection = NSClassFromString("MallocStackLogging") {
            // デバッグ用malloc stack loggingを有効化
            setenv("MallocStackLogging", "1", 1)
        }
        #endif
    }
}
クロスプラットフォーム開発戦略
統一開発アプローチ
macOS Tahoe 26のクロスプラットフォーム機能により、開発者はプラットフォーム固有の機能とユーザー期待値に最適化しながら、すべてのAppleデバイス間で一貫した体験を作成できます。
プラットフォーム適応アーキテクチャ:
import SwiftUI

struct AdaptiveContentView: View {
    @Environment(\.horizontalSizeClass) private var horizontalSizeClass
    @Environment(\.verticalSizeClass) private var verticalSizeClass

    var body: some View {
        Group {
            #if os(macOS)
            MacOSLayout()
            #elseif os(iOS)
            if horizontalSizeClass == .compact {
                PhoneLayout()
            } else {
                TabletLayout()
            }
            #elseif os(watchOS)
            WatchLayout()
            #elseif os(tvOS)
            TVLayout()
            #endif
        }
        .glassEffect() // 全プラットフォームで動作
    }
}

// プラットフォーム固有実装
struct MacOSLayout: View {
    var body: some View {
        NavigationSplitView {
            SidebarView()
        } detail: {
            DetailView()
        }
        .navigationSplitViewStyle(.balanced)
    }
}

struct PhoneLayout: View {
    var body: some View {
        NavigationStack {
            ContentListView()
        }
    }
}
共有ビジネスロジック:
// 全プラットフォーム間で共有
@Observable
class AppState {
    var selectedItem: Item?
    var items: [Item] = []
    var isLoading = false

    func loadItems() async {
        isLoading = true
        defer { isLoading = false }

        do {
            // インテリジェントソート用Foundation Models使用
            let aiSortedItems = try await FoundationModel.shared.enhanceItems(items)
            await MainActor.run {
                self.items = aiSortedItems
            }
        } catch {
            // エラーハンドリング
        }
    }
}

// プラットフォーム固有UI
struct ItemListView: View {
    @State private var appState = AppState()

    var body: some View {
        Group {
            #if os(macOS)
            Table(appState.items) {
                TableColumn("Name", value: \.name)
                TableColumn("Date", value: \.date) { item in
                    Text(item.date, style: .date)
                }
            }
            #else
            List(appState.items) { item in
                ItemRowView(item: item)
            }
            #endif
        }
        .task {
            await appState.loadItems()
        }
    }
}
共有リソースとアセット:
// プラットフォーム間でのアセット管理
extension Image {
    static func platformIcon(_ name: String) -> Image {
        #if os(macOS)
        return Image(systemName: "\(name).circle")
        #elseif os(iOS)
        return Image(systemName: "\(name).fill")
        #elseif os(watchOS)
        return Image(systemName: name)
        #endif
    }
}

// プラットフォーム間で動作するカラースキーム
extension Color {
    static let platformPrimary: Color = {
        #if os(macOS)
        return .blue
        #elseif os(iOS)
        return .accentColor
        #elseif os(watchOS)
        return .green
        #endif
    }()
}
プラットフォーム固有最適化
macOS固有機能:
#if os(macOS)
import AppKit

class MacOSSpecificManager: NSObject {
    func setupMenuBar() {
        let statusItem = NSStatusBar.system.statusItem(withLength: NSStatusItem.variableLength)
        statusItem.button?.title = "App"

        let menu = NSMenu()
        menu.addItem(NSMenuItem(title: "Show Main Window", action: #selector(showMainWindow), keyEquivalent: ""))
        statusItem.menu = menu
    }

    @objc func showMainWindow() {
        NSApp.activate(ignoringOtherApps: true)
        NSApp.windows.first?.makeKeyAndOrderFront(nil)
    }

    func setupDockMenu() -> NSMenu {
        let dockMenu = NSMenu()
        dockMenu.addItem(NSMenuItem(title: "New Document", action: #selector(newDocument), keyEquivalent: ""))
        return dockMenu
    }

    @objc func newDocument() {
        // 新しいドキュメントを作成
    }
}

// SwiftUIとの統合
struct MacOSContentView: View {
    @State private var macManager = MacOSSpecificManager()

    var body: some View {
        ContentView()
            .onAppear {
                macManager.setupMenuBar()
            }
    }
}
#endif
iOS固有機能:
#if os(iOS)
import UIKit

struct iOSSpecificView: UIViewRepresentable {
    func makeUIView(context: Context) -> UIView {
        let view = UIView()

        // iOS固有ジェスチャーとインタラクション
        let longPress = UILongPressGestureRecognizer(
            target: context.coordinator,
            action: #selector(Coordinator.handleLongPress)
        )
        view.addGestureRecognizer(longPress)

        return view
    }

    func updateUIView(_ uiView: UIView, context: Context) {
        // 必要に応じてUIを更新
    }

    func makeCoordinator() -> Coordinator {
        Coordinator()
    }

    class Coordinator: NSObject {
        @objc func handleLongPress(_ gesture: UILongPressGestureRecognizer) {
            // iOS固有の長押しを処理
        }
    }
}
#endif
パフォーマンス最適化とベストプラクティス
メモリ管理と最適化
SwiftUIパフォーマンス最適化:
struct OptimizedListView: View {
    @State private var items: [Item] = []

    var body: some View {
        LazyVStack(pinnedViews: .sectionHeaders) {
            ForEach(groupedItems, id: \.key) { group in
                Section {
                    ForEach(group.value) { item in
                        ItemRowView(item: item)
                            .equatable() // 不要な再描画を防ぐ
                    }
                } header: {
                    SectionHeaderView(title: group.key)
                        .glassEffect()
                }
            }
        }
        .scrollIndicators(.hidden)
        .background(.clear)
    }

    private var groupedItems: [(key: String, value: [Item])] {
        Dictionary(grouping: items) { item in
            item.category
        }
        .sorted { $0.key < $1.key }
    }
}

extension ItemRowView: Equatable {
    static func == (lhs: ItemRowView, rhs: ItemRowView) -> Bool {
        lhs.item.id == rhs.item.id
    }
}
メモリ効率的な画像読み込み:
import SwiftUI

struct OptimizedAsyncImage: View {
    let url: URL?
    let placeholder: Image

    @State private var imageData: Data?
    @State private var isLoading = false

    var body: some View {
        Group {
            if let imageData = imageData,
               let uiImage = UIImage(data: imageData) {
                Image(uiImage: uiImage)
                    .resizable()
                    .aspectRatio(contentMode: .fill)
            } else if isLoading {
                ProgressView()
                    .glassEffect()
            } else {
                placeholder
                    .foregroundColor(.secondary)
            }
        }
        .task(id: url) {
            await loadImage()
        }
    }

    @MainActor
    private func loadImage() async {
        guard let url = url else { return }

        isLoading = true
        defer { isLoading = false }

        do {
            // 最適化されたキャッシュポリシーでURLSessionを使用
            let request = URLRequest(
                url: url,
                cachePolicy: .returnCacheDataElseLoad,
                timeoutInterval: 30
            )

            let (data, _) = try await URLSession.shared.data(for: request)

            // 大きすぎる場合は画像を圧縮
            if let image = UIImage(data: data) {
                let compressedData = compressImageIfNeeded(image)
                self.imageData = compressedData
            }
        } catch {
            // エラーを静かに処理するかエラー状態を表示
        }
    }

    private func compressImageIfNeeded(_ image: UIImage) -> Data? {
        let maxSize: CGFloat = 1024 // 最大寸法
        let compressionQuality: CGFloat = 0.8

        let size = image.size
        if max(size.width, size.height) > maxSize {
            let scale = maxSize / max(size.width, size.height)
            let newSize = CGSize(
                width: size.width * scale,
                height: size.height * scale
            )

            UIGraphicsBeginImageContextWithOptions(newSize, false, 0)
            image.draw(in: CGRect(origin: .zero, size: newSize))
            let resizedImage = UIGraphicsGetImageFromCurrentImageContext()
            UIGraphicsEndImageContext()

            return resizedImage?.jpegData(compressionQuality: compressionQuality)
        }

        return image.jpegData(compressionQuality: compressionQuality)
    }
}
ビルド最適化とCI/CD
Xcodeビルド設定:
# 最適なパフォーマンスのための.xcodebuild設定
SWIFT_COMPILATION_MODE = "wholemodule"
SWIFT_OPTIMIZATION_LEVEL = "-O"
GCC_OPTIMIZATION_LEVEL = "s"

# ビルドキャッシングを有効化
COMPILER_INDEX_STORE_ENABLE = "YES"
ENABLE_PREVIEWS = "YES"

# Apple Silicon用最適化
VALID_ARCHS = "arm64"
EXCLUDED_ARCHS[sdk=iphonesimulator*] = "i386"

# 高度な最適化を有効化
SWIFT_ENABLE_INCREMENTAL_COMPILATION = "YES"
SWIFT_ENABLE_BATCH_MODE = "YES"
CI/CDパイプライン設定:
# macOS Tahoe開発用GitHub Actions
name: Build and Test

on:
  push:
    branches: [main, develop]
  pull_request:
    branches: [main]

jobs:
  build-and-test:
    runs-on: macos-14

    steps:
    - uses: actions/checkout@v4

    - name: Setup Xcode
      uses: maxim-lobanov/setup-xcode@v1
      with:
        xcode-version: '16.0'

    - name: Cache build artifacts
      uses: actions/cache@v3
      with:
        path: |
          ~/Library/Developer/Xcode/DerivedData
          ~/Library/Caches/org.swift.swiftpm
        key: ${{ runner.os }}-xcode-${{ hashFiles('**/*.xcodeproj') }}

    - name: Build
      run: |
        xcodebuild clean build \
          -project YourApp.xcodeproj \
          -scheme YourApp \
          -destination 'platform=macOS' \
          -configuration Release \
          CODE_SIGNING_ALLOWED=NO

    - name: Test
      run: |
        xcodebuild test \
          -project YourApp.xcodeproj \
          -scheme YourApp \
          -destination 'platform=macOS' \
          -enableCodeCoverage YES

    - name: Archive
      if: github.ref == 'refs/heads/main'
      run: |
        xcodebuild archive \
          -project YourApp.xcodeproj \
          -scheme YourApp \
          -destination 'generic/platform=macOS' \
          -archivePath YourApp.xcarchive
セキュリティとプライバシー実装
セキュアな開発プラクティス
App Transport Security設定:
<!-- セキュアネットワーキングのためのInfo.plist設定 -->
<key>NSAppTransportSecurity</key>
<dict>
    <key>NSAllowsArbitraryLoads</key>
    <false/>
    <key>NSAllowsLocalNetworking</key>
    <true/>
    <key>NSExceptionDomains</key>
    <dict>
        <key>your-api.com</key>
        <dict>
            <key>NSExceptionRequiresForwardSecrecy</key>
            <false/>
            <key>NSExceptionMinimumTLSVersion</key>
            <string>TLSv1.3</string>
        </dict>
    </dict>
</dict>
Keychain統合:
import Security
import CryptoKit

class SecureStorage {
    private let service = "com.yourapp.secure"

    func store(data: Data, for key: String) throws {
        let query: [CFString: Any] = [
            kSecClass: kSecClassGenericPassword,
            kSecAttrService: service,
            kSecAttrAccount: key,
            kSecValueData: data,
            kSecAttrAccessible: kSecAttrAccessibleWhenUnlockedThisDeviceOnly
        ]

        let status = SecItemAdd(query as CFDictionary, nil)

        if status == errSecDuplicateItem {
            // 既存項目を更新
            let updateQuery: [CFString: Any] = [
                kSecClass: kSecClassGenericPassword,
                kSecAttrService: service,
                kSecAttrAccount: key
            ]

            let updateAttributes: [CFString: Any] = [
                kSecValueData: data
            ]

            let updateStatus = SecItemUpdate(updateQuery as CFDictionary, updateAttributes as CFDictionary)
            guard updateStatus == errSecSuccess else {
                throw KeychainError.updateFailed
            }
        } else if status != errSecSuccess {
            throw KeychainError.storeFailed
        }
    }

    func retrieve(for key: String) throws -> Data {
        let query: [CFString: Any] = [
            kSecClass: kSecClassGenericPassword,
            kSecAttrService: service,
            kSecAttrAccount: key,
            kSecReturnData: true,
            kSecMatchLimit: kSecMatchLimitOne
        ]

        var result: AnyObject?
        let status = SecItemCopyMatching(query as CFDictionary, &result)

        guard status == errSecSuccess else {
            throw KeychainError.retrieveFailed
        }

        guard let data = result as? Data else {
            throw KeychainError.invalidData
        }

        return data
    }
}

enum KeychainError: Error {
    case storeFailed
    case updateFailed
    case retrieveFailed
    case invalidData
}
プライバシー意識データ処理:
import FoundationModels

class PrivacyAwareAI {
    private let model = FoundationModel.shared

    func processUserInput(_ input: String) async throws -> String {
        // 個人情報を削除するため入力をサニタイズ
        let sanitizedInput = sanitizePersonalData(input)

        // 完全にオンデバイスで処理
        let response = try await model.generate(
            prompt: sanitizedInput,
            privacyMode: .strict // データログなし
        )

        return response.text
    }

    private func sanitizePersonalData(_ input: String) -> String {
        // メールアドレス、電話番号などを削除
        var sanitized = input

        // メール正規表現
        let emailRegex = try! NSRegularExpression(pattern: #"\b[A-Za-z0-9._%+-]+@[A-Za-z0-9.-]+\.[A-Z|a-z]{2,}\b"#)
        sanitized = emailRegex.stringByReplacingMatches(
            in: sanitized,
            options: [],
            range: NSRange(location: 0, length: sanitized.count),
            withTemplate: "[EMAIL]"
        )

        // 電話番号正規表現
        let phoneRegex = try! NSRegularExpression(pattern: #"\b\d{3}-\d{3}-\d{4}\b"#)
        sanitized = phoneRegex.stringByReplacingMatches(
            in: sanitized,
            options: [],
            range: NSRange(location: 0, length: sanitized.count),
            withTemplate: "[PHONE]"
        )

        return sanitized
    }
}
将来性確保と移行戦略
IntelからApple Siliconへの移行
Universal Binary サポート:
# 移行期間用ユニバーサルバイナリビルド
xcodebuild -project YourApp.xcodeproj \
  -scheme YourApp \
  -destination 'generic/platform=macOS' \
  -arch arm64 -arch x86_64 \
  archive
機能検出:
import Foundation

struct DeviceCapabilities {
    static let hasAppleSilicon: Bool = {
        var size = 0
        sysctlbyname("hw.optional.arm64", nil, &size, nil, 0)
        return size > 0
    }()

    static let hasNeuralEngine: Bool = {
        hasAppleSilicon && ProcessInfo.processInfo.operatingSystemVersion.majorVersion >= 11
    }()

    static let supportsFoundationModels: Bool = {
        hasNeuralEngine && ProcessInfo.processInfo.operatingSystemVersion.majorVersion >= 26
    }()

    static func optimizeForHardware() {
        if hasAppleSilicon {
            // Apple Silicon最適化を有効化
            enableAdvancedFeatures()
        } else {
            // Intel Mac用フォールバック
            useCompatibilityMode()
        }
    }

    private static func enableAdvancedFeatures() {
        // Foundation Models、高度グラフィックスなどを有効化
    }

    private static func useCompatibilityMode() {
        // Apple Siliconが必要な機能を無効化
    }
}
移行タイムライン計画:
class MigrationManager {
    enum MigrationPhase {
        case preparation  // Tahoe 6か月前
        case transition   // Tahoe 26ローンチ期間
        case optimization // 移行後最適化
        case completion   // Apple Siliconのみ
    }

    static func getCurrentPhase() -> MigrationPhase {
        let now = Date()
        let tahoeRelease = DateComponents(year: 2025, month: 9, day: 15)
        let tahoeDate = Calendar.current.date(from: tahoeRelease)!

        let monthsFromRelease = Calendar.current.dateComponents([.month], from: tahoeDate, to: now).month ?? 0

        switch monthsFromRelease {
        case ..<0:
            return .preparation
        case 0..<6:
            return .transition
        case 6..<12:
            return .optimization
        default:
            return .completion
        }
    }

    static func recommendedActions() -> [String] {
        switch getCurrentPhase() {
        case .preparation:
            return [
                "Apple Siliconハードウェアでテスト",
                "ARM64用依存関係を更新",
                "Intel廃止予定タイムラインを計画"
            ]
        case .transition:
            return [
                "Intel Macユーザー割合を監視",
                "移行ガイダンスを提供",
                "Apple Silicon用最適化"
            ]
        case .optimization:
            return [
                "Intel固有コードパスを削除",
                "Apple Silicon専用機能を実装",
                "M系チップ用パフォーマンス最適化"
            ]
        case .completion:
            return [
                "完全Apple Silicon最適化",
                "高度ハードウェア機能の活用",
                "将来のM系機能への計画"
            ]
        }
    }
}
結論:macOS Tahoe開発のマスタリング
戦略的開発ロードマップ
macOS Tahoe 26は、Mac開発における重要な時点を表し、革新的な機能に迅速に適応する開発者にとって前例のない機会を提供します。AI搭載開発ツール、統一デザインシステム、強力なオンデバイスインテリジェンスの組み合わせは、アプリケーション革新の新たな可能性を生み出します。
即座に取るべき行動項目:
- 開発環境の更新:Xcode 16に移行し、チームがAI支援コーディングワークフローに慣れ親しむ
- Liquid Glassデザインの実装:アプリケーションに半透明デザイン要素の統合を開始
- Foundation Modelsの探求:オンデバイスインテリジェンス機能を使用したAI機能のプロトタイプ
- Apple Silicon用最適化:M系プロセッサの完全な互換性とパフォーマンス最適化を確実に
- Intel移行計画:サポートされる最後のIntel Macユーザーの移行戦略を開発
長期戦略的考慮事項:
プラットフォーム進化への備え:
- macOS 27準備:Apple Silicon専用機能と機能を予想
- クロスプラットフォーム統合:統一されたデザインと開発フレームワークの活用
- AI統合の深化:すべてのアプリ機能におけるAI機能のより深い統合を計画
- パフォーマンス最適化:次世代M系プロセッサ機能への準備
競争優位性:
- 早期採用:Liquid Glassデザイン実装における先行者優位
- AI差別化:オンデバイスインテリジェンス搭載のユニークな機能
- パフォーマンスリーダーシップ:Apple Silicon機能の最適活用
- ユーザー体験の卓越性:macOS Tahoeの革新的インターフェースとのシームレスな統合
技術投資優先順位:
- 開発チーム研修:新しいフレームワークとツールの包括的教育
- インフラ現代化:Apple Silicon開発用に最適化されたCI/CDパイプライン
- テスト戦略:IntelとApple Silicon構成間での包括的テスト
- パフォーマンス監視:高度プロファイリングと最適化ワークフローの実装
将来性のある開発プラクティス
持続可能な開発アプローチ:
// 将来対応コード構造の例
protocol PlatformOptimized {
    var supportsAdvancedFeatures: Bool { get }
    func optimizeForCurrentPlatform()
}

extension PlatformOptimized {
    var supportsAdvancedFeatures: Bool {
        DeviceCapabilities.hasAppleSilicon &&
        DeviceCapabilities.supportsFoundationModels
    }

    func optimizeForCurrentPlatform() {
        if supportsAdvancedFeatures {
            enableAIFeatures()
            implementLiquidGlassDesign()
            optimizeForNeuralEngine()
        } else {
            useStandardFeatures()
            implementFallbackDesign()
        }
    }
}
革新の機会:
- AI強化ユーザーインターフェース:ユーザー行動に基づく知的インターフェース適応
- コンテキスト対応アプリケーション:ユーザーコンテキストを理解し適応するアプリ
- シームレスなクロスデバイス体験:すべてのAppleプラットフォーム間での統一体験
- プライバシー優先革新:ユーザープライバシーを維持する高度機能
macOS Tahoe 26は、開発者に次世代Macアプリケーションを作成するために必要なツールとフレームワークを提供します。この新しい時代での成功には、AI搭載開発ワークフローの受け入れ、Liquid Glassデザインシステムのマスタリング、Apple Siliconのユニークな機能への最適化が必要です。
今日これらの技術の理解と実装に投資する開発者は、今後数年間Macソフトウェアエコシステムをリードする位置に置かれるでしょう。macOS Tahoeは単なるオペレーティングシステムアップデートではありません—Mac開発の未来を定義する革新のプラットフォームです。
macOS Tahoe用の開発を始める準備はできましたか?互換性ガイドとインストールガイドをご覧になり、Appleの最も先進的なオペレーティングシステムでの旅を始めてください。